
Table of Contents:

Web development with zero: 5 steps to free
Learn MoreHow to Create an Effective Website Header
A website header plays a key role in forming the first impression of visitors. It can take various forms depending on the elements chosen by the developer, placed within the <header> tag. These elements can include a logo, navigation menu, and additional graphic components. An effectively designed website header not only improves user experience but also promotes search engine optimization, which helps attract more traffic.
When creating the layout of the homepage, it is important to consider the key elements that shape the overall perception of the site. A logo is typically placed at the top of the page, serving as a visual identification of the brand. Below the logo is a navigation menu, making it easier for users to find the information they need. Next, you can integrate a background image with a text block that attracts attention and conveys the main message. Different developers may approach this task differently: one will focus only on the logo, another will add navigation, and a third will create a full-fledged first screen with visually appealing elements. Each of these approaches has its place, and the choice depends on personal style, the developer's preferences, and the goals of the project.
To use HTML tags effectively, it is necessary to understand the differences between the <header> and <head> tags. The <header> tag is designed to create the header of the page and is located inside the <body> tag, which encloses all the content visible to users. The <head> tag, in turn, precedes the <body> and contains service information necessary for the correct display of the page in browsers. This information, including metadata and style references, is not visible to users, but plays a key role in optimizing the page for search engines and improving its performance. Proper use of these tags improves the readability of a page for both users and search engines.
An example of a page using the <strong> and <em> tags demonstrates their visual differences. The <strong> tag denotes important text, making it more noticeable, while the <em> tag is used to italicize text, emphasizing its emotional coloring or emphasis. Proper use of these tags not only improves the readability of content but also contributes to SEO optimization, since search engines take into account the structure of the text when assessing its relevance. Using semantic tags helps not only users but also search engines better understand the content of a page, which can ultimately improve its ranking in search results.
The tag can be used not only as a site header, but also for individual pages or their parts. For example, on a product catalog page where product cards and a control panel are located, the control panel itself can be designed as a tag. This will make it the header of a specific page, improving navigation and user perception of content. Using the tag in various contexts helps structure information and improves website usability.
It is important to keep in mind that there can be multiple headings on a single page. However, to maintain the correct document structure, they should not be placed inside the <header> tags or other blocks. This can cause unpredictable page behavior in different browsers. Correct use of headings helps improve the readability of content and promotes better indexing of the site by search engines.
Now let's convert the catalog into a blog. Each entry will include a title, subtitle, and content. These elements can be combined into a single tag, thus forming a header for all blog entries. This will improve the structure and readability of the content, and also enhance its SEO optimization. Correct use of headings and subheadings contributes to better perception of information by users and search engines.
An example page with a site title and several blog post headings clearly illustrates this solution. This approach helps structure content, making it easier for users to navigate and absorb information. Optimizing headings and their hierarchy play a key role in SEO, contributing to better search engine rankings. Using clear and informative headings not only improves user experience but also increases the visibility of the page in search results.

The meaning of the tag in HTML5
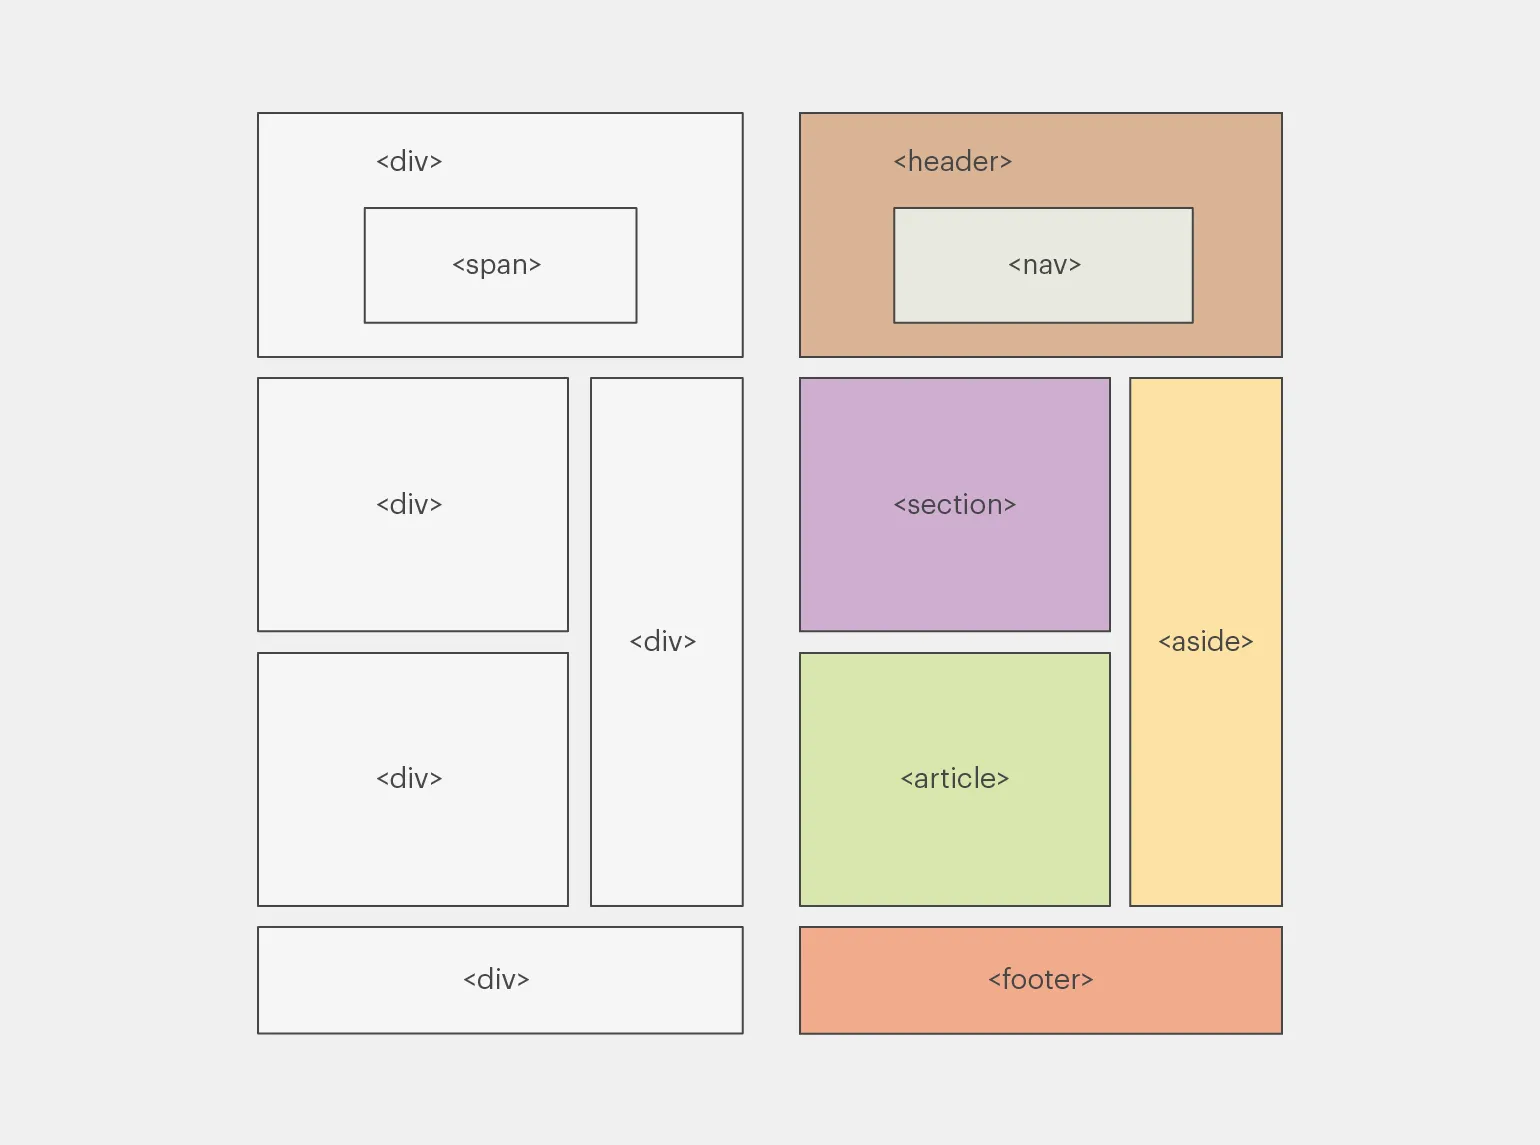
HTML tags are divided into block and inline elements. The <header> tag, introduced in HTML5, refers to block elements and is used to indicate the header of a web page. Previously, the <div> tag was used for this purpose. Using the <header> tag improves the semantics of the document and contributes to better SEO, since search engines can more easily recognize the structure of the page.
Replacing the <div> tag with <span> in any HTML document will not affect the display of the site in browsers. Both of these tags perform similar functions - they serve as containers for structuring other elements. For example, <div>
In modern web design, it is not recommended to replace the
Semantic markup introduced more informative elements to HTML, replacing outdated tags. For example, the <nav> tag is used to designate a navigation menu, while the <footer> tag is intended for the bottom of the page. The names of these tags clearly reflect their functional purpose, which significantly simplifies the development and understanding of the code. Semantic elements contribute to improved SEO because they help search engines better index content and determine its structure. Using semantic markup also improves accessibility, allowing assistive technologies to interact more effectively with web pages.
Semantic markup has a number of benefits, including improving website accessibility. It simplifies the work of search engines and promotes better interaction for users with disabilities. Search robots cannot perceive pages visually, so semantic markup helps them more easily analyze the structure and content of sites. This leads to more accurate indexing and increases the likelihood that the site will appear in search results, which in turn improves the visibility and accessibility of information for all users.
People with visual impairments use screen readers—specialized programs that read text and webpage elements aloud. These technologies allow users to hear navigation, quickly navigate between sections, and find the information they need. Semantic markup is an important aspect for screen readers to correctly interpret the site structure, including the header, main content, and other elements. Optimizing web pages with semantics in mind improves accessibility and usability for people with visual impairments.
Semantic markup is a key element of digital accessibility, actively supported by Chrome browser developers. It helps improve the user experience, including for people with disabilities. We recommend studying the website accessibility guidelines for a deeper understanding of the principles and practices aimed at creating an inclusive internet space.
Tag Attributes : What You Need to Know?
The tag does not have unique attributes, but it supports global attributes that apply to all HTML elements. For example, using the «title» attribute, you can add a pop-up description to an element, which improves user experience and increases content accessibility. This can be useful for search engines, since the description helps better index information.
The tag is often used with the «class» attribute, which specifies a name for styles in CSS. This simplifies the styling process and contributes to a more organized code structure. Using the «class» attribute Allows developers to easily control the appearance of elements on a page and reuse styles across different elements, which improves CSS efficiency and code readability.
Let's imagine we're adding three blog post headers, each assigned a unique class. The first header will have a red background, the second will have a yellow background, and the third will have a green background. Using different background colors allows each header to be visually distinct, which improves the perception of the content and helps users quickly navigate the blog. This approach not only makes posts more appealing but also helps increase reader engagement.
When creating class names in HTML, it's important to remember that they can be anything, but for better semantics and usability, it's best to use meaningful names. For example, for the heading element, a suitable class name would be "header." There are many resources that offer popular and semantically meaningful class names, such as the Common Words website. Using such names not only simplifies the understanding of the code structure, but also contributes to better indexing of pages in search engines, which in turn has a positive effect on SEO.
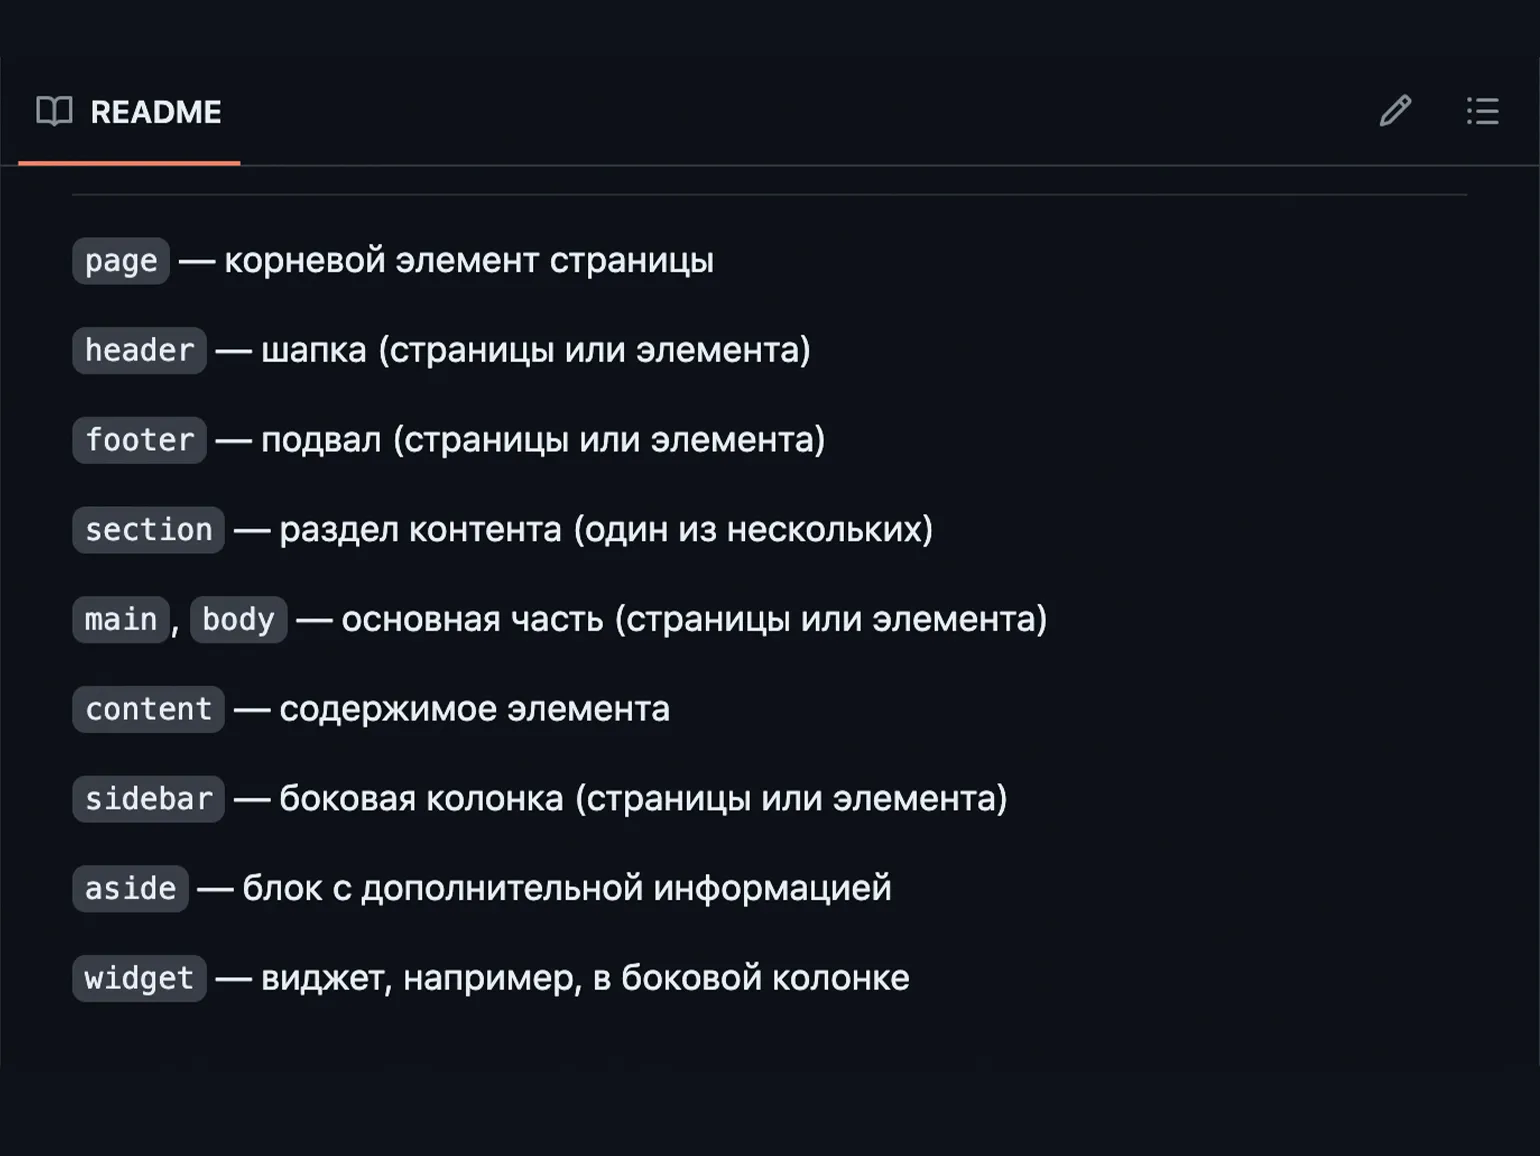
When working in a team, it is often necessary to use unique class names to avoid conflicts. To solve this problem, methodologies such as BEM (Block, Element, Modifier) proposed by Yandex have been developed. These methodologies help organize code, improving its readability and maintainability. Using BEM allows for a clearly structured stylesheet, simplifying collaboration between developers and reducing the risk of errors. Using naming systems such as BEM becomes especially important in large projects where many participants work on the same code.
The BEM (Block, Element, Modifier) methodology involves creating unique names for all elements on a page, including tags. If there are several identical tags on a page, each of them should be assigned a separate class. This avoids confusion and promotes a clearer code structure. Using this methodology improves code readability and maintainability, which is especially important for large projects. Using BEM helps developers effectively organize styles and significantly simplifies the process of working with CSS.
Class names in HTML must adhere to certain rules, which we'll discuss later. A separate article will cover the BEM methodology in detail. It allows you to structure code by breaking it into logical blocks with clear and descriptive names. This not only makes the code easier to read and maintain, but also helps you better understand its structure.

Be sure to check out the additional materials:
BEM Methodology: Basic Principles and Benefits for Developers
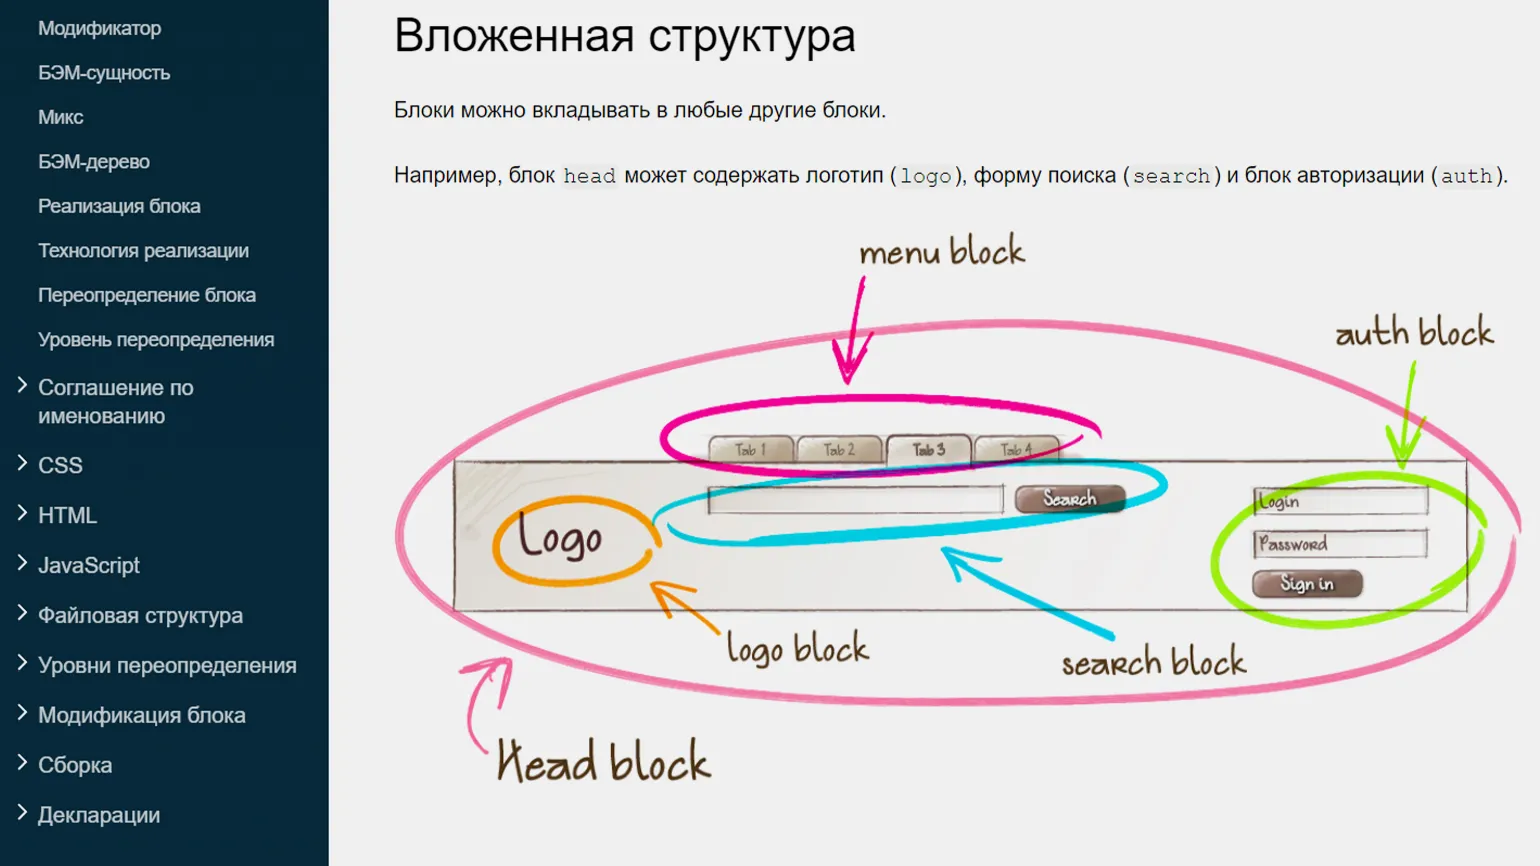
The BEM (Block, Element, Modifier) methodology is an approach to interface development that significantly simplifies the work of developers. The main goal of BEM is to create a clear and structured system that promotes better code organization and simplifies its maintenance.
BEM divides the interface into independent blocks, elements, and modifiers. Blocks are independent components, elements are constituent parts of blocks, and modifiers are different states or variations of blocks and elements. This approach avoids code duplication and improves its readability.
Using the BEM methodology contributes to faster project development and their easier adaptation to changes. The BEM class naming system makes the code logical and predictable, which simplifies the work of both the development team and new project contributors.
Using BEM also improves website performance due to a clear structure and reduced number of style conflicts. This allows you to quickly implement changes and develop the project without the risk of compromising its integrity.
As a result, the BEM methodology is an effective tool for developers that helps create high-quality and easily maintainable web applications.
How to Create a Website Header: A Step-by-Step Guide
A website header is a key element that creates the first impression of your resource. Web developers have the opportunity to independently select elements for this area, which can be difficult for beginners, especially when it comes to layout and the use of BEM naming. A properly designed website header not only improves user experience but also contributes to better indexing in search engines. It is important to consider aspects such as the logo, navigation, contact information, and call to action to make the header functional and attractive.
In this article, we will present two website header examples. The first example includes a logo and navigation menu, which is a standard solution for most web resources. The second example demonstrates a menu with a background image and text, which gives the site uniqueness and style. For practical use, you can download the source files or use the mockups from freepik.com. These examples will help you better understand how to create attractive and functional website headers, which will positively impact user experience and SEO.
In this section, we will carefully examine the layout plan, present diagrams, and provide code with detailed explanations. We will discuss key aspects that will help you better understand the layout process, as well as analyze the main elements and approaches used in development. This will allow you to effectively apply the acquired knowledge in practice and create high-quality web pages.
The layout plan includes key stages that must be taken into account to create a high-quality and functional web design. The first stage is an analysis of the project requirements, which allows you to determine the goals and objectives of the layout. This is followed by the development of a layout, which serves as the basis for the visual presentation of the site. After this, the layout process begins, using modern technologies such as HTML and CSS to create a structured and responsive page. The final stage is testing, which helps identify potential errors and improve user experience. By following this plan, you can achieve an effective layout that meets modern web development standards.
- Create a
element that will contain all the header components. - Include in
with the class «container» — this block limits the width of the content and prevents it from stretching on wide screens. The container is a reusable element that can be used on different pages. - Create an inner wrapper with the class «header__inner» to control the arrangement of elements using Flexbox.
- Place the logo and menu in the created wrapper. These blocks can be reused on other pages.