Contents:
Blender: 5 Steps to Design Mastery
Learn MoreCreating a 3D Gift in Blender
Launch Blender and delete standard objects, including the light and camera, to focus on the process of creating a gift. This will allow you to use the program's space and resources as efficiently as possible for your creative task.
To select the cube, press Tab to enter edit mode. To activate the Loop Cut tool, use the keyboard shortcut Ctrl + R. Create a horizontal split by setting the cut line so that the top of the cube is 2-3 times smaller than the bottom. This process will help you achieve the desired shape and proportions when modeling in 3D applications.
Enter polygon selection mode by pressing 3. Select the top of the box and activate the Extrude Faces Along Normals tool using the keyboard shortcut Alt + E. Move the cursor up while holding the S key to maintain a rectangular shape. This process allows you to accurately shape 3D objects, which is an important step in modeling. Proper use of the selection and extrusion tools will help you achieve the desired results in your 3D graphics work.
Once the lid is the desired size, finish the process by right-clicking.
To create a vertical seam, use the keyboard shortcut Ctrl + R to split the box down the center. While the path is still selected, press P and choose Selection to separate it from the box. This process will help you organize your design elements efficiently and improve their visual appeal. Correctly creating vertical seams will contribute to a neater and more professional look for your project.
To remove the remaining seam, hold down the Alt key, click on the path, and press Ctrl + X. Then, press Tab to exit edit mode.
In the Layers panel, select the created path and switch back to edit mode. Set the X or Y coordinates depending on the path's position so that it appears as a stroke. This will allow you to fine-tune the appearance of your graphic element, improving its visual appeal and consistency with the design. Correctly positioning the path will help create a harmonious and professional look for your project.
Select the entire path using the A tool and enlarge it by pressing the S key. This will allow you to edit and work with the path more precisely. Make sure you select the path correctly before resizing it for the best result.
Enter point editing mode by pressing 1. Select the points located under the lid and move them down with the move tool to avoid them intersecting with the box. This will help you fine-tune the design elements and improve visual perception.
To smooth the corners, select the entire path (A), then press Ctrl + Shift + B and move the cursor left or right to adjust the corner radius. To add an additional point to the corner, use the mouse wheel, scrolling up. This method allows you to fine-tune the shape and improve the overall appearance of your design.
Duplicate the path using Ctrl + D or right-click. Rotate the duplicate 90 degrees using the Rotate function. Once you are finished editing, exit the mode by pressing Tab.
You now have a shape consisting of two intersecting paths. This shape can be used in a variety of artistic and graphic projects, as well as in design. Intersecting paths creates interesting visual effects that can be applied to both digital and traditional art. Consider using such shapes to create unique compositions and draw attention to your work.
Create a plane in a 3D program by pressing Shift + A and selecting Mesh → Plane. Then, move the plane to the desired position. To convert it to a curve, use the Convert To command and select the Curve option. This will allow you to edit the plane using curve tools, which will provide greater flexibility in modeling.
Select the crossed path and go to the right panel, selecting the Geometry tab. Using the eyedropper tool, select the square path and activate the Fill Caps option to fill it. This setting will improve the visual perception of your design, ensuring neat and smooth lines.
Use the Scale tool to scale the square path down along the X and Y axes to create a ribbon that wraps around the box. Then, smooth the ribbon by pressing Ctrl + 2 and selecting Shade Smooth. This process will help achieve a more natural and neat appearance for the object.
If necessary, adjust the path sizes or reduce the ribbon thickness for the best result.
Create a new path by selecting Curve → Path and position it on top of the box. Then, enter edit mode and center the path to achieve a precise placement.
Edit the points to create the bow using the Move tool. To add more points, select two adjacent points, right-click, and select Subdivide. This will allow you to fine-tune the shape of the bow and achieve the desired result. Using these tools will greatly simplify the modeling process and help you achieve a higher quality design.
Once you've finished editing, return to Object Mode to repeat the previous steps with a new outline. Hiding the square outline will help avoid confusion and make it easier to work with the design.
Select the bow knot and choose Set Origin → Origin to 3D Cursor. Then, use the Rotate tool to rotate the knot to fill the empty corners. Duplicate the knot, repeating this process to achieve a symmetrical and neat result.
Add a UV sphere by choosing UV Sphere from the Mesh menu. Reduce the size of the sphere and place it in the center of the knot. For optimal visual performance, apply the Shade Smooth setting. This will create a smoother and more realistic look for the model.
Select the box, then go to the Material settings and create a new material, setting the Specular to 0.4 and Roughness to 0.6. These settings will help you achieve the desired visual effect and improve the appearance of your object.
Create a new material for the node, setting the parameters: Metallic at 0.5 and Roughness at 0.3. Choose a color that suits your requirements, for example, red. This approach will ensure a realistic display of the material in your project.
Copy the materials to the remaining sections of the ribbon by selecting them. Then, choose the option to transfer data by going to the Object menu and choosing Link / Transfer Data, and then click Link Materials.
Create a new collection by combining all the elements of the gift. To do this, select the necessary elements and press M, then choose the option «New Collection».
Your 3D gift is ready to use! It can be effectively used to create volumetric icons, adding uniqueness and style to your project.
Creating a Christmas Tree in 3D
Launch Blender and create a cylinder that will serve as the base of your tree. To do this, press Shift + A and select Mesh → Cylinder. Reduce its size using the S key. After that, press Tab, select the top of the cylinder and lift it up to form an elongated cylinder that will become the base of your tree. Don't forget to adjust the object's parameters to achieve the desired effect and make your model more realistic.
Create a circle that will serve as the top of the tree. To do this, press Shift + A and select Mesh → Circle. Move the circle to the top of the cylinder, positioning it slightly lower. This will give your tree a finished look and create a natural wood effect. Enter edit mode using the Tab key. Then select all the vertices of the circle using the A key and press F to create a flat surface. This process will help you effectively convert the circle to 2D format, which will make further work with the object much easier. Now press the E key and drag the cursor upward to create a wide cylinder. Then, without deselecting the cylinder, press S to narrow the top of the cylinder. First, activate polygon selection mode by pressing 3. Then, click on the top surface of the last cylinder. To create a copy, use the keyboard shortcut Ctrl + D and then right-click. Enlarge the copy by pressing the S key and repeat the previous steps for further manipulation.
Create an additional cone-shaped section using the same procedure.
If you're not satisfied with the cylinder placement, hold down the Alt key and click the desired cylinder to select it. You can then move it using the Move tool.
To add bevels to the object, exit edit mode. In the right panel, go to the modifier settings, click the 'Add Modifier' button and select the Bevel modifier. Set the parameters: Amount - 0.1 and Segments - 2. After that, press Ctrl + 2, then right-click the shape and select the Shade Smooth option to smooth the surface.
To achieve a more rounded shape for the cylinders, you can use the polygon selection mode. Select all the bottom planes of the cylinder, then press the I key and move the cursor to the left. This action will allow you to add an additional row of polygons, which will make the cylinders smoother and more aesthetically pleasing.
Without deselecting, use the Move function to move all the bottom circles down. This action will help you organize the elements on the page and improve the visual perception of the content. Using the Move tool allows you to quickly and efficiently reposition objects, which is especially useful when working with graphical interfaces.
To add a star to the top of the tree, press Shift + A and select Mesh → Extras → Simple Star. Then, reduce the star's size and place it at the very top of the tree. In the modifier settings, add a Bevel effect using the same parameters as before.
To highlight the tree's cones, go to the material settings and select the +New option. Set the color to #E2E4FF and the Metallic value to 0.6. This will create an icy effect, giving your tree a more realistic and attractive look.
For the tree's trunk, we recommend using a material with the Metallic value of 0.2 and the Roughness value of 0.6. These settings will help achieve a realistic wood texture, making your project more appealing and natural. Selecting the right material settings is a key step in 3D modeling, especially when creating natural objects like Christmas trees.
To create the glowing effect of the star on the tree's top, pay special attention to it. Set the Emission Strength value to 2.2 and choose white for a bright and inviting light. The right settings will highlight the beauty of the tree and create a festive atmosphere.
You can create multiple mini Christmas trees using the same method as for the main tree. The main difference is in the materials: for the mini trees, choose a glowing material for the star, as was done with the packaging ribbon. This will add uniqueness and brightness to your mini Christmas trees and create a harmonious combination with the main tree.
Organizing objects into a collection is an important step for effective control and arrangement of elements. To optimize the process of working with elements, select all the objects associated with the tree and press M, then choose the «New Collection» option. This will allow you to simplify management and improve the overall structure of your project.
Compositing and Rendering in Blender
To get started, activate the add object mode by pressing Shift + A. In the menu, select Mesh and then Cylinder. Increase the size of the cylinder using the S command. After that, switch to edit mode by pressing Tab. Select the top of the cylinder, press E and drag the cursor up to create a cap. This will allow you to create the basic shape of the object that can be used later for various 3D projects.
Select the polygons of the cap, then press P and choose the Selection option from the menu that opens. After that, exit edit mode to save the changes.
Select the cylinder cap and go to the modifier settings in the right panel. Click the 'Add Modifier' button and select 'Bevel' to add chamfers. Set the parameters to 'Amount' - 0.01 and 'Segments' - 5. After that, right-click the shape and select 'Shade Smooth' to smooth the surface. This will give the model a more natural and professional look.
Select the cylinder, then select the lid and go to the Object menu. Choose Link/Transfer Data and then click Copy Modifiers to copy the modifiers. This will allow you to transfer settings and modifications from one object to another, which will greatly simplify the editing process.
Select the small cylinder, then press Tab, then A and F. Repeat the same steps for the larger cylinder. Use the move tool to lower them a little to ensure a clean separation between the objects.
Select one of the cylinders and in the material settings on the right panel, click the «Add New» button. Set the color with the code #8C80E7. After that, copy the created material to the other cylinder to achieve a uniform look.
Customize the background of your world by choosing the color #0E0035. This will help create a unique atmosphere and improve visual perception.
Decorate the pedestal with Christmas trees and presents, arranging them as you like. This will create a festive atmosphere and make your space more inviting. The correct arrangement of Christmas trees and gifts will help emphasize the style of your decoration and draw attention to the main accents.
To add a light source to your scene, press Shift + A, then select Light and Area. Move the light source in front of the composition using the Move tool. Increase the light area by pressing the S key and dragging the cursor up. In the object settings, set the Power value to 1000 W and copy this light source outside the composition boundaries. This will create more realistic lighting and improve the overall atmosphere of your 3D scene.
To decorate your composition, use glowing balls. To do this, press Shift + A, select Mesh and then UV Sphere. Right-click the created sphere and select Shade Smooth to achieve a smooth surface. Copy the material used for the glowing star, reduce the size of the sphere and duplicate it several times to create a spectacular decoration for the main Christmas tree. This will add visual appeal and create a cozy atmosphere in your scene.
To add a camera for rendering, use the keyboard shortcut Shift + A. Then adjust its position to ensure an optimal view of the scene. To automatically align the camera in the desired direction, select Align View from the View menu, then Align Active Camera to View.
If you are not satisfied with the current camera position, use the G key to move it in any direction. Use the mouse wheel to change the zoom. This will help you adjust the view and improve the perception of the scene.
To return to camera mode, press the 0 key on the numeric keypad.
Before rendering in Blender, change the renderer settings from Eevee to Cycles. Set the Max Samples value to 10 in the View section and to 128 in the Render section. For more recommendations on rendering in Blender, refer to specialized guides that will help you optimize the process and achieve high image quality.
To preview the result, click the corresponding button in the top bar. Adjust lighting and object placement as needed to achieve optimal results.
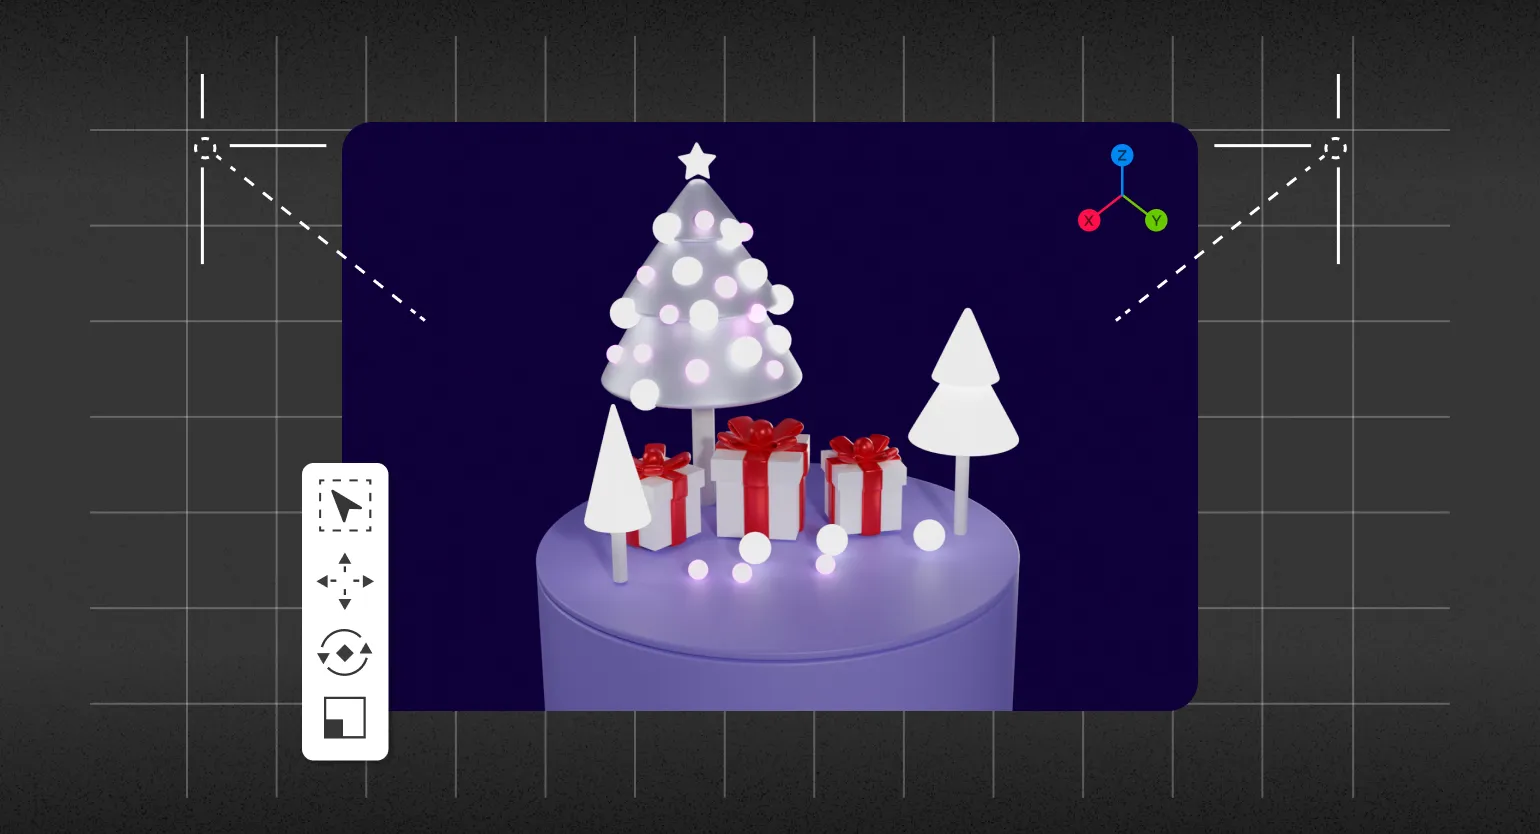
Result:

Blender: 5 steps to 3D graphics mastery
Want to master Blender and create stunning scenes? Find out how to start making money with 3D graphics!
Find out more