Contents:

Learn: Online Tutor
Learn MoreOver the past two years, Zoom has become an indispensable tool for online communications due to its ease of use, multiplatform support, and rich feature set. However, many useful features of this program remain hidden in the settings, and regular updates from the developers add new tools and improvements. If you've only used Zoom for regular video calls and are planning to host a webinar for the first time, there are a few features you should know about. Familiarizing yourself with these capabilities will help make your presentation more effective and professional.
We've prepared a list of useful Zoom features and tips to help you effectively conduct online lessons, webinars, workshops, and other events. All of the features listed are available in the free version of the application.
This article covers the latest version of Zoom at the time of publication: 5.9.3 (4239). When you launch the application, you will be prompted to install the update. If you missed this notification or want to check the desktop client version yourself, open Zoom, click your profile picture in the upper-right corner, and select "Check for updates" from the menu. Updating the program guarantees access to new features and improvements, making it more convenient and effective to use Zoom for video calls and online meetings.
1.
Zoom offers the ability to divide conference participants into separate groups, each of which can communicate independently in its own room. You can create up to 50 such rooms. This feature is especially useful for teachers who divide students into teams during lessons to complete group assignments. The ability to use separate rooms helps improve interaction between participants and increase the effectiveness of group work.
To enable breakout rooms in Zoom, start by opening the platform's main page. Go to "My Account," then select "Settings." Under "In a Meeting (Advanced)," find and activate the "Breakout Room" toggle switch. This will allow you to effectively organize group work during video conferences.
The "Allow organizers to assign attendees to breakout rooms when scheduling" feature is useful if you want to create groups of attendees in advance. This option is available only in the web version, not in the mobile app or desktop program. To use this feature, go to the "My Account" page, select "Schedule an Event," then go to the "Settings" section and enable the "Pre-Assign Breakout Room" option. The "Create Rooms" button will then appear. In the window that opens, you can create breakout rooms by clicking the "+" button and add attendees by entering their email addresses. This feature simplifies event organization and helps you manage groups of attendees more efficiently.
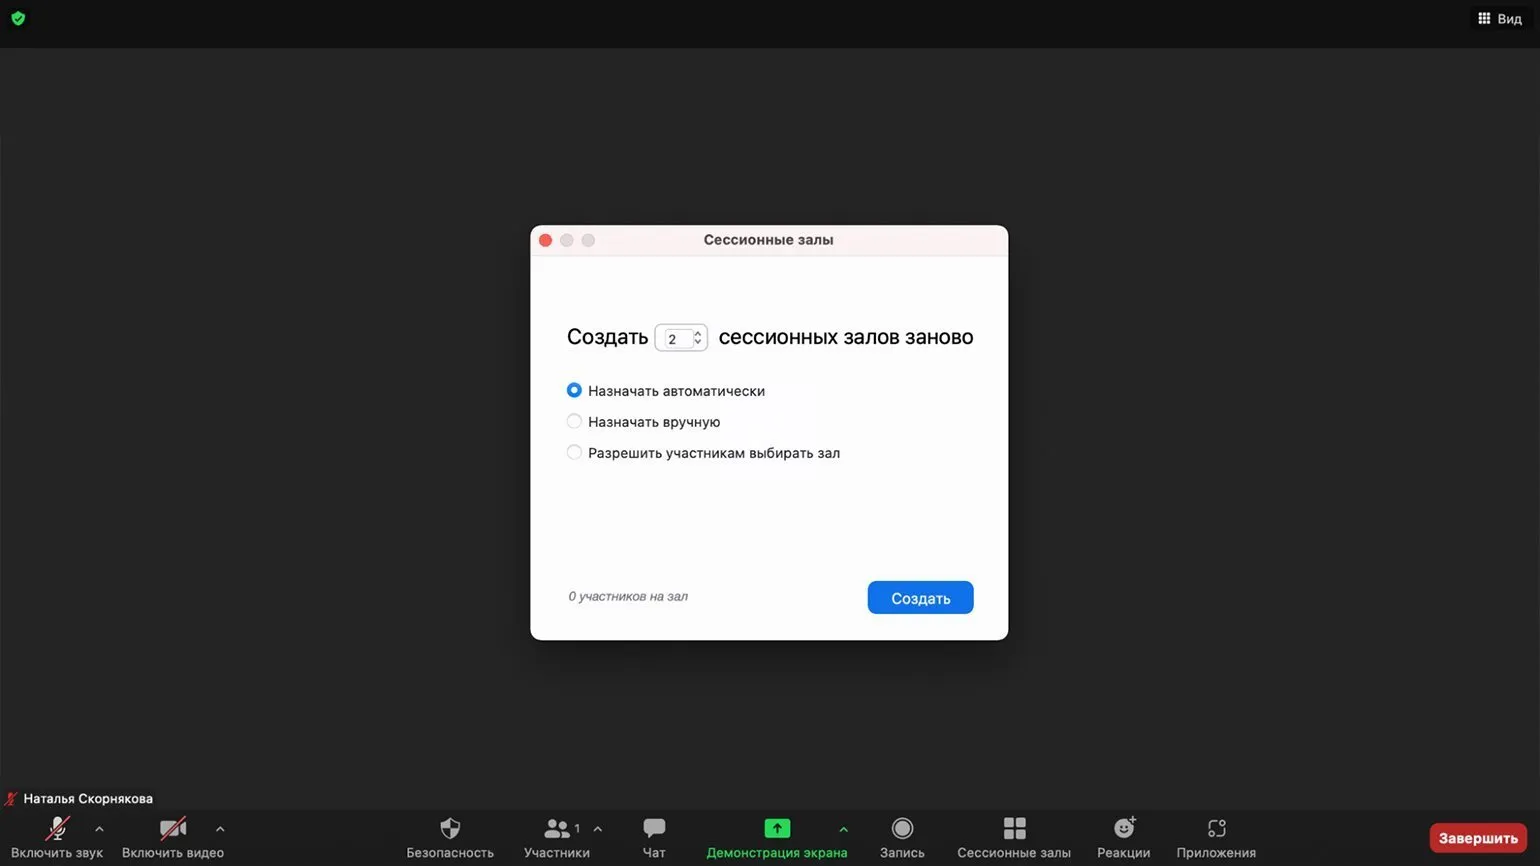
Now you can open breakout rooms directly during a conference—a special button will appear in the bottom panel. In this section, you can configure the number of groups and the method for distributing participants: manually by the organizer, automatically, or by user selection. The organizer has access to all groups and can move participants between rooms at any time.
2. Whiteboard
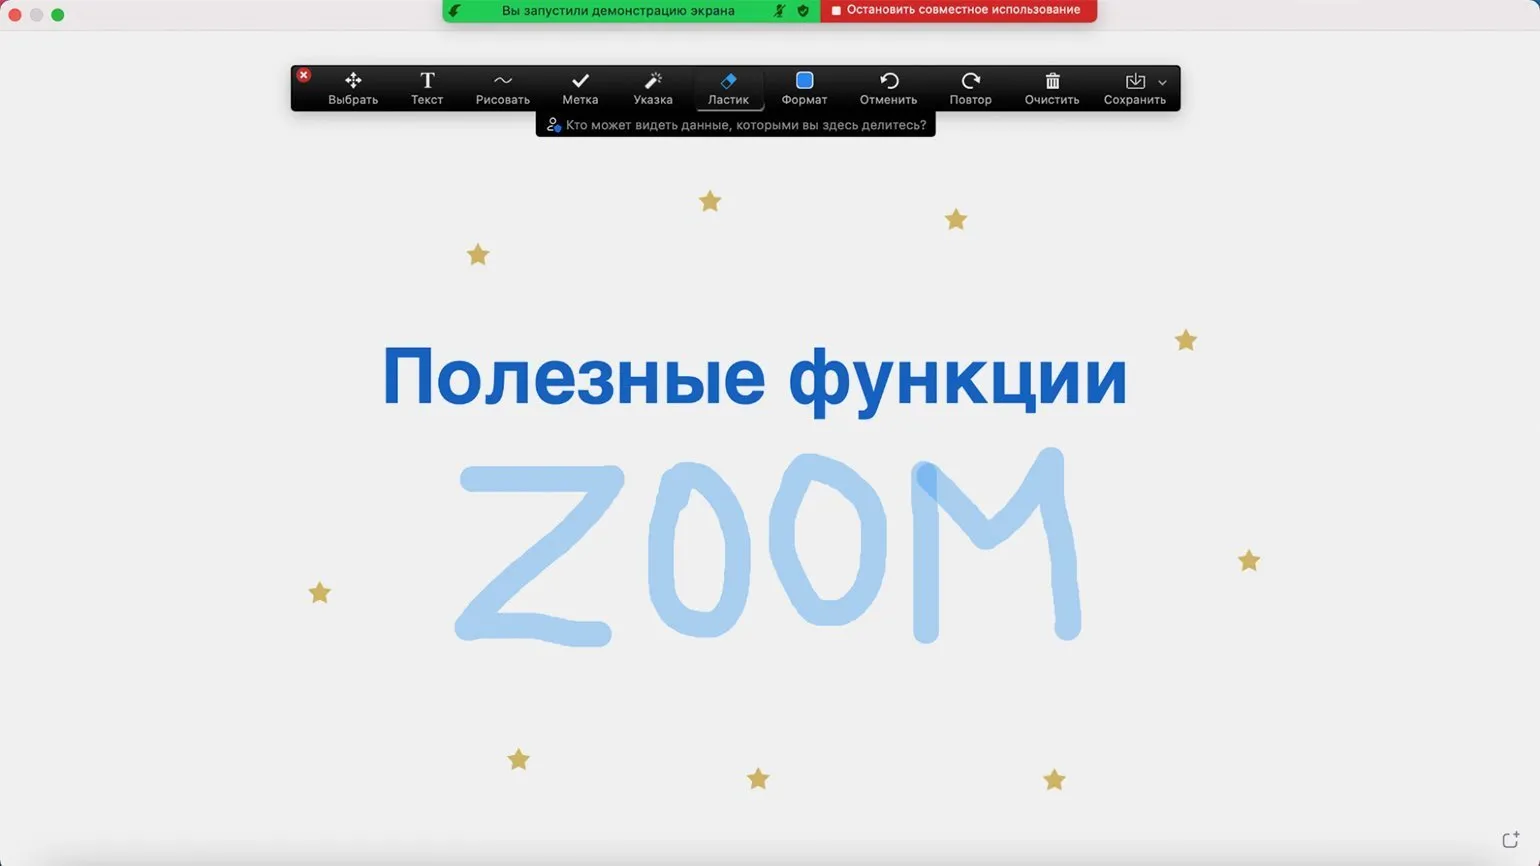
Using a whiteboard is recommended for conferences. This convenient tool allows you to enhance the interactivity of your event. For example, you can ask participants a question and record their responses in real time or quickly create a diagram for a visual explanation. A whiteboard promotes active participant engagement and improves the learning process.
To open the whiteboard, click the "Share Screen" button, then select "Whiteboard," and click "Share." On the page that opens, you can type and draw. Tools such as a virtual pointer and symbol markers are also available. You can save the image in PNG format by clicking the "Save" button.
3. Presentation as a Background
Zoom has introduced an interesting feature, currently in beta, that allows you to use presentation slides as a background for your video. To activate this option, click the "Share Screen" button, go to the "Advanced" tab, select "Slides as a virtual background" and click "Share". The platform will offer to upload a presentation created in PowerPoint or Keynote, allowing meeting participants to see both your slides and your image at the same time. This solution is ideal for webinars and online presentations, allowing you to make communication more interactive and informative.
4. Pinning and Tracking Video
If you have a large number of participants in your meeting and want to focus on specific ones, use the pinning feature. This feature works only for you, meaning that the pinned video will appear only on your screen, without affecting the view of other participants. A pinned video takes center stage on the screen, which is especially useful for tracking a specific student's engagement during an online lesson, for example. You can pin up to nine videos at once, allowing you to effectively manage attention and focus on key participants.
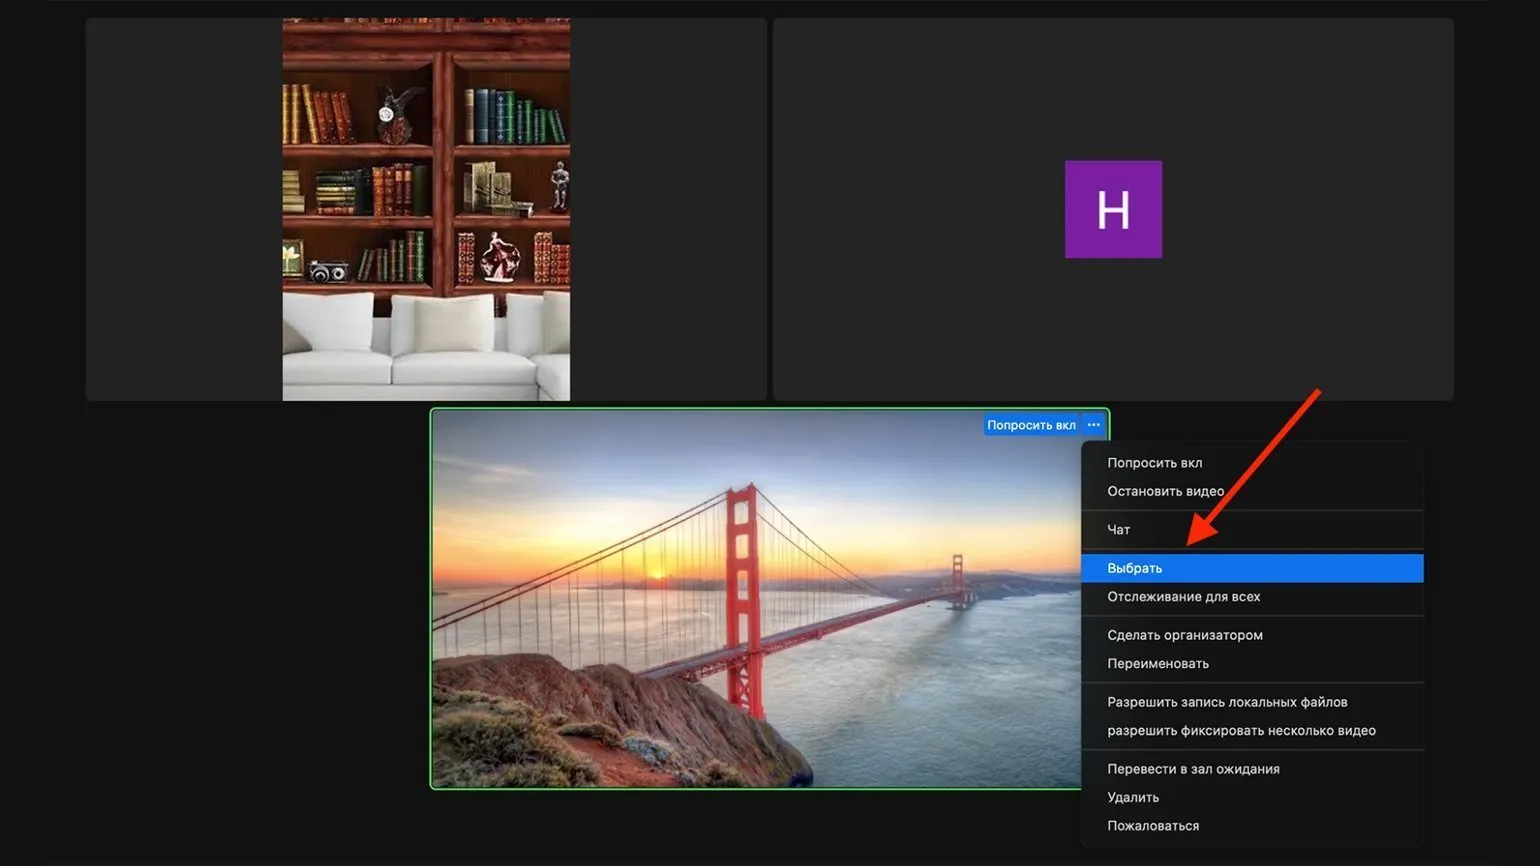
To select a video, hover over it and click the three-dot icon "...." Then select "Select." This will allow you to quickly and easily manage your content.
To unpin a video, go to the upper left corner of the screen and click on the appropriate button. This will allow you to move the video to the desired location or remove it from the current screen.
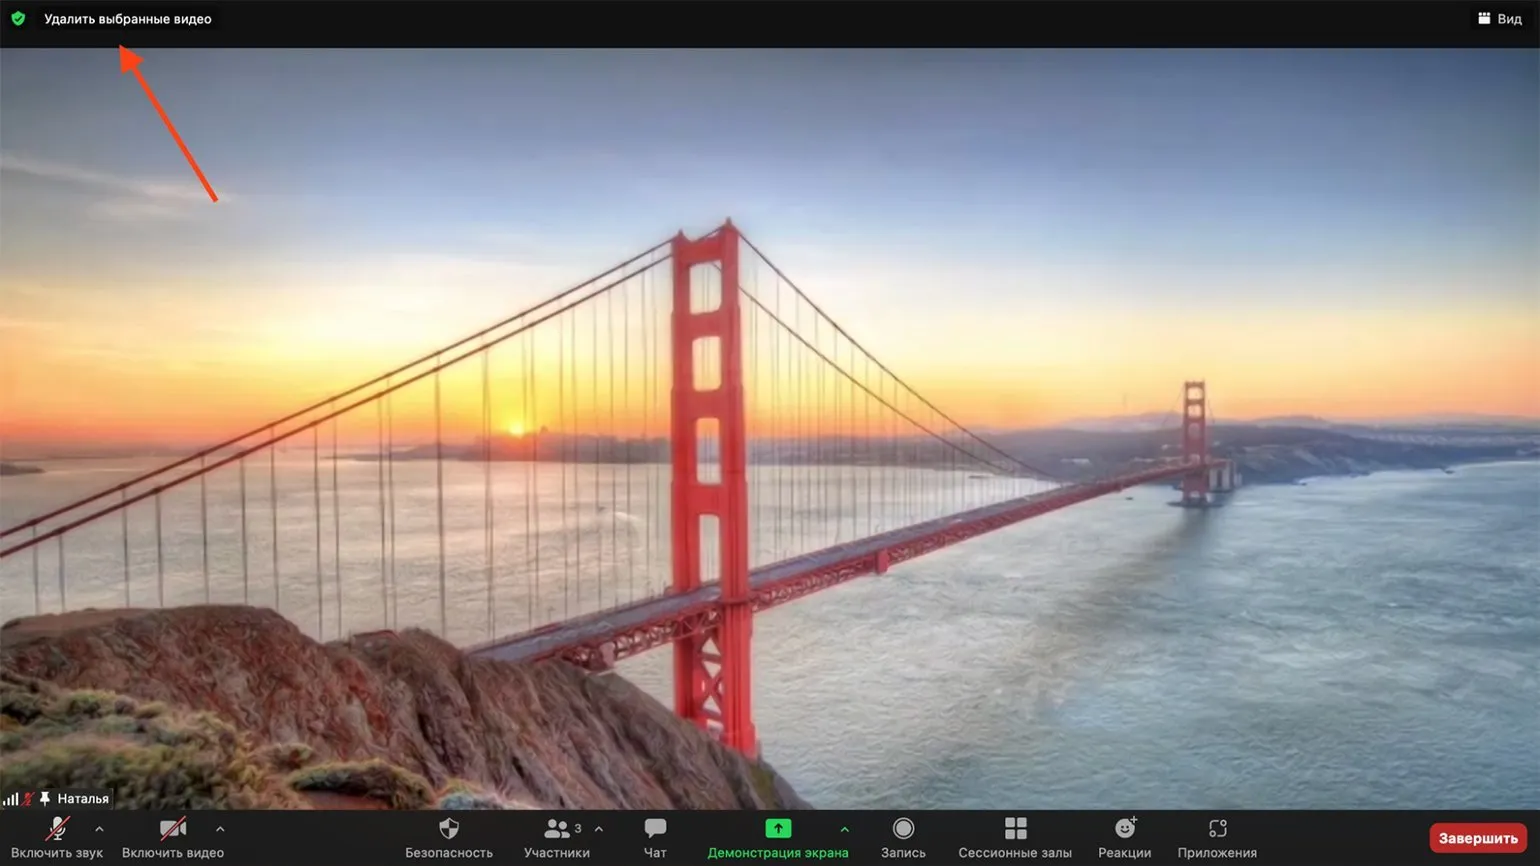
Zoom has a tracking feature that allows you to pin a video not only for you, but also for all meeting participants. This option allows you to pin up to nine users at a time. It is especially useful for events with multiple speakers, such as project presentations by a group of students. This allows all participants to be the focus, not just the one who is currently speaking. Using the tracking feature improves interaction and makes meetings more dynamic and effective.
To activate the tracking feature, follow the same steps as for pinning a video. Click the "..." button in the upper right corner of the video and select the "Track for everyone" option. To remove a pinned video, use the "Remove tracked video" button located in the upper left corner.
5. Immersive View
Zoom developers offer a unique opportunity to change the usual squares in video conferences by introducing a single virtual background. This can be a classroom, a meeting room, or a cozy nook by the fireplace, which can accommodate up to 25 participants. The Zoom platform also offers the ability to upload your own scenes, making video calls more personalized and engaging. Using virtual backgrounds will not only add variety to your meetings but also create a comfortable atmosphere for communication.
The host has the option to automatically distribute participant video avatars or move them manually. It is important to note that for video avatars to display correctly, all participants must have the latest version of the program. Otherwise, they will only be able to see standard formats, such as speaker video or a gallery with squares. Updating the program will ensure a full interaction experience and improve the quality of the video conference.
To select an immersive background during a meeting, click the "View" button in the upper right corner of the screen, then select the "Presence Effect" option. You can choose one of the suggested scenes or upload your own background and click "Start" to activate the selected effect. This will help create a more professional atmosphere and improve the perception of your presentation.
In this mode, screen sharing will function as usual. After the presentation ends, the selected background will be automatically restored.
The quality of the immersive presentation in Zoom, as well as the ability to set a virtual background as a photo, depends on the technical specifications of your device. Not all computer models support this feature. Make sure your computer meets the necessary requirements for optimal performance of Zoom and virtual backgrounds. This will help you create a professional atmosphere during video calls and presentations.
6. Sharing Audio
If you plan to show conference participants a video and then discuss it, you don't have to wait for everyone to watch it on their own device. The Zoom platform allows for convenient shared viewing with audio streaming from your computer. To do this, simply click the "Share Screen" button and check the "Share Audio" box. This will provide participants with high-quality audio, which will make the discussion more productive and engaged.

7. Quickly Unmute
If you've muted your microphone while another participant is speaking, but you urgently need to add something or answer a question, use this simple trick. Press the spacebar, and your microphone will temporarily unmute while you hold it. This method eliminates the risk of forgetting to mute your microphone after speaking, which could disrupt other participants. This approach makes video conferences more comfortable and organized, allowing you to collaborate effectively without unnecessary interruptions.
The spacebar feature in Zoom is only available when the application window is open. However, keyboard control is also available when the application is minimized. To activate this option on the desktop version, click on the profile icon and select "Settings." This will allow you to effectively manage meetings and improve interaction with participants.
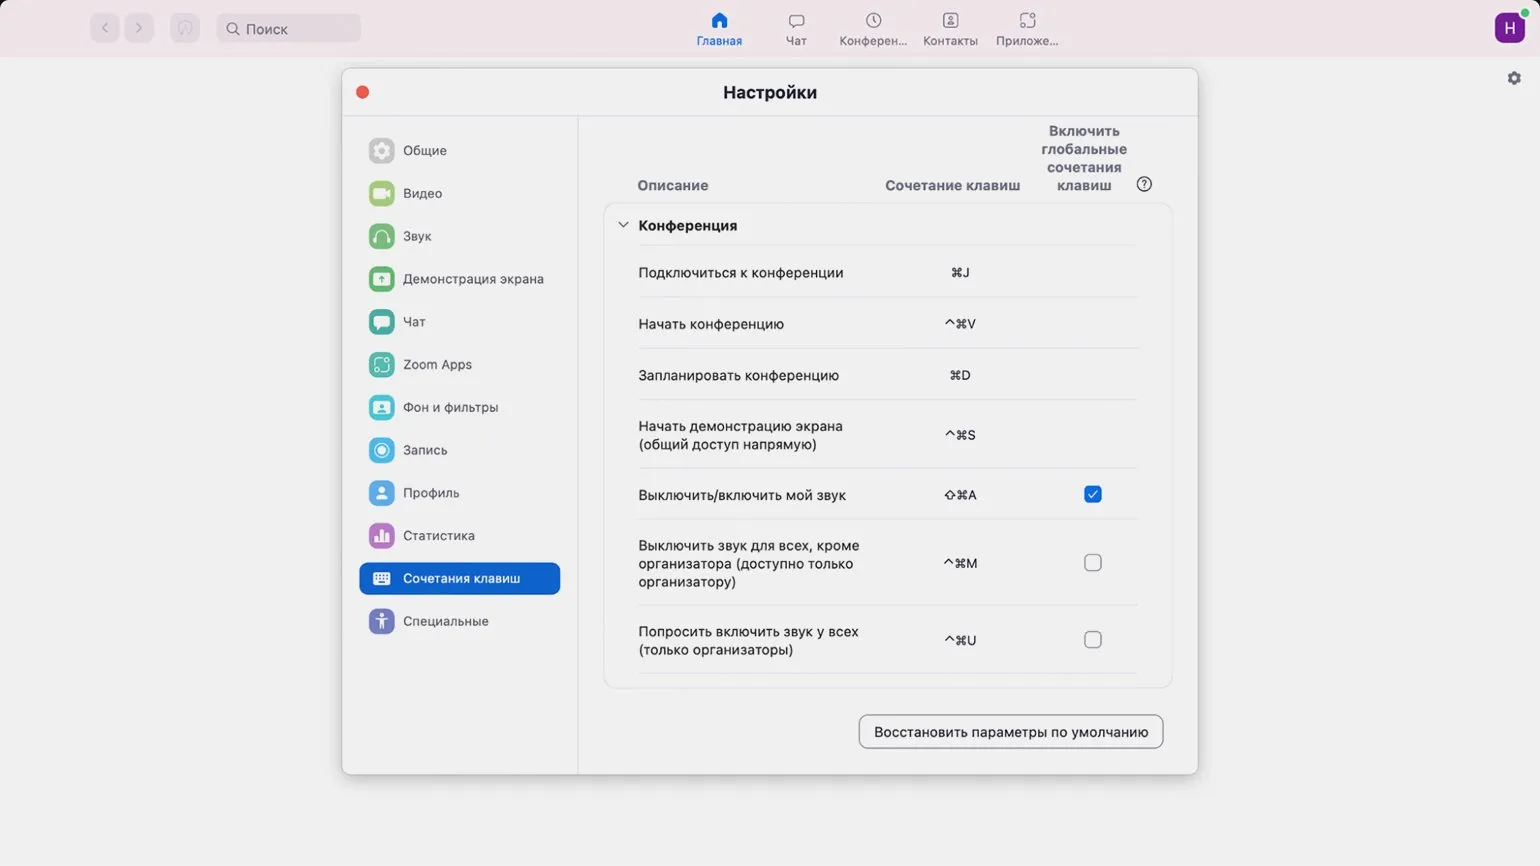
The Keyboard Shortcuts tab provides useful keyboard shortcuts that can significantly simplify your work. In the right column, you can check the boxes next to the required global shortcuts, which will allow them to function even when the application is minimized. This will improve your productivity and make using the app more convenient.
Reworked text:
Explore additional materials:
- 6 Telegram features that will be useful for learning
- How Flipgrid engages the TikTok generation in learning
- How to use SpatialChat to bring online communication closer to real life
- 12 tools for online educational events
Online Tutor
It doesn't matter what you teach—English, CrossFit, yoga, vocals, or culinary arts. Everything you previously taught in schools, studios, and offices can now be taught online. Promote your knowledge and skills and earn money from anywhere in the world.
Find out more