Contents:

Learn: 3D Generalist Profession
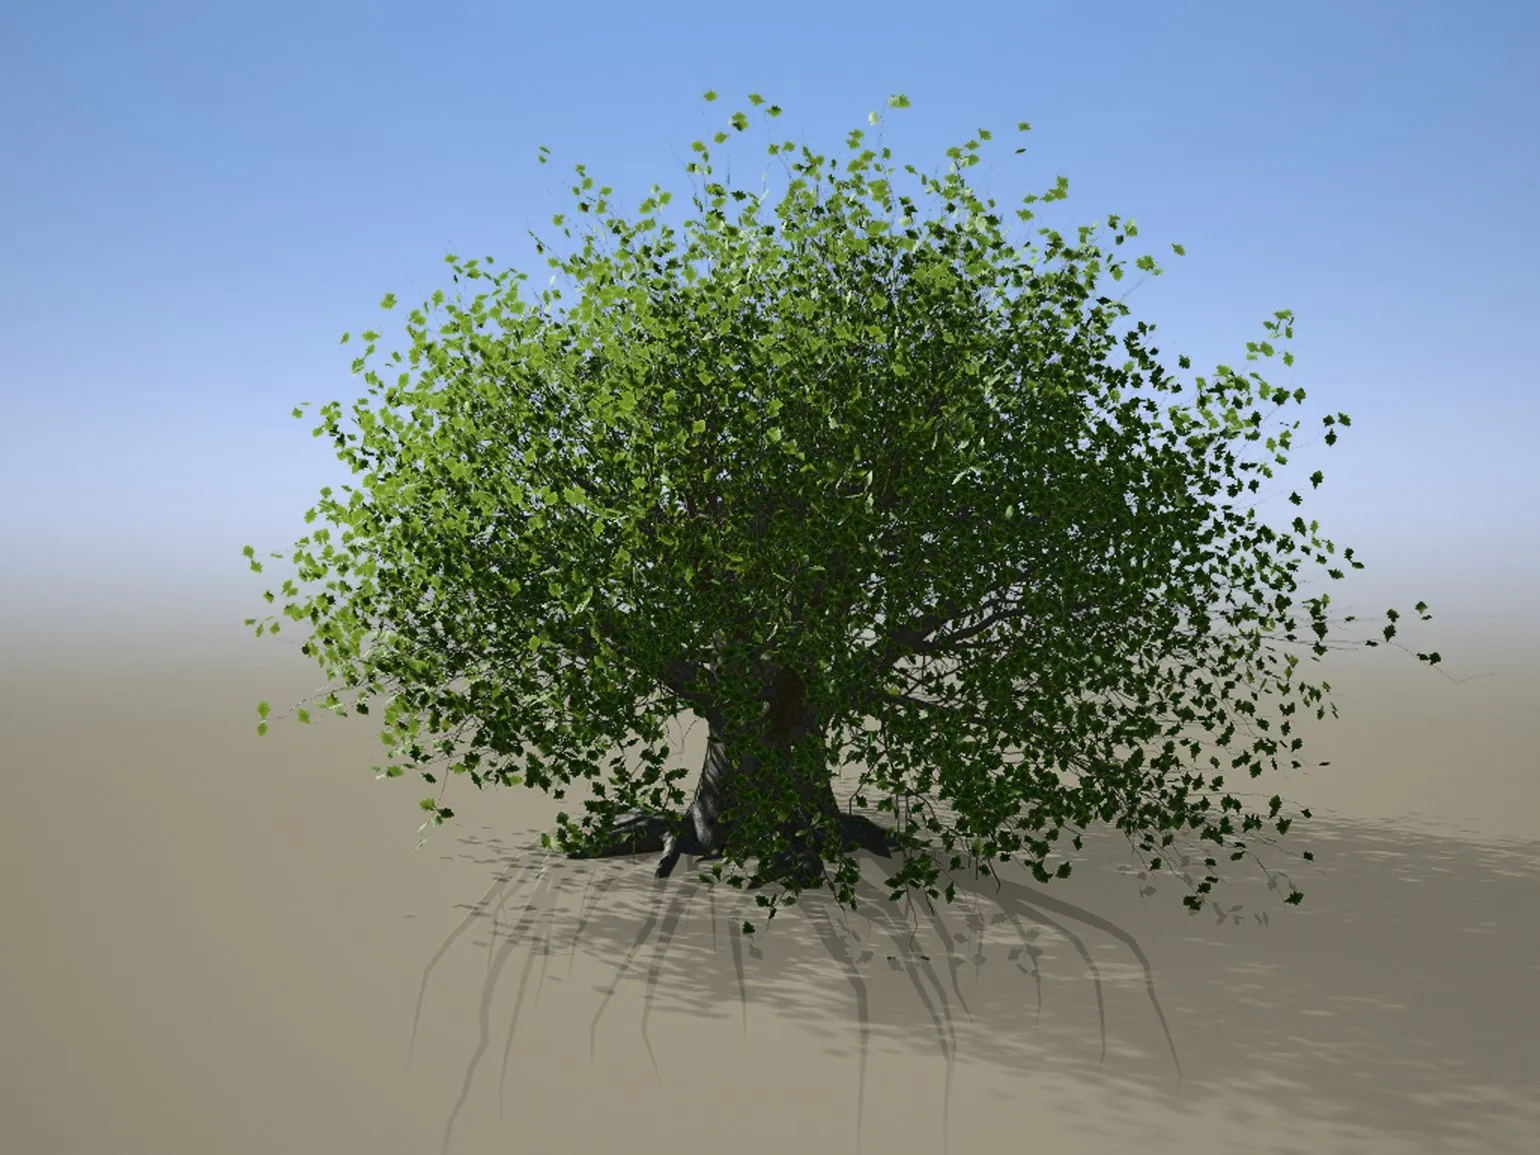
Learn MoreFlora plays a vital role in creating the atmosphere of games. It includes not only dense forests, meadows, and shrubs, but also simple houseplants and ivy entwining buildings. Players typically don't notice these details unless they directly interact with them, but they shape the overall perception of the game world. Each plant, whether a majestic tree or a humble flower, adds uniqueness and depth to the environment, making it more alive and realistic. Thus, attention to flora in games significantly enriches the gaming experience and helps create memorable moments.
Developers at major studios use specialized programs for generating 3D vegetation to improve efficiency. In this article, we will take a detailed look at SpeedTree, one of the most popular tools for modeling and rendering plants in real time. SpeedTree offers a wide range of features that allow you to create detailed and realistic plant models, making it indispensable in the gaming and film industries. The tool supports integration with various game engines, simplifying the development process and accelerating the creation of visually stunning scenes.
In this article, you will become familiar with the key aspects of this topic. We will cover the main concepts in detail, provide practical tips, and share relevant information. This will help you better understand the subject and apply your acquired knowledge in practice. Get ready to dive into learning and discover new horizons.
- Background of SpeedTree;
- In what areas is the program in demand;
- What is special about the current version;
- SpeedTree license types;
- How to create a simple model in the trial version and transform it using a third-party object.
The Thorny Path to Creating 3D Trees
The SpeedTree project was created by Interactive Data Visualization, Inc. (IDV), a company founded by Michael Sechrest and Chris King in the early 2000s. Initially, IDV focused on developing 3D technologies for the military and industrial industries. However, the team soon received an order to create a golf simulator, which became a turning point in their work. This project became the basis for the further development of SpeedTree, which is now widely used in the gaming industry to create realistic vegetation and landscapes. SpeedTree allows developers to create high-quality 3D trees and plants, significantly improving the visual quality of computer games and simulators.
A virtual golf course requires a realistic environment, including trees that create the atmosphere of a real game. We conducted a thorough search for rendering software capable of providing realistic wind effects, flexible tree generation tools, and high performance. This approach creates an immersive experience for users, making the game more engaging and realistic.
After a long and unsuccessful search, we decided to create the trees ourselves. As a result, we developed a small program that incorporated the key features that later became the foundation of SpeedTree. These included a procedural geometry generation algorithm, the first version of SpeedTreeCAD, and a unique approach to lighting and wind simulation.
Unfortunately, the golf simulator was never released. Project support has been discontinued, and our initial development of the virtual tree generation software has been postponed indefinitely.
Kevin Meredith, formerly Director of Business Development at Interactive Data Visualization, Inc., has significant experience in data visualization and business analytics. His professional work encompasses the creation of effective strategies for improving customer engagement and optimizing business processes using modern visualization technologies. Kevin is passionate about implementing innovative solutions that help companies better understand their data and make informed decisions.
A few months later, IDV received a commission from an architectural firm to create a render of a complex covering over 100,000 m², which included nearly 1,000 high-quality animated tree models. Concerned about the capabilities of their generator, the developers began searching for solutions among plugins for other programs, such as 3ds Max. However, their attempts proved unsuccessful. Some tools lacked wind animation algorithms, others offered only high-polygon models, which negatively impacted optimization, and still others did not meet the client's visual requirements. As a result, IDV faced significant challenges in creating high-quality and optimized renders, highlighting the importance of choosing the right tools in the architectural visualization development process.
IDV returned to its previous developments, improved them, and successfully completed the task in-house. This success inspired the company to further develop its tree generation technology, opening up new opportunities for innovation in this field.
In December 2002, SpeedTreeRT, specialized software for rendering foliage and trees in real time, launched. This solution allowed users to automatically adjust the level of detail of foliage, as well as customize wind effects and lighting for numerous models, including hundreds and thousands of objects. SpeedTreeRT has become an essential tool for game and animation developers, delivering high-quality graphics and realistic rendering of natural elements.
In March 2009, at GDC, IDV unveiled the open beta version of SpeedTree 5.0. This version allowed users to not only procedurally generate trees but also manually customize them, allowing them to export finished content to game engines. The full release of SpeedTree 5.0 took place in July 2009, providing developers with a powerful tool for creating realistic vegetation in games.
Using SpeedTree in Games and Films
Today, SpeedTree is an important tool for creating in-game environments and is actively used by many AAA studios, including Epic Games, Sony Interactive Entertainment, Microsoft Game Studios, CD Projekt RED, Square Enix, FromSoftware, and Activision. Games that have used SpeedTree include such major projects as Assassin’s Creed Valhalla, Red Dead Redemption 2, Days Gone, and Tom Clancy’s Ghost Recon Breakpoint. Using SpeedTree allows developers to create high-quality and realistic landscapes, which significantly improves the visual perception of games and player immersion.
SpeedTree technology is widely used in the film industry, which is confirmed by the large number of projects in which it has been used. IDV has dozens of films to its credit, including works from such giants as Disney and Marvel. Famous films using SpeedTree include Avatar, The Wolf of Wall Street, and Mad Max: Fury Road. This technology makes it possible to create realistic vegetation and natural landscapes, which significantly enriches the visual perception of films and increases their artistic value.
SpeedTree has been used to create environments in television shows since 2011, first featured in Sesame Street. In 2015, IDV won an Oscar and an Emmy, recognizing its significant advancements in technology and engineering. SpeedTree software creates realistic vegetation and natural landscapes, making it an indispensable tool for directors and producers.
Current version
SpeedTree 9 offers two versions: Games, designed for developing video games, and Cinema, focused on creating visual effects and architectural visualizations, but without the ability to export to Unity and Unreal Engine. The program includes a wide range of tools for creating 3D flora from scratch and offers new functionality that significantly expands user capabilities.
- a photogrammetry tool - Mesh Converter, which helps optimize the details of a scanned object while preserving its unique geometry and textures;
- Freehand mode for manual editing of trees;
- HDRI lighting support;
- new options for editing branches;
- loopable wind animation.
Content created in SpeedTree is easily integrated not only into game engines, including custom solutions, but also into popular 3D modeling and rendering programs. These programs include Maya, 3ds Max, Blender, Cinema 4D, Houdini, as well as the Arnold and Redshift renderers. This makes SpeedTree a versatile tool for game developers and artists, allowing them to create realistic vegetation and natural elements that can be used in a variety of projects.
Licensing Terms
SpeedTree supports Windows, Mac, and Linux operating systems and is available by subscription. There are three types of commercial licenses, each offering unique opportunities for game and animation developers.
- Indie ($19 per month or $199 per year) — for indie developers and studios whose income or investments do not exceed $100,000 per year.
- Pro ($299 per six months or $499 per year) — for companies with a turnover of up to $1 million. There is an option for a more expensive floating license, that is, with the ability to connect the software on multiple workstations one after another, as well as additional purchase of access to the SpeedTree marketplace — Games Tree Library.
- Custom — a contractual license on request for large organizations with revenue over $1 million.
All licenses allow you to export files in the following formats: .obj, .fbx, .usd, .st, .stsdk, .cgf and .xml. These formats are widely used in various fields, including 3D modeling and animation, providing flexibility and compatibility with various software.
If a user is interested in the program but is not ready to purchase, they can download the free Learning Edition. This version includes all the features for plant modeling, but exporting models to other programs is not possible. Projects created and saved in the Learning Edition work exclusively in this version and are not compatible with paid licenses. In this article, we will examine the capabilities of the free version of SpeedTree in detail, which will allow you to evaluate its functionality and make an informed decision about further use of the program.
Client Installation
To get the free version, you need to visit the official website, register an account, add a license to your cart, and complete the order.
The Learning Edition provides unlimited access without the model export feature, making it ideal for learning. Users can also take advantage of a 10-day trial of the Pro version, which includes the ability to partially export to a game engine. This version allows users to evaluate the advanced features and capabilities offered by the Pro edition.
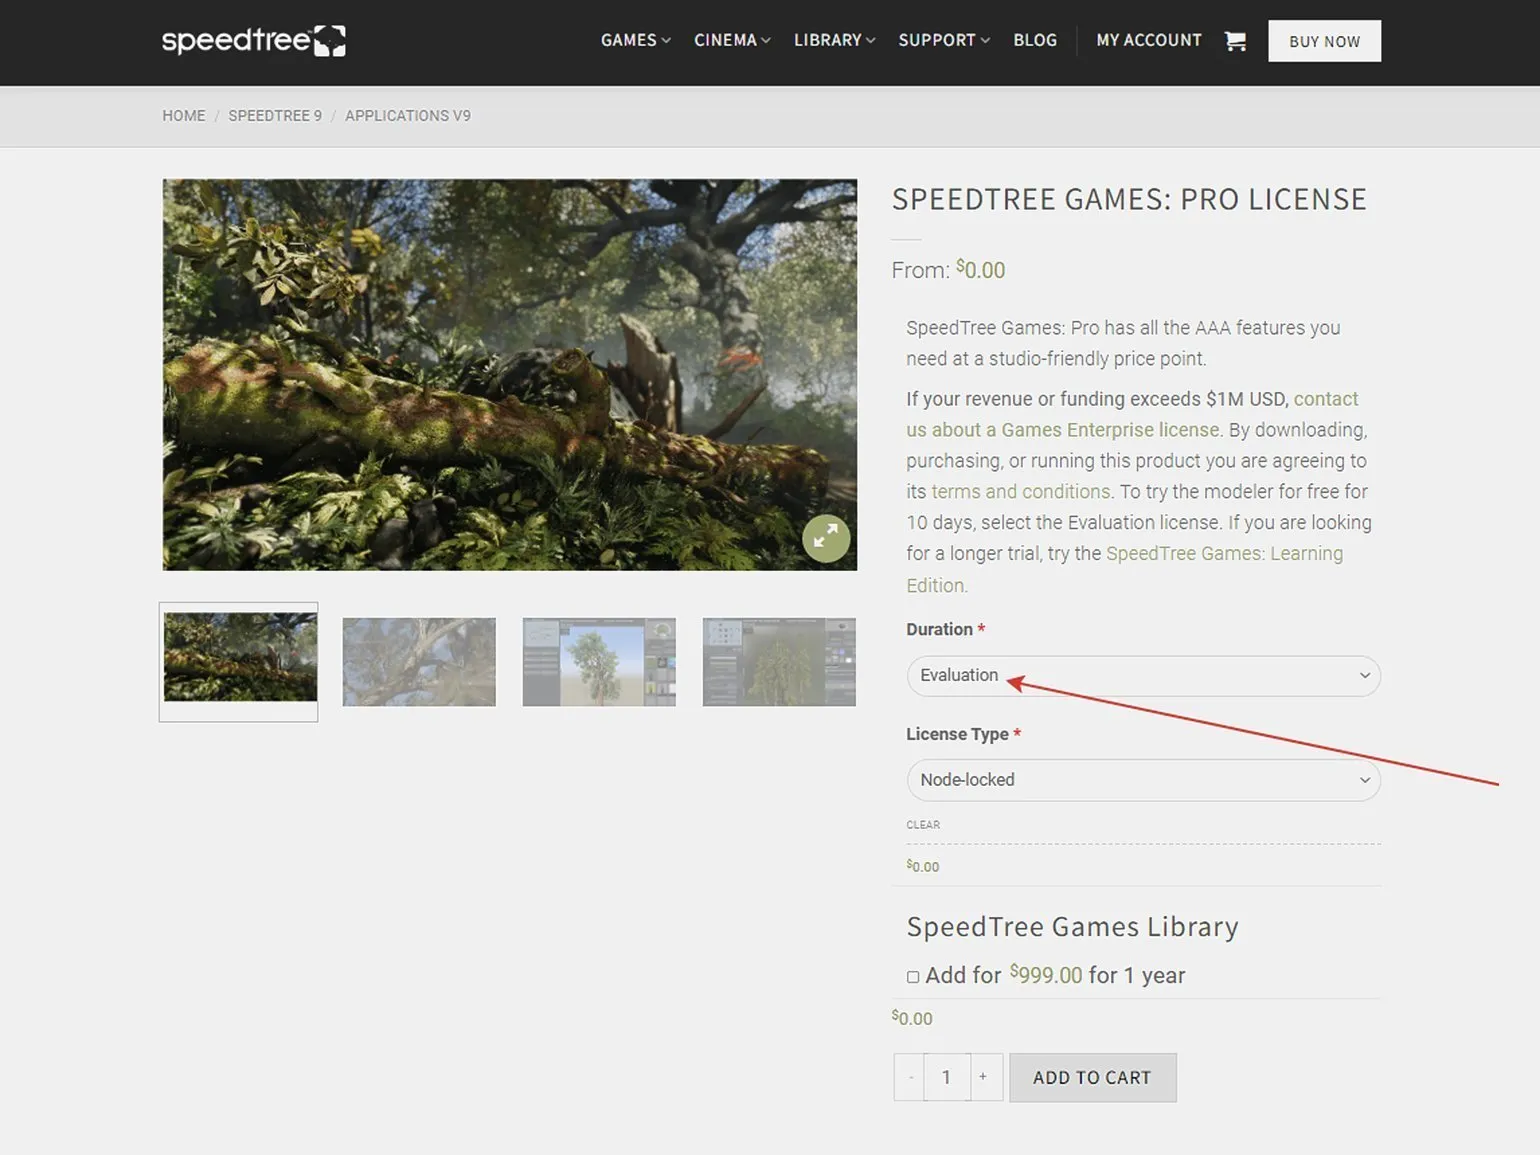
Partial export involves randomly deleting polygons from a 3D model. This operation results in the model losing its functionality and becoming unusable. In most cases, this imports only the basic frame of an object, such as a tree trunk, without details such as leaves and animation. This can negatively impact the visual quality and overall aesthetics of the model in projects requiring high detail.
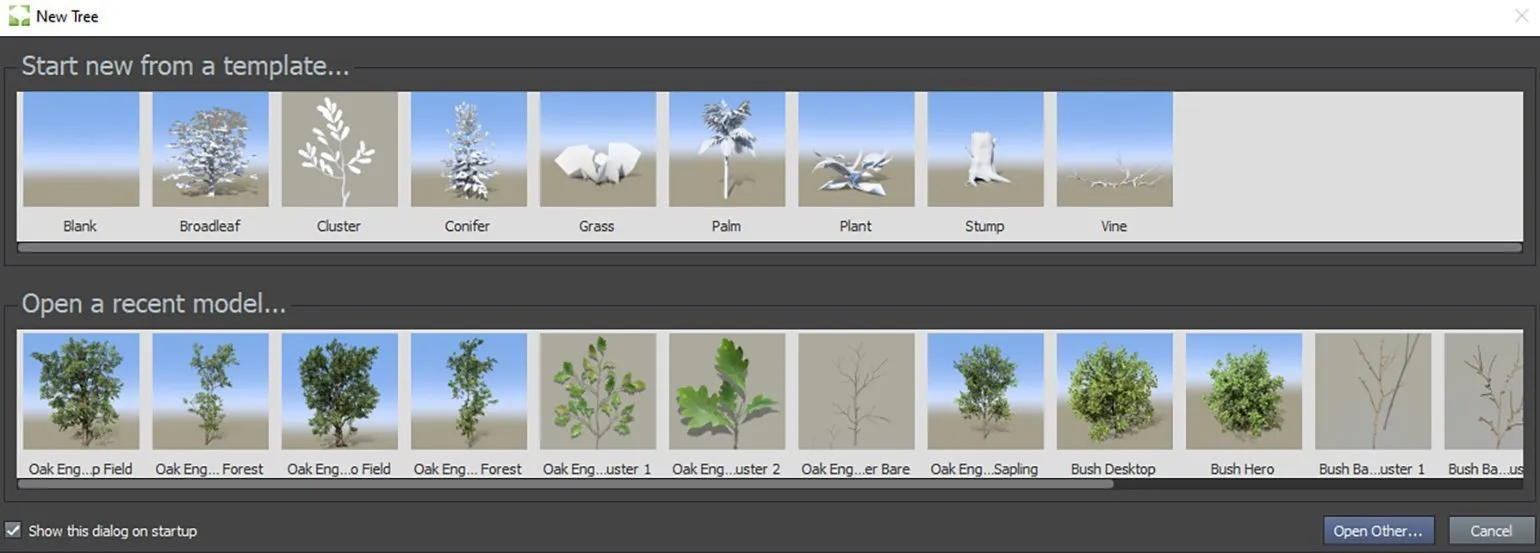
After placing your order, you need to go to the Downloads section and download the installation file appropriate for your operating system. After installation is complete and the client is launched, a dialog box will appear in which you can select templates (at the top) and ready-made models (at the bottom). Going forward, the bottom row will display your recent projects you've been working on, making them easy to access.
Editor Interface
The SpeedTree interface may seem complex due to its many windows and settings, but once you understand its structure, you'll find that the tree creation process is quite intuitive. The variety of sliders opens up ample opportunities for creative experimentation. In this article, we'll focus on the main functionality and several key operations in SpeedTree Modeler. For a more in-depth exploration of all the program's capabilities, we recommend referring to the official documentation. SpeedTree offers powerful modeling tools that can significantly simplify the creation of realistic trees and vegetation for your projects.
To begin, let's look at a completed tree model to visually examine the interface layout. This will allow you to better understand the structure and functionality, and will also simplify the process of working with the interface. By analyzing the model, you can identify key elements and their relationships, which will help in further mastering the system.
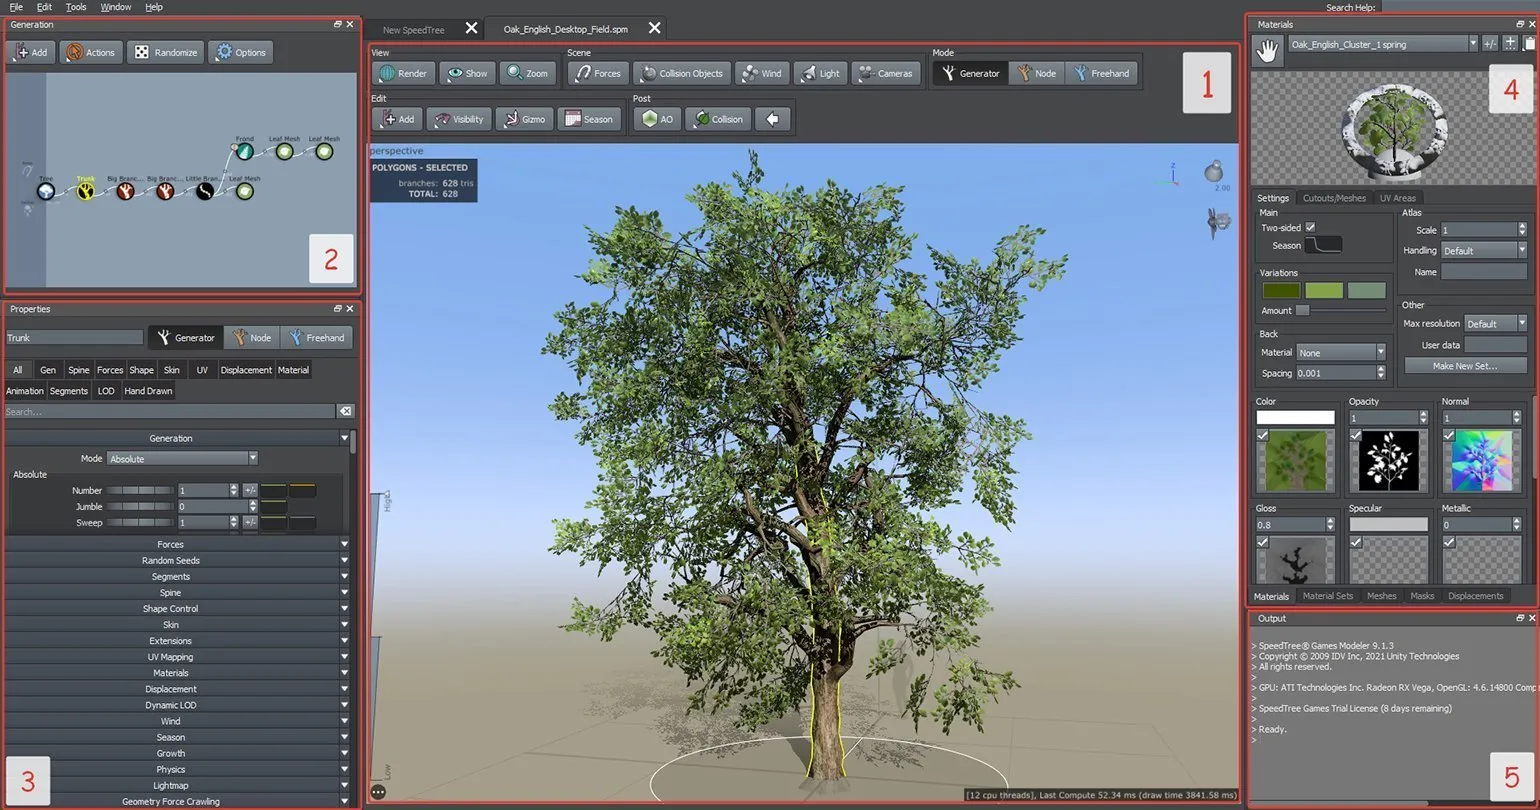
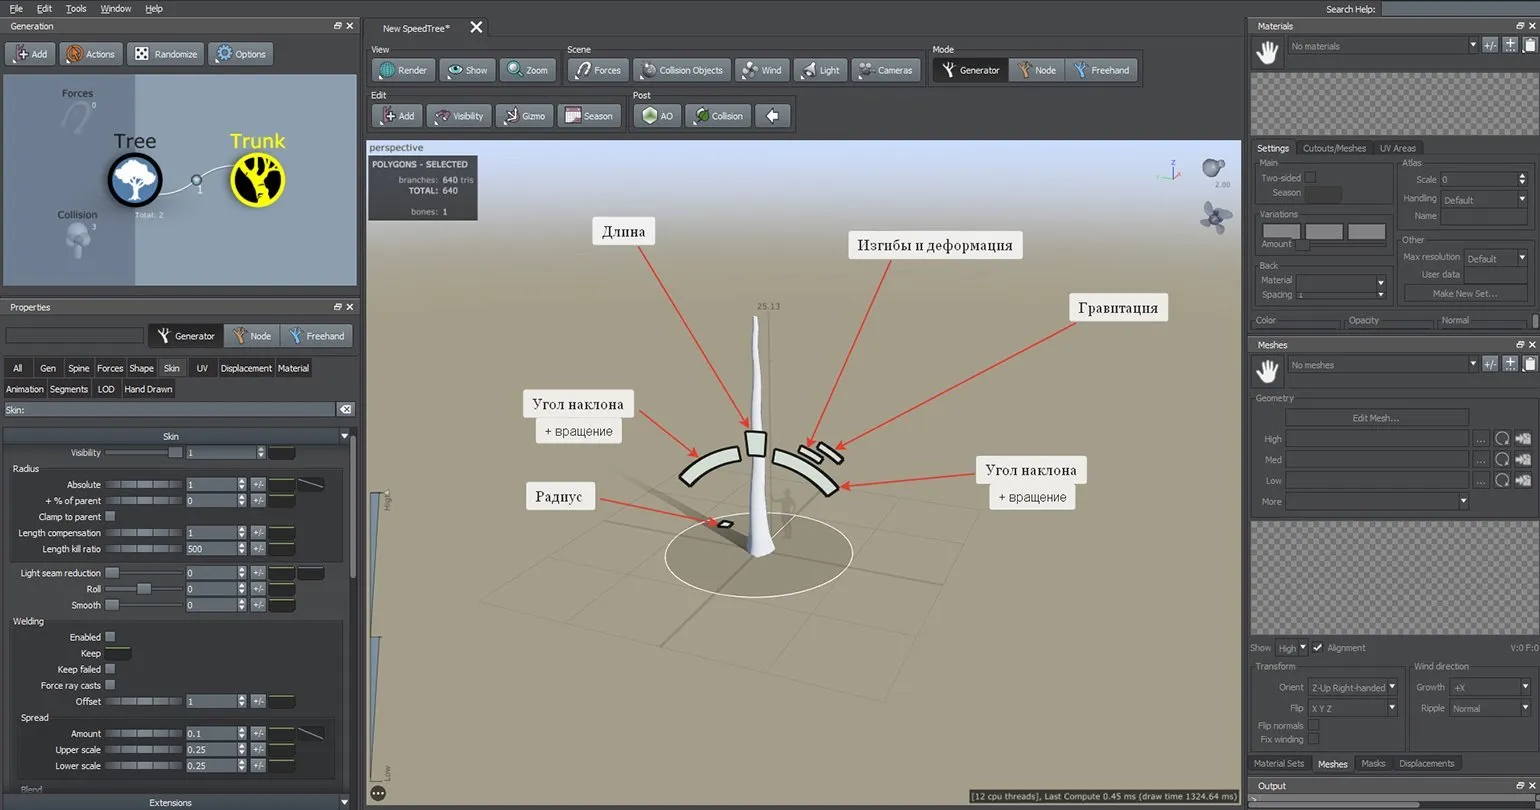
In the center of the interface is the Tree Window (window #1 in the screenshot above), which represents the main 3D viewport. This window contains a toolbar for generating and modeling objects, as well as for setting up physics and rendering. Lighting and wind direction adjustments are also available here, and can be found in the upper right corner of the viewport. In the lower left corner, a level-of-detail scale for the object is located, allowing you to control the display quality.
Navigation in the viewport is performed exclusively with the mouse. This allows users to conveniently navigate through content and interact with interface elements. Using a mouse for navigation provides precision and ease of control, which is especially important for users seeking to effectively interact with web pages. Optimizing mouse navigation in the viewport improves the user experience and increases satisfaction with using the site.
- LMB — rotates around the object.
- RMB — opens the menu.
- Hold MMB — moves within the plane.
- Mouse wheel — zooms in/out.
- Double-click LMB — focuses on the selected object.
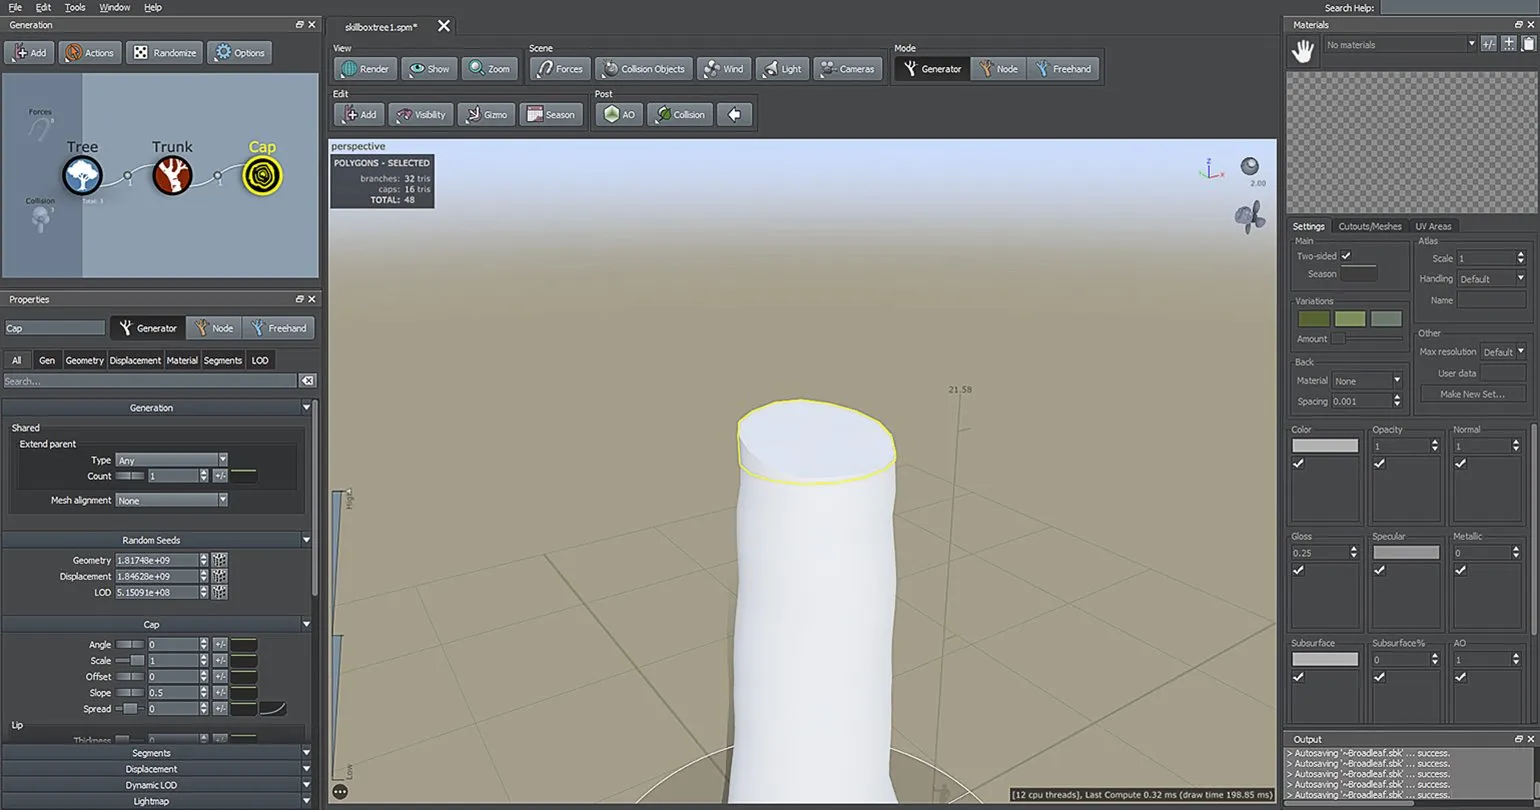
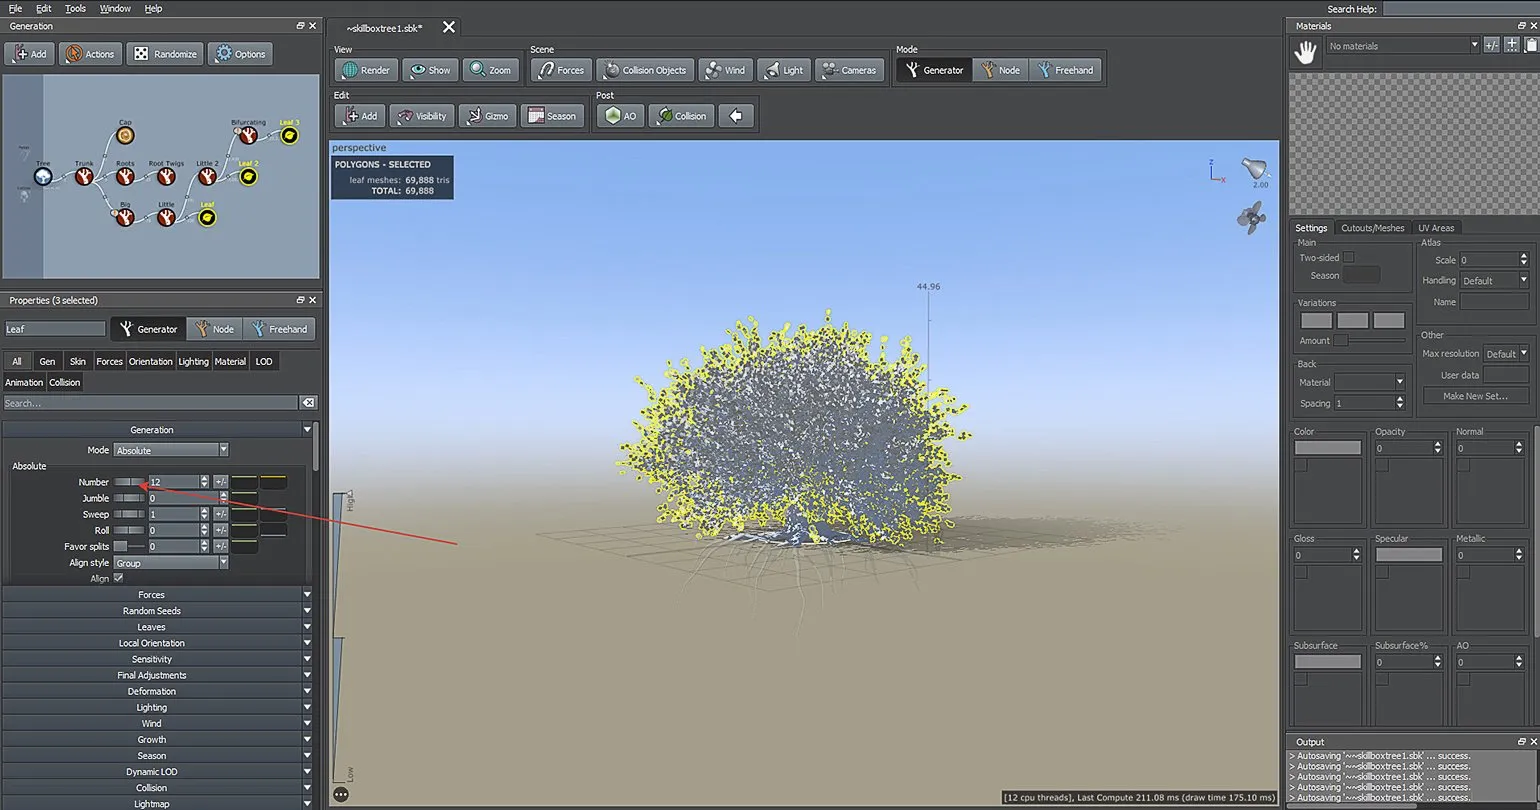
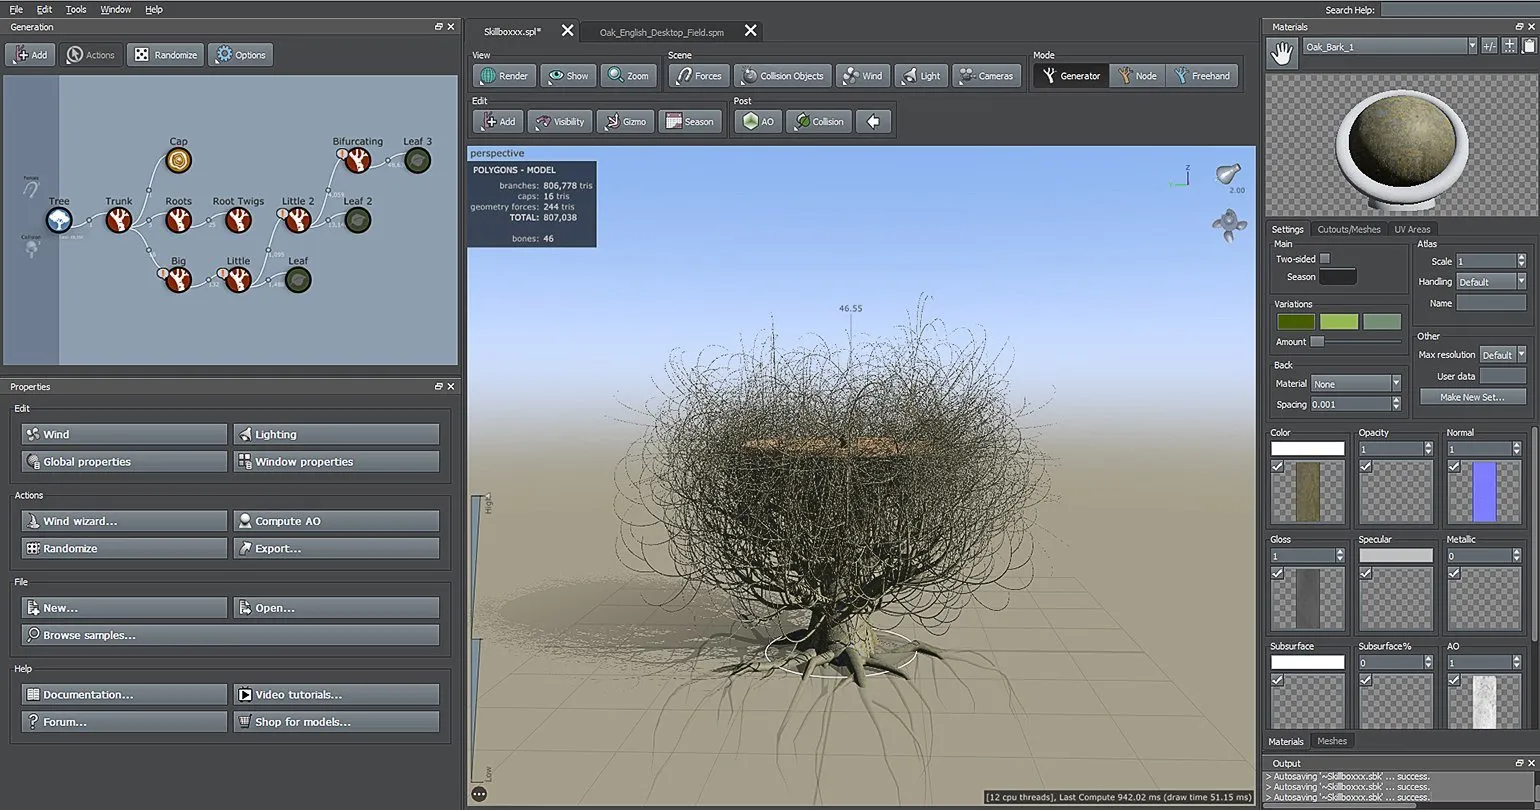
In the upper left corner is the Generator Editor (window #2). This is a generation system in which all elements of the current tree or other vegetation are represented as nodes and organized into a logical growth chain. When a specific node is selected, the part of the object associated with this fragment is highlighted in yellow in the viewport. For example, in the screenshot shown, the trunk node is highlighted.
The Generator Editor allows you to effectively manage individual segments of the model, which is especially useful when there are many elements. For example, if you want to hide all the leaves in the viewport, just select the Leaf nodes and press the H key. This simplifies the editing process and allows you to focus on the elements you need, increasing overall productivity.
Below is the main settings panel — Properties (window #3). To access the object's settings, you must select the model in the viewport. This will allow you to change various parameters and characteristics of the object, which is important for further editing and optimizing your work.
Properties offers three editing modes. Generator mode is activated by default and is responsible for creating the main elements of the plant, such as the trunk, roots, branches, and leaves. In this mode, elements are edited in groups, which allows, for example, to increase the length of all branches at once. Node mode allows you to change each part of the plant separately, providing more precise editing. Freehand mode offers maximum freedom, allowing you to manually draw and model the vertices of the object, which significantly expands the creative possibilities when creating unique plants.
The Materials menu (window #4) provides information about the properties of the textures imported into the project. This menu also contains tabs for Meshes, Masks, and Displacement. These tabs can be enabled or disabled through the main menu: Window → Assets. Optimizing your work with textures and objects in this section can significantly improve the visual quality of your project and simplify resource management.
The Output Window (No. 5) provides the user with information about the program's internal processes. This tool allows you to monitor the execution of tasks and identify possible errors, which helps improve the application's performance. The information presented in the Output Window can include program status messages, warnings, and debug data, making it an essential element for developers and users looking to optimize their work with the software.
First Steps
Creating plants in SpeedTree is a creative process that requires experimentation and time to master the program's functionality. In this tutorial, we will take a detailed look at how to create a simple tree from scratch using the Blank template. Templates are available both at program startup and via the File → New menu. Mastering SpeedTree will allow you to create unique plants, significantly expanding your 3D modeling and design capabilities.
This project is a demonstration of the program's basic capabilities, designed for beginners. It illustrates key features and tools that will help you master the program and get started.
First, let's create the trunk. Open the node editor, right-click the Tree icon, and select "Add geometry to selected" → "Trunk" from the menu that appears.
Standard parameters can be quickly adjusted in the viewport using the handles that appear when you click on the trunk in Generator mode. The game is controlled using a mouse: to do this, hold down the left mouse button on one of the markers.
Hotkeys are convenient for performing basic mesh operations. This speeds up your workflow and increases your efficiency in 3D editors. Knowing keyboard shortcuts greatly simplifies tasks related to editing, transforming, and managing meshes. Use hotkeys to quickly access the tools and commands you need, helping you focus on the creative process without wasting time.
- Tab — switches editing modes,
- H — hide the selected object,
- W — move,
- E — rotate.
SpeedTree does not support Russian. If you encounter problems with hotkeys in SpeedTree, check that your keyboard is switched to the English layout. The program does not recognize the Russian layout, which may cause hotkeys to function incorrectly. Ensuring your keyboard is properly configured will help avoid discomfort and improve your SpeedTree experience.
Using standard settings, we'll shape the barrel to your desired shape. In this project, we are creating a tree resembling an oak, so the trunk will be shorter and wider, which will emphasize its characteristic features.
By default, the tree trunk is represented as a tubular object. To add cut geometry, right-click the Trunk node and select Add geometry to selected, then Cap. This node will be useful when modeling a stump or a cut tree top, allowing you to create more realistic visualization and detailed geometry.
A massive tree requires massive roots, which are formed from the trunk. To add roots, right-click the Trunk node and select Add geometry to selected → Decorations → Roots.
After making changes to the generation scheme, two new elements will appear: Root and Root Twings, which represent the main roots and their branches. If the trunk radius has been increased, the roots may not be visible in the viewport, since they are "anchored" to the trunk by default. Due to overlapping geometry, the roots may disappear from view. To check the presence of roots, simply decrease the trunk radius, which will allow you to see their location and interaction with the rest of the geometry.
To resolve this issue, select the Roots element and go to the Skin tab in the Properties window. In this section, find the Welding item and uncheck the Enabled option or check the Keep Failed option. As a result of this action, the root base will cease to depend on the geometry of the trunk, which will improve the modeling process and avoid unwanted distortions.
The roots displayed on the model do not look very good. To correct their shape, length, and direction, use the settings in the Spine tab. First of all, you need to pay attention to three length parameters.
- Absolute - the minimum allowed length;
- + % of parent - the length obtained by multiplying the value of this parameter by the length of the parent (in this case, the trunk) and adding the Absolute value;
- + % radius - to calculate the length, multiply the value of this parameter by the radius of the object (in this case, the root) and add Absolute and + % of parent.
Deciphering this may seem like a complex task, but by experimenting with the sliders, you can more easily understand the effect of each parameter. Practicing with the settings allows you to better understand their interactions and improve the results.
To achieve the effect of partially exposed tree roots, their height can be adjusted in both Node and Generator modes. Specifically, this adjustment can be made using the Start Angle slider, located in the Orientation parameter on the Spine tab. This allows you to precisely control the position of the roots, creating a more natural and realistic tree appearance.
The Gen (Generation) tab allows you to customize the shape of the root mass, offering 10 generation modes. These settings affect the direction of root growth, their thickness, and the number of branches. After generating the roots, it is possible to edit them individually in Node mode, which provides additional flexibility in settings.
Creating branches starts with large elements. We recommend using the Trunk node and adding geometry by selecting Branches and then Big. You can connect smaller branches to the Big node using the Little node, and you can also add another Little node to create an additional level of branching. To improve the visual perception of the tree crown, you can use the Bifurcating node, which adds additional lushness and realism.
Please pay attention to the following key settings, which can have a significant impact on the efficiency of your project. Proper configuration of these settings will help optimize your workflow and improve results.
The Gen tab is an important interface element that provides users with access to various features and settings. Within this tab, users can find tools for content generation, process optimization, and data management. The focus is on ease of use and an intuitive design, allowing even beginners to quickly master the functionality. Importantly, the Gen tab supports integration with other modules, expanding your workflow and improving overall efficiency. Users can easily customize parameters, receive recommendations, and analyze results in real time, making the Gen tab an indispensable tool for achieving their goals.
- Branch arrangement — modes (Mode).
- Increase the number of branches —
- Number parameter in Proportional, Absolute modes;
- Number and Steps parameters in Proportional Steps, Absolute Steps (the two parameters depend on each other);
- Frequency in Classic, Interval modes (the Count value in this mode affects the number of branches growing at the same level);
- Absolute in Flood and Parent modes;
- Threshold in Bifurcation. When experimenting with these parameters, it is worth remembering that branches are generated according to an algorithm determined by a particular mode.
- The overall branch size is the Size Scalar parameter in the Gen tab.
The Spine tab is an important interface element that allows users to control the main functions of the application. It contains key tools and settings that ensure ease of use and effective interaction with the system. Using the Spine tab, you can easily adjust parameters, view data, and access the necessary functions. This makes the Spine tab an indispensable tool for optimizing your workflow and increasing productivity. Take a look at its capabilities for improving interaction with the application and adapting it to your needs.
- Bend branches - settings in the Noise section.
After completing the branch settings in the node editor, select small branches and create leaves by choosing the Add geometry to selected → Leaf option. For more lush foliage, increase the number of meshes using the Number slider in the Gen tab. This process will create a more realistic and detailed tree, which will significantly improve the visual perception of the model.
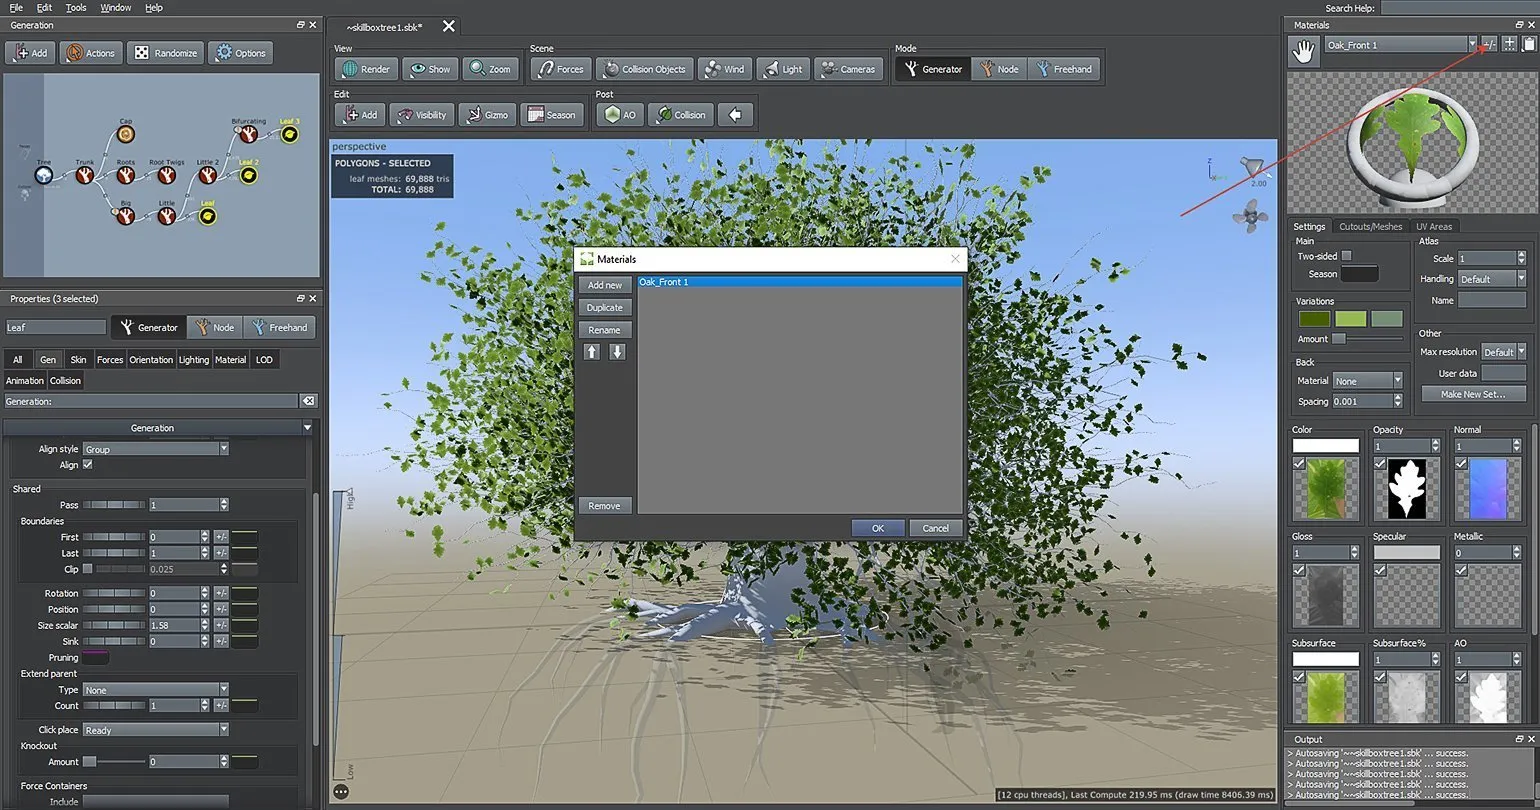
In the Materials menu, let's add textures for our tree. Click the + button next to the previous one to import your own textures or use ready-made options from SpeedTree. This greatly simplifies the process of creating realistic trees, especially if you need to quickly achieve a high-quality result. Using ready-made textures allows you to save time and effort, while providing a high degree of realism in your projects.
In the «Settings» section, there are several slots for different types of maps. If the Meshes, Displacements and Masks panels overlap these slots, it is recommended to close the latter for ease of work. Clicking on a slot will open the texture settings menu, where you can make the necessary changes and optimize work with graphic elements.
In this example, we are using oak leaf textures from the SpeedTree set, available in the samples/Broadleaf/Leaves folder. Using the «+» button Select a colored leaf texture, for example, Oak_Front 1.png. The program will automatically load all the corresponding maps into the appropriate slots. This simplifies the process of working with textures and allows you to quickly customize visual elements.
To replace or add new elements, simply click on the map slot, which will open the search window.
The finished material must be installed on the foliage using the drag-and-drop method with the palm icon located at the top of the window. This process allows for the effective placement of content, ensuring its proper positioning and improving user experience.
If you have a large number of materials, it's recommended to sort them by title. To do this, open the list by clicking the +/− icon in the upper right corner of the window. In this menu, you can add new materials, delete existing ones, and rename them. To rename a material, simply double-click its title. Proper organization of materials facilitates navigation and finding the necessary information.

We'll create materials for the trunk, roots, and branches in the same way we did for the leaves. For textures, we'll use ready-made materials from the SpeedTree starter set, located in the samples/Broadleaf/Bark folder. This approach will ensure a harmonious combination of all elements and improve the overall visual effect of the model.
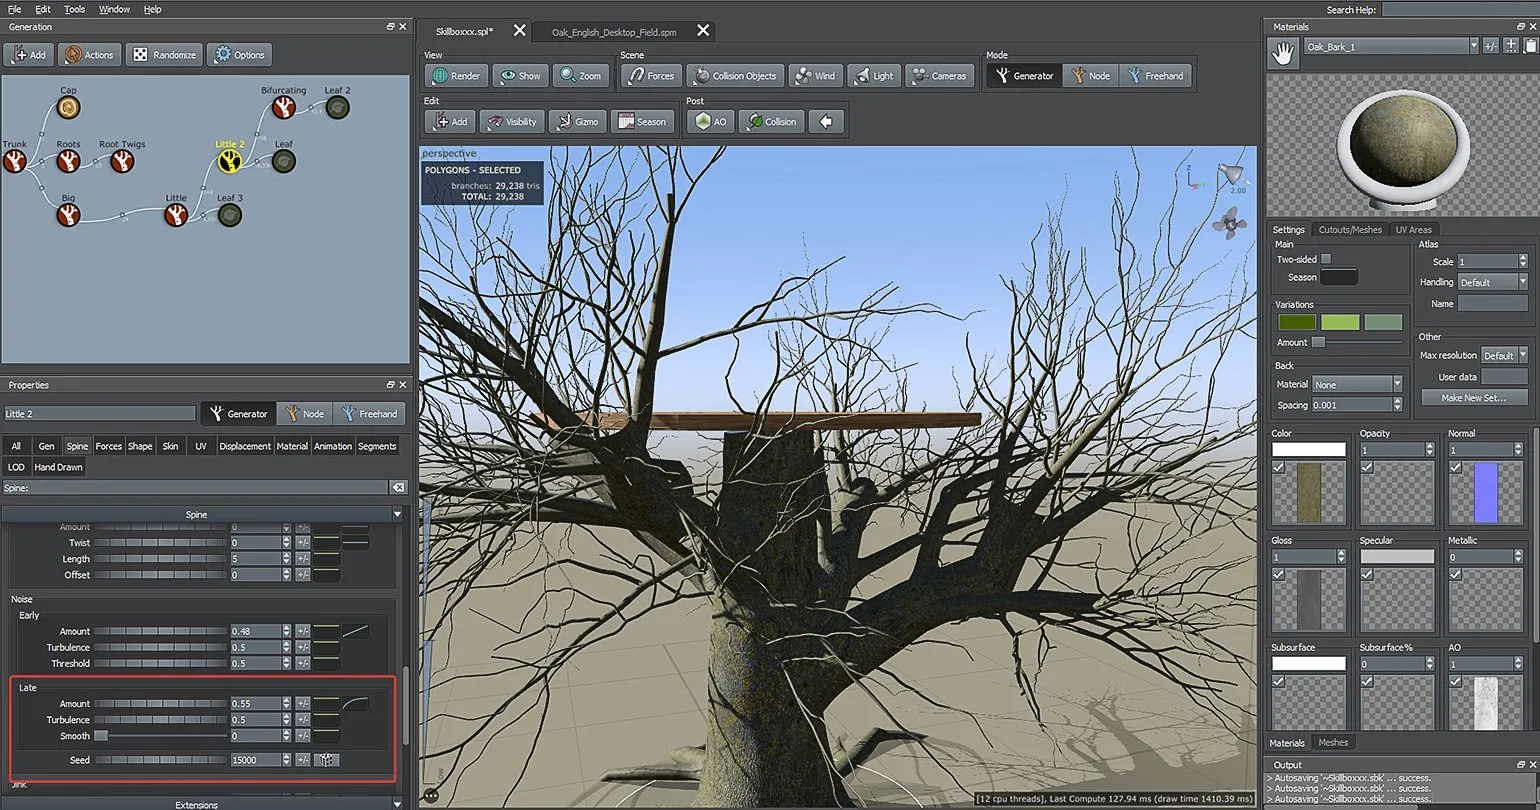
Importing a Third-Party Object and Setting Up Physics
SpeedTree features the Forces tool, which allows models to be modified under various conditions. In this article, we'll take a closer look at tree physics as it interacts with external objects, such as a treehouse construction site. We'll explore how Forces helps adapt tree models to specific design requirements and provides realistic simulation of interactions with the environment.
To begin, let's load a pre-made .fbx mesh into the scene. Open the Meshes tab, then, similar to adding materials, click the + button to import the model. Then, drag the loaded mesh into the scene. This process allows you to integrate 3D objects into your workspace, greatly simplifying the creation of visualizations and interactive applications. Imported models can be used for further editing and customization, which opens up a wide range of design possibilities.
SpeedTree uses a unique unit system of measurement in feet, which can be changed in the Preferences settings in the Tree Window and Scene Unit sections. When importing objects from other programs, they may be significantly larger than the tree. Therefore, after importing, it is important to open the model settings in the Properties window, change the size in the Transform section by selecting Scale, and enter new values in the Uniform section to adjust the scale.
It is recommended to reset the coordinates in the Translation section. This will help avoid potential problems related to the mesh positioning during subsequent export.
Creating a material begins with selecting textures from the archive or using the SpeedTree library. After this, you need to transfer the selected textures to the new object. For ease of use, we recommend temporarily disabling all leaf nodes. Then, using the W key, move the object along the Z axis to the top of the tree, approximately at the end of the trunk. This will allow you to fine-tune the material and visualize it in the context of the entire tree.
In the Generation Editor, you need to select the branch nodes whose position will depend on the external object. To do this, go to the Forces tab and in the section of the same name, enable the Allow options and the name of the imported mesh—in this case, Plane. After completing these steps, the tree segments will automatically begin to stretch to a third-party object, which will ensure the dynamic behavior of elements in the scene.
Now, select the custom mesh, go to the Properties section, and find the Behavior section. This section contains properties that determine how vegetation reacts to objects. These settings allow you to customize the interaction between vegetation and the environment, which can significantly improve the realism of the scene. Properly setting vegetation behavior helps create a more dynamic and lively atmosphere in your project.
Force is an important aspect to consider in various fields, such as physics, engineering, and even in a legal context. It describes the influence exerted on an object, which can lead to a change in its state of motion or shape. Understanding force and its characteristics allows you to more accurately analyze mechanical systems and predict the behavior of objects under various conditions. In engineering, calculating force is critical to developing safe and efficient designs. In a legal context, the concept of force can refer to the conditions under which the actions of one party can affect another. This knowledge aids in a deeper understanding of both physical and social interactions.
- Attract — branches are drawn toward the object (default);
- Avoid — branches deviate from the object;
- None — the geometry remains unchanged.
Collide has a significant impact on branch development. It promotes the expansion and deepening of branching, which in turn has a positive effect on the overall structure and stability of the plant. With proper use of this option, you can achieve optimal growth and increased yield. Effective use of Collide allows you to activate photosynthesis processes and improve water exchange, which is key to plant health and productivity.
- Obstruct — branches collide with the geometry of a third-party mesh and grow further, bending;
- Prune — branches collide with geometry and break;
- Stop — the principle is similar to Prune, but branches do not break, but stop growing upon colliding with geometry.
The result can be refined using an additional marker, which is displayed in the viewport when certain segments are selected. This allows you to more precisely customize the content and improve its user experience.
Root physics can be configured in a similar manner, allowing them to intertwine with surrounding objects. This ensures realistic interaction of roots with the environment and improves visualization in projects related to nature or landscape design. Optimally configured roots will create the illusion of natural growth and interaction with other elements, significantly enhancing the quality of graphics and the effect of immersion in the virtual environment.
In the node window, exclamation marks may appear next to segments. Clicking them opens a window with program messages about incorrect parameters, which can affect the final result. For example, some segments may be automatically hidden if they collide with the geometry of another object.
In such situations, it is necessary to pay attention to problem areas. The necessary settings can be easily found in the Properties section, where the +/− icon will be highlighted in red. It is important to remember that error messages do not always indicate serious errors, and some of them can be ignored.
If necessary, individual branches are adjusted manually.
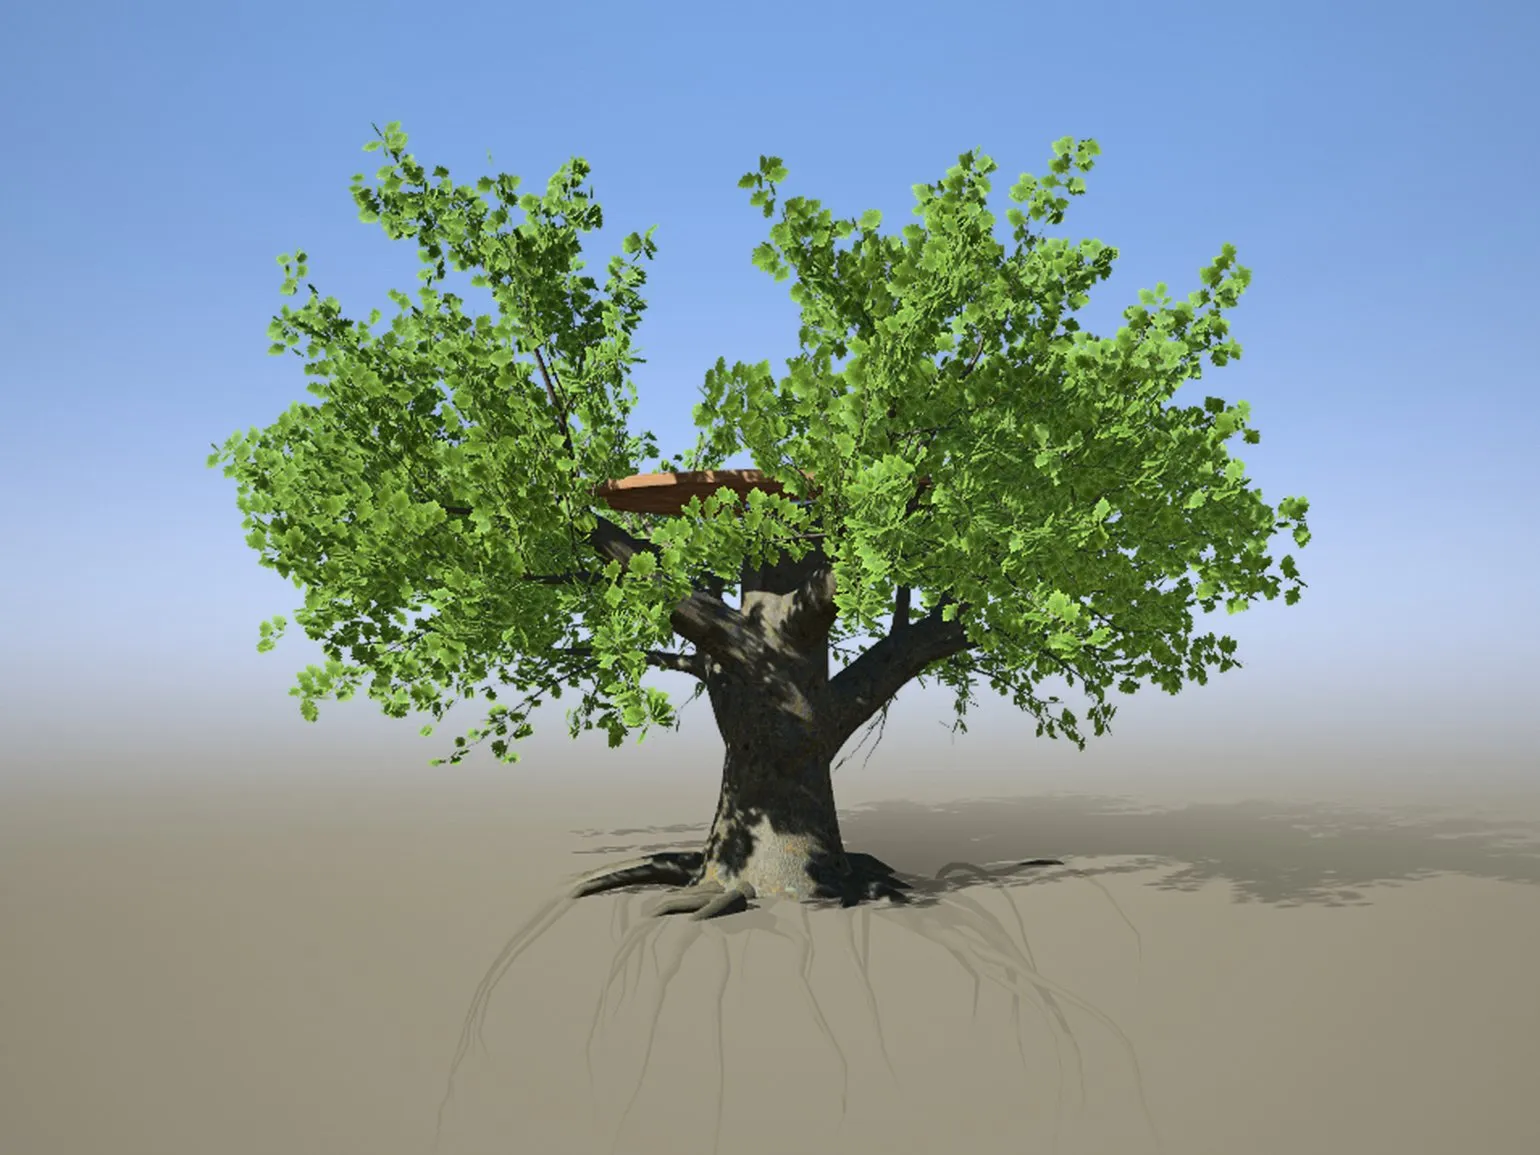
As a result, a tree was created with branches that lean under the influence of the foundation of the future house. Since this is a test version, it will not be possible to import the new model into the game. However, you can perform a simple render by pressing F9. This will allow you to visualize the model and evaluate its appearance in the context of the game environment.
In the full version of SpeedTree, you can export your projects via the File menu, selecting Export to game… or Export mesh…. In this guide, we'll cover the export process for Unreal Engine 4 and Unity to simplify the integration of your models into these game engines. Proper export will preserve the quality and detail of your trees and plants, ensuring they display correctly in your project.
Bottom Line
SpeedTree is a powerful tool for creating realistic plants. While it's not particularly difficult to learn, it does require time and patience: familiarizing yourself with all the settings and features can take several days. If the developer understands the program's basic tools and has a clear plan at the start of the project, the process will be significantly simplified. It is also important to consider how much the developer needs this software to achieve their goals.

A 3D artist at IThub Games creates high-quality 3D graphics for video games. His work involves modeling characters, objects, and environments, creating immersive and realistic game worlds. Using modern technology and software, the 3D artist develops visual elements that enhance gameplay and increase player engagement. His professional 3D design skills and attention to detail make him an essential part of the team that contributes to the success of IThub Games projects. SpeedTree is powerful software for creating realistic vegetation in 3D modeling. The program is constantly updated, allowing users to access new features, such as photogrammetry support and tools for refining scanned objects. This makes SpeedTree an indispensable tool for designers and game developers seeking to create high-quality and detailed natural elements. Each new release brings improvements, making the process of creating vegetation more intuitive and efficient. SpeedTree has a user-friendly and intuitive interface, making it easy to learn. This program significantly saves time, allowing you to create trees three times faster than with traditional 3D modeling tools. Particular attention should be paid to the parameter randomization feature, which gives trees a natural, random appearance. By mastering procedural generation, users can create multiple variations of the same tree with just one click. SpeedTree is becoming an indispensable tool for game developers and 3D designers striving to create realistic natural landscapes. Importantly, SpeedTree offers numerous options for customizing automatic tree rigging, procedural levels of detail, and collisions. Adaptive optimization and the use of Vertex Colors are also available, greatly simplifying work with vegetation in game projects. Using SpeedTree, it becomes clear that the developers truly care about their product and create it to a high standard. In my opinion, this program currently outperforms other 3D packages in creating realistic trees and vegetation.
Large studios use SpeedTree to develop large-scale projects with vast worlds that require detailed and realistic vegetation. Manually creating hectares of forest requires significant time and money. In the indie segment, the use of SpeedTree depends on the project format and its requirements, giving developers the opportunity to optimize the process of creating natural landscapes. This technology significantly reduces the time spent on flora modeling while maintaining quality and detail, which is especially important for indie developers striving to create a unique atmosphere in their games.
If the game features an open world or requires unique vegetation, SpeedTree is an excellent solution for development. In other situations, you may want to consider purchasing assets from marketplaces, which can save you time and resources.

3D artist with experience in the gaming industry, specializing in creating high-quality 3D graphics for video games. At IThub Games, I develop characters, environments, and visual effects using cutting-edge technology and software. My goal is to create unique and realistic game worlds that immerse players in captivating adventures. I strive for perfection in every detail, which allows me to make significant contributions to projects and enhance their overall appeal. SpeedTree is powerful software for creating vegetation in computer graphics. The program is constantly being developed and updated, offering users new features, such as photogrammetry support and the ability to refine scanned objects. These updates significantly expand the capabilities of designers and developers, allowing them to create more realistic and detailed natural scenes. SpeedTree is ideal for use in games, films, and visualizations, delivering high quality and performance. SpeedTree has a user-friendly and intuitive interface that is easy to learn even for beginners. This program significantly saves time, allowing you to create trees three times faster than using traditional 3D modeling. One of the key advantages is the ability to randomize parameters, giving trees a natural and chaotic appearance. By mastering procedural generation, users can quickly generate multiple variations of the same tree with just one click, making the modeling process more efficient and creative. SpeedTree is ideal for game and animation developers seeking to create realistic natural landscapes.
SpeedTree's features, such as automatic tree rig setup, procedural levels of detail and collision, adaptive optimization, and vertex color support, are also noteworthy. These features significantly simplify the process of working with vegetation in games. Using SpeedTree, it's clear that the developers truly put their heart and soul into their creation and make it as functional as possible. Today, this program demonstrates the best results in creating trees compared to any other 3D packages.
3D Generalist Profession
You will become a universal specialist who can do everything in 3D: create objects and environments, adjust textures and colors, animate models and implement them into a 3D scene. Master Houdini, Autodesk Maya, Blender, Photoshop, ZBrush, Marmoset 3D, Substance Painter, Marvelous Designer, Arnold, and Rizom UV. You'll be able to apply for work in advertising, games, or film. Pictured: work by course participant Evgeny Kuznetsov.
Find out more