Contents:
Course with employment: “Profession 3D Generalist"
Find out more
Specialist in the field of computer graphics, as well as optimization and automation of various projects. The author of educational materials and a series of Blender tutorials aimed at learning and mastering 3D modeling and visualization.
We are launching the "Checkpoint" Telegram channel, designed for aspiring developers. In our channel, you'll find useful materials, including articles on game design, software guides, and interviews with developers who have already released their own games. Subscribe to stay up-to-date with valuable tips and the latest news from the world of game development.
A year ago, Andrey presented a detailed Blender course on his YouTube channel, a program he has been using for over seven years. The training begins with the basics and is aimed at beginners, but subsequent lessons will also be useful for more experienced users, as Andrey reveals the program's hidden capabilities. This course was recorded using version 2.90.1, but the knowledge gained is relevant for both earlier versions (starting with 2.80) and the latest version 3.0.0.
In this material, we present the key points of the first lesson, which covers software installation, familiarization with the interface, and basic object manipulation. Installation is the first step to mastering the platform, and we will cover all the necessary steps in detail. We will also focus on the interface so you can easily navigate the environment. Finally, we will discuss basic object manipulation, which forms the basis for further work. This knowledge will help you confidently begin exploring more complex aspects.
A specialist in computer graphics, as well as project optimization and automation. The author of a unique series of training materials on using Blender, which allows users to effectively master the skills of 3D modeling and animation.
Installation and preliminary configuration
Blender can be downloaded from the official website blender.org or through the Steam platform. Upon first launch, the user will be offered a dialog box with basic settings, as well as the ability to import settings from previous versions for those who have already worked with Blender. This simplifies the transition to the new version and allows you to maintain your familiar workflow.
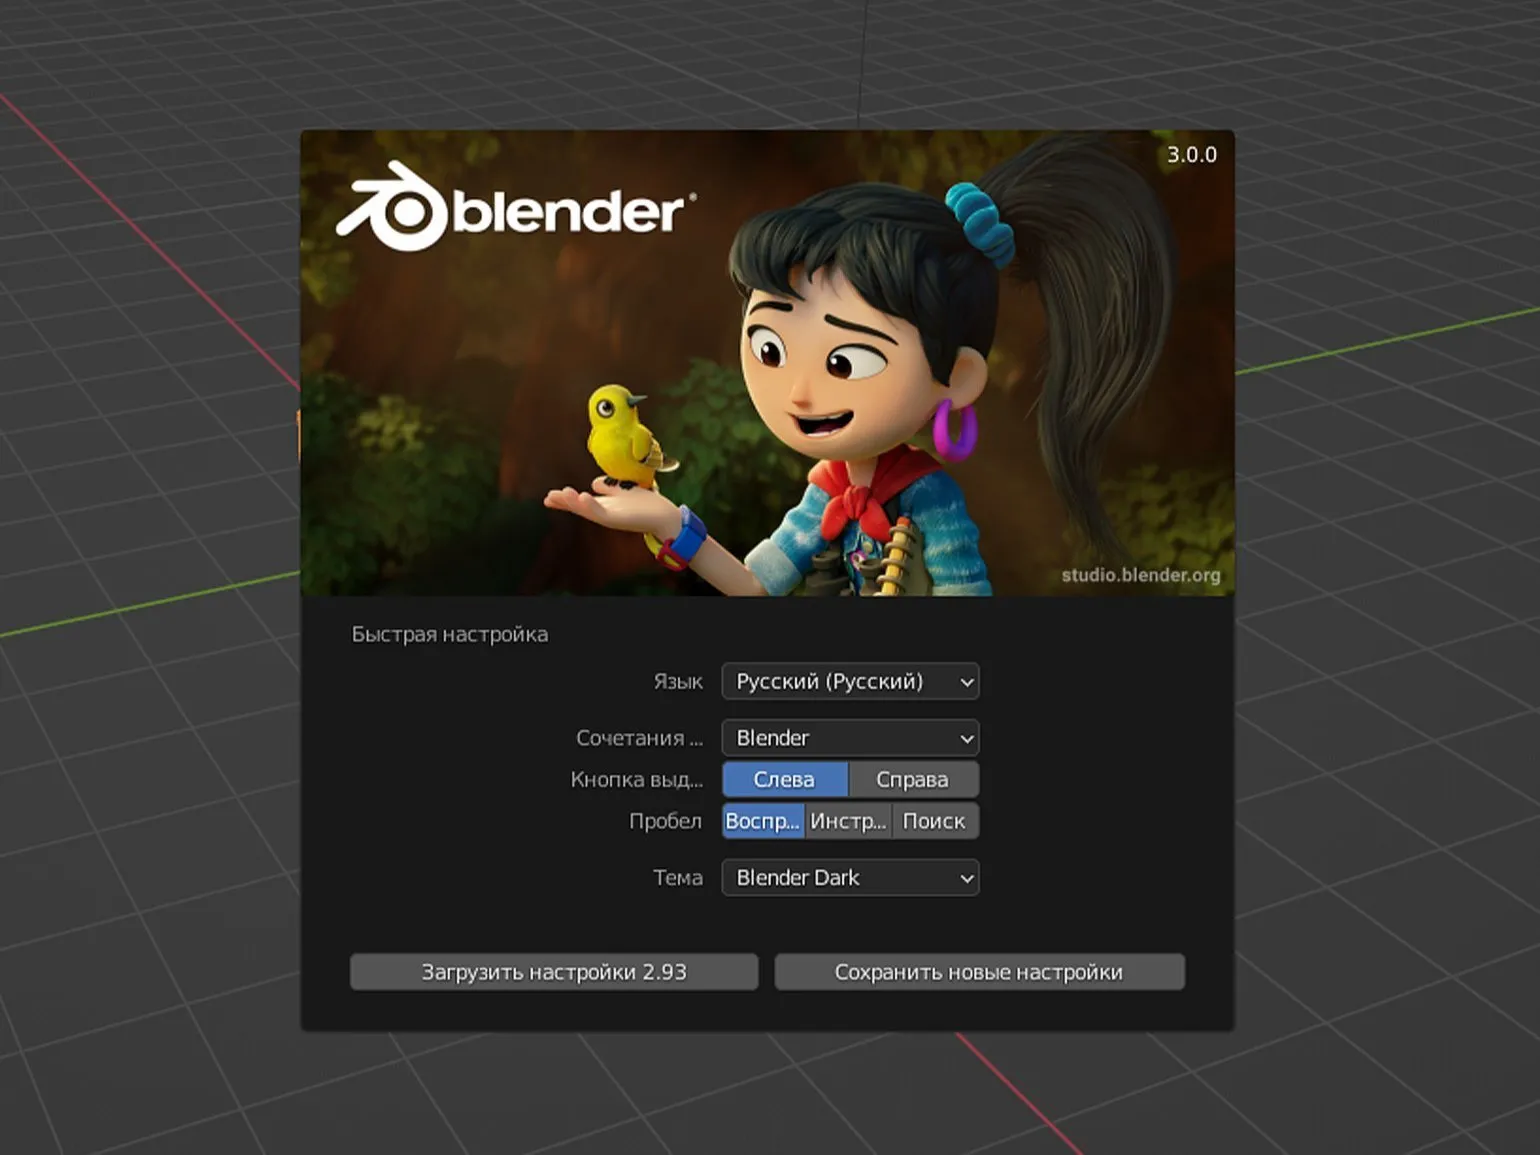
The "Select With" option refers to mouse settings that allow you to select objects and their elements. By default, the left mouse button is used for this function, but you can also configure the selection using the "Spacebar" key. It is important to note that these settings largely depend on the user's personal preferences and do not have a significant impact on the overall workflow. Choosing the appropriate selection method can improve the convenience and efficiency of completing tasks, so it is recommended to configure it to suit your needs.
Interface
After clicking beyond the loading screen, the Blender interface will open, which is presented in the form of several windows. Each window has its own function and allows users to effectively work with 3D modeling and animation. It's important to familiarize yourself with every part of the interface to get the most out of the program.
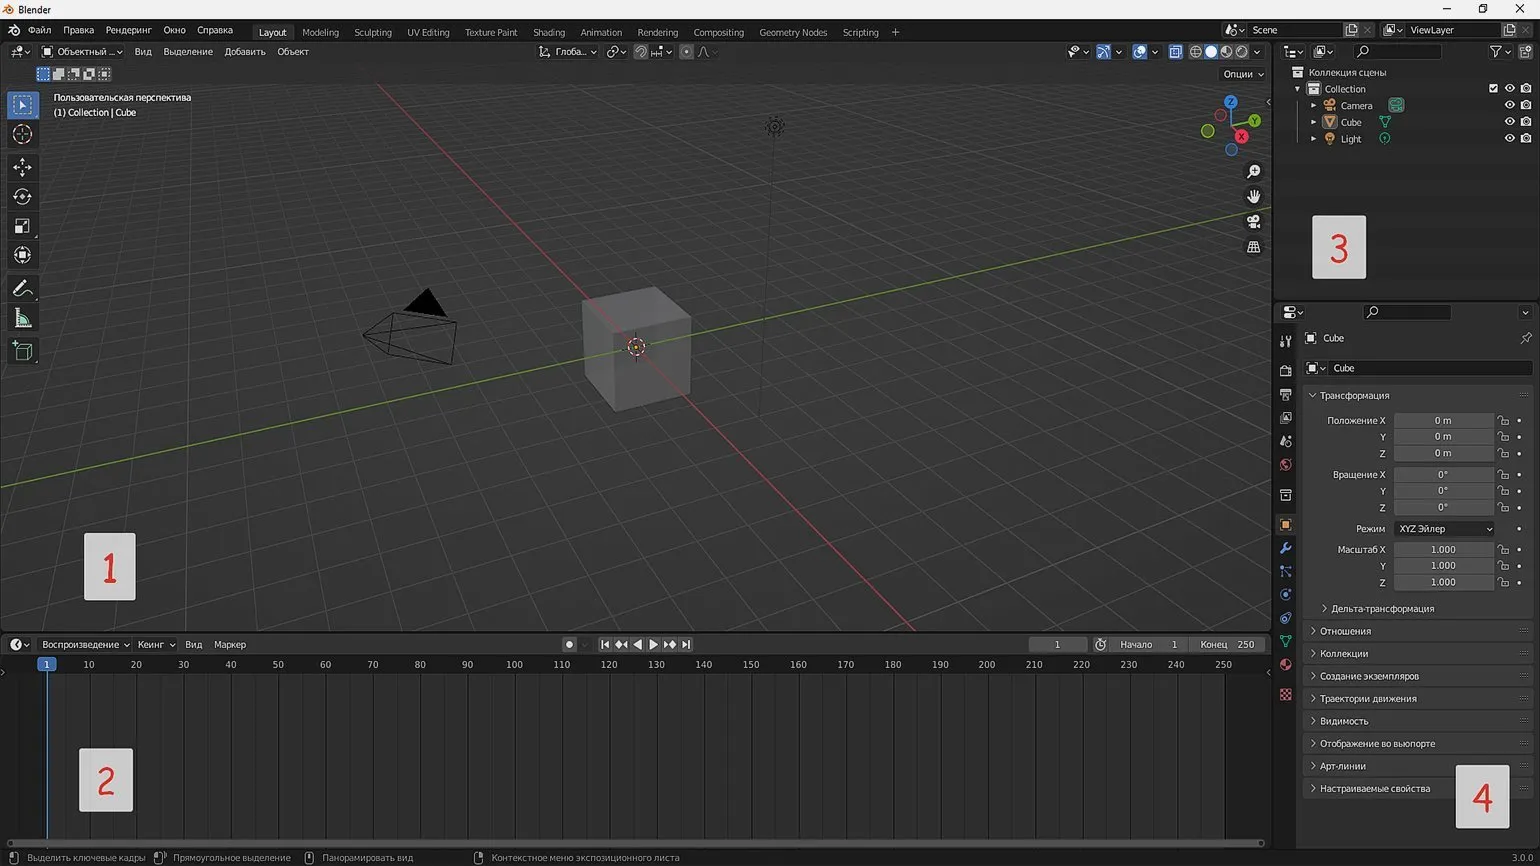
The main element of the interface is the 3D viewport window. In this window, we create and edit 3D objects, as well as set up the scene, materials, lighting, camera movement, and other important elements. The completed scene can be exported as a 3D object for use in other 3D editors or game engines. Additionally, the finished scene can be used to render still images or animations, allowing for high-quality visualization of projects.
The viewport area displays the timeline window, also known as the timeline. This window contains keyframes, which play a vital role in creating animation. The timeline allows for convenient management of animation elements and precise timing adjustments.
In the upper right corner is the project structure, which clearly displays all the objects in the scene. Objects can be organized into collections, which is especially useful when working with large-scale projects. This system simplifies sorting a large number of objects in a convenient format. Clicking on any list item selects it in the 3D viewport, which facilitates visualization and editing of objects.
The project structure includes many tabs with a variety of settings. In subsequent lessons, we will examine these settings in detail. In this lesson, we will focus on the 3D viewport and study the basic aspects of navigation in it. Proper mastery of navigation in the 3D viewport is key to effective work with a project and the creation of high-quality content.
Navigation Basics
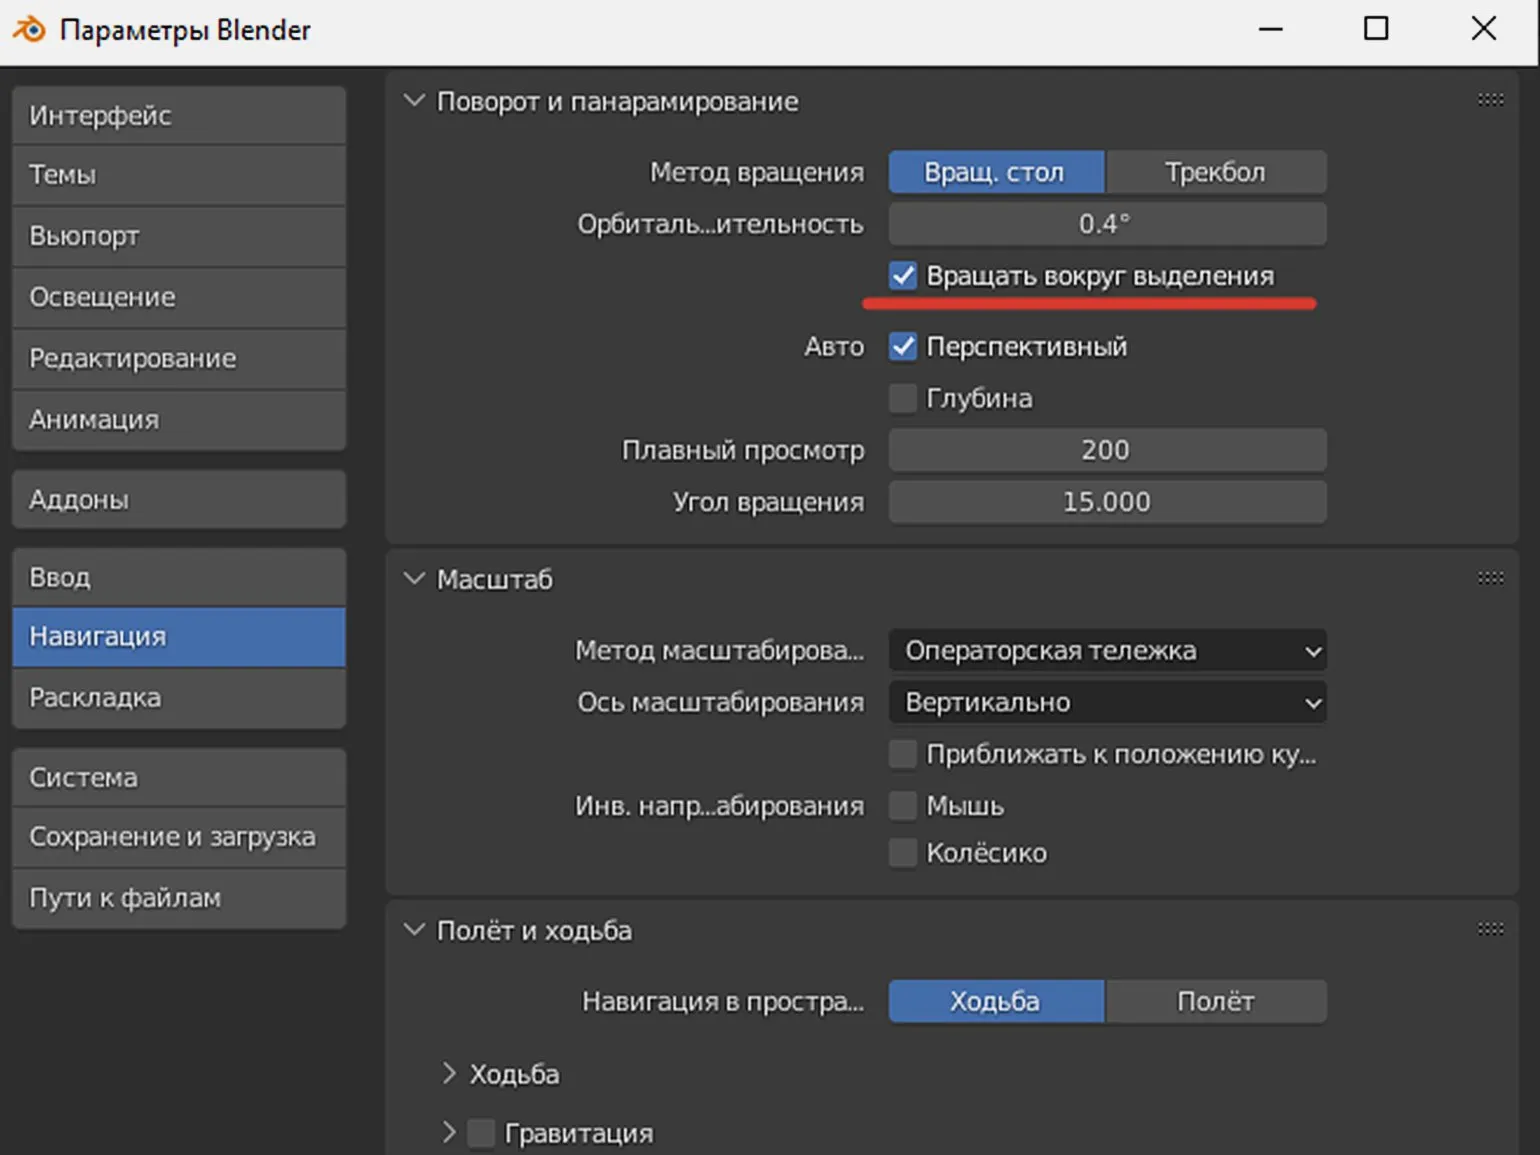
In Blender, the primary navigation tool is the mouse wheel. By holding the wheel down, we can rotate the scene. By default, rotation occurs around a fixed point in space. To set the selected object as the center of rotation, go to Edit - Preferences - Navigation and enable the Orbit Around Selection option. This will significantly simplify working with objects and improve the modeling process.
Having selected an object, we can examine it in detail from all sides. This feature also applies to other elements in the scene, such as the camera and lights.
To change the scale of an object, use the Ctrl key combination and the mouse wheel, moving the cursor up to zoom in and down to zoom out. It is also possible to change the zoom level by scrolling the mouse wheel, but in this case the zooming will be jerky, which may be less convenient.
When approaching an object in 3D space, a situation often arises where further movement becomes impossible due to reaching a limit. In such cases, the Num Del key (located on the numeric keypad) is useful. Pressing this key allows you to center the viewpoint on the selected object, significantly simplifying interaction and navigation in the scene. This functional solution is useful for improving the workflow and increasing the efficiency of modeling.
To move around the viewpoint, hold down the Shift key and scroll the mouse wheel. Drag the cursor to the right, left, up, or down to change the angle easily.
Object Management
Keyboard shortcuts are crucial in Blender because they significantly speed up tasks and increase efficiency. Without them, the workflow becomes less convenient and more labor-intensive. We recommend saving a list of hotkeys in a text file for easy reference and to remember important combinations. This will help improve your productivity and simplify the learning curve of the program.
In this section, we will cover basic object operations, starting with movement. To move an object, use the G key. Once this function is activated, the object can be moved along three axes: the X axis is marked in red, the Y axis is green, and the Z axis is blue. These three axes allow you to precisely control the object's position in 3D space.
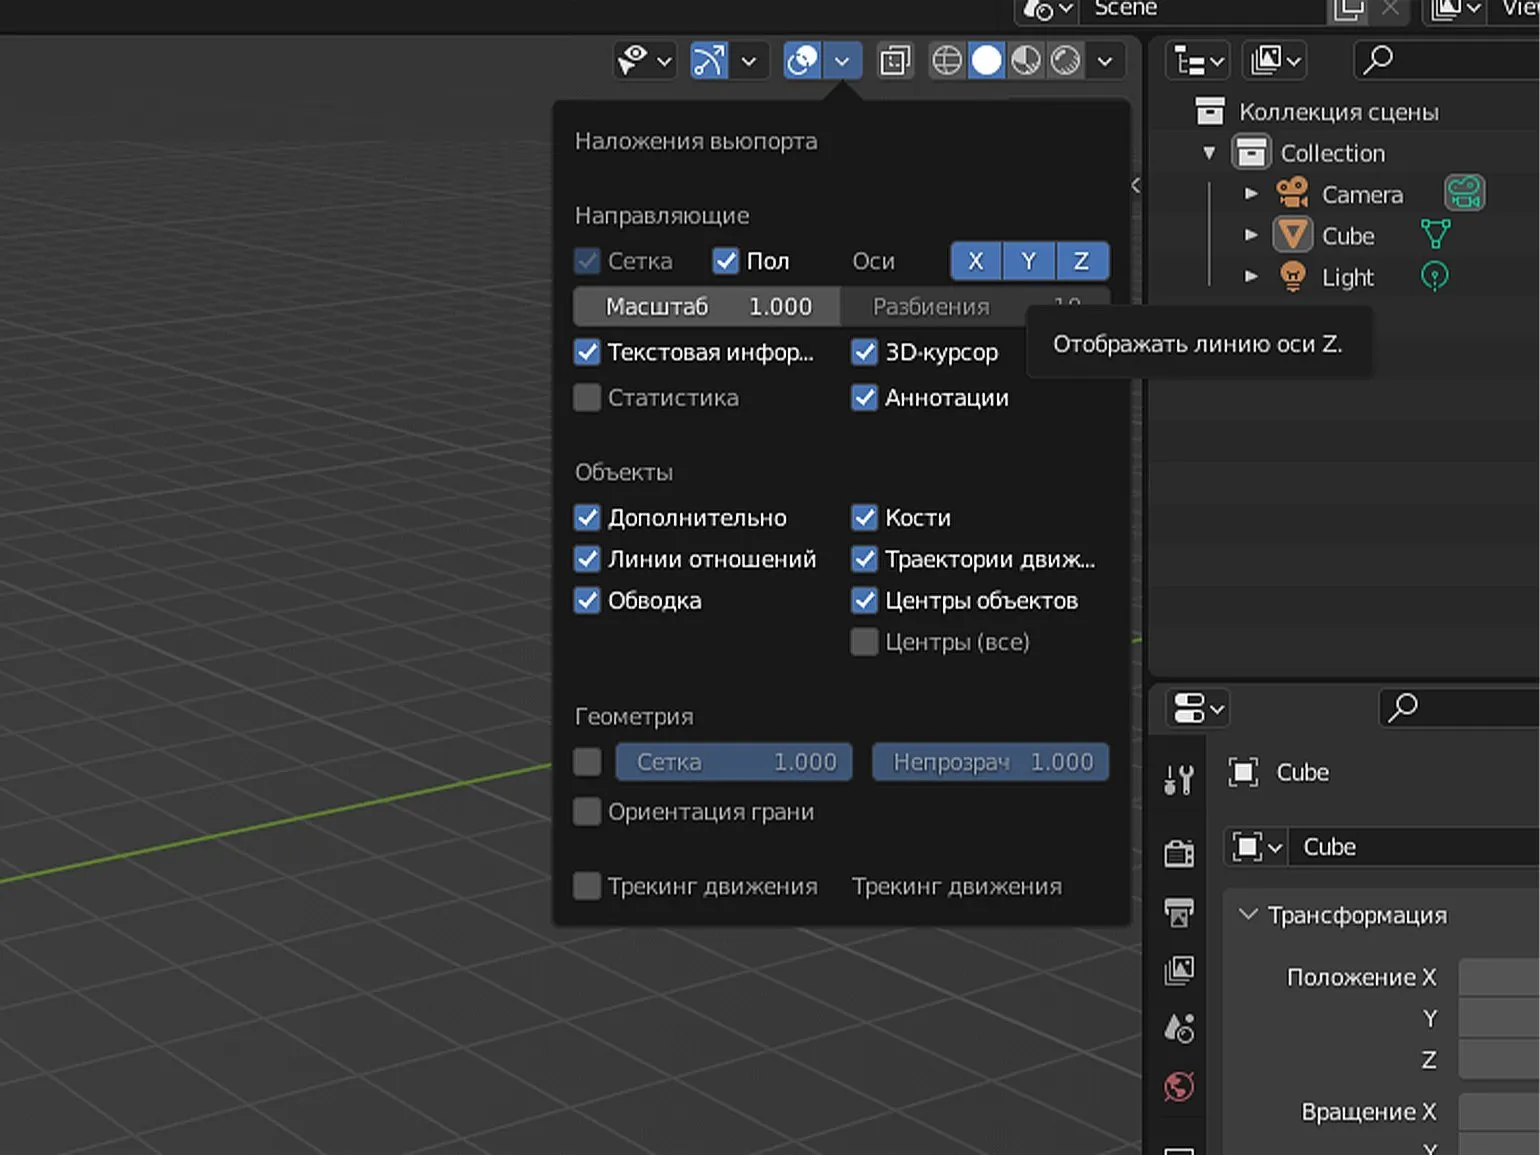
By default, the Z axis is not displayed in 3D programs. To activate it, go to the Viewport Overlays tab. This will allow you to see the Z-axis, making it easier to work with 3D models and improving the visualization of the spatial arrangement of objects. Enabling this axis will help you better navigate in space, especially when working with perspective and complex scenes.
Moving an object along a single axis in 3D applications is accomplished using the keyboard shortcuts G + X, G + Y, and G + Z. These shortcuts allow precise control of an object's position by moving it along a given axis, simplifying the modeling and editing process. Using hotkeys makes work more efficient by allowing you to quickly switch between axes.
The angle of rotation of the object is adjusted using the R key. The further the mouse cursor is from the object, the slower the rotation. By default, rotation is performed around the viewing angle axis, which corresponds to the observer's position. In addition, rotation can be limited to one of three axes using the R + X, R + Y, or R + Z key combinations. This allows for more precise control over the object's orientation in space.
To change the size of an object in 3D programs, use the S key. This method allows you to scale an object by controlling its size with the cursor. You can change the dimensions along individual axes using the keyboard shortcuts S + X to change the width, S + Y to change the height, and S + Z to change the depth.
Basic Objects in Blender
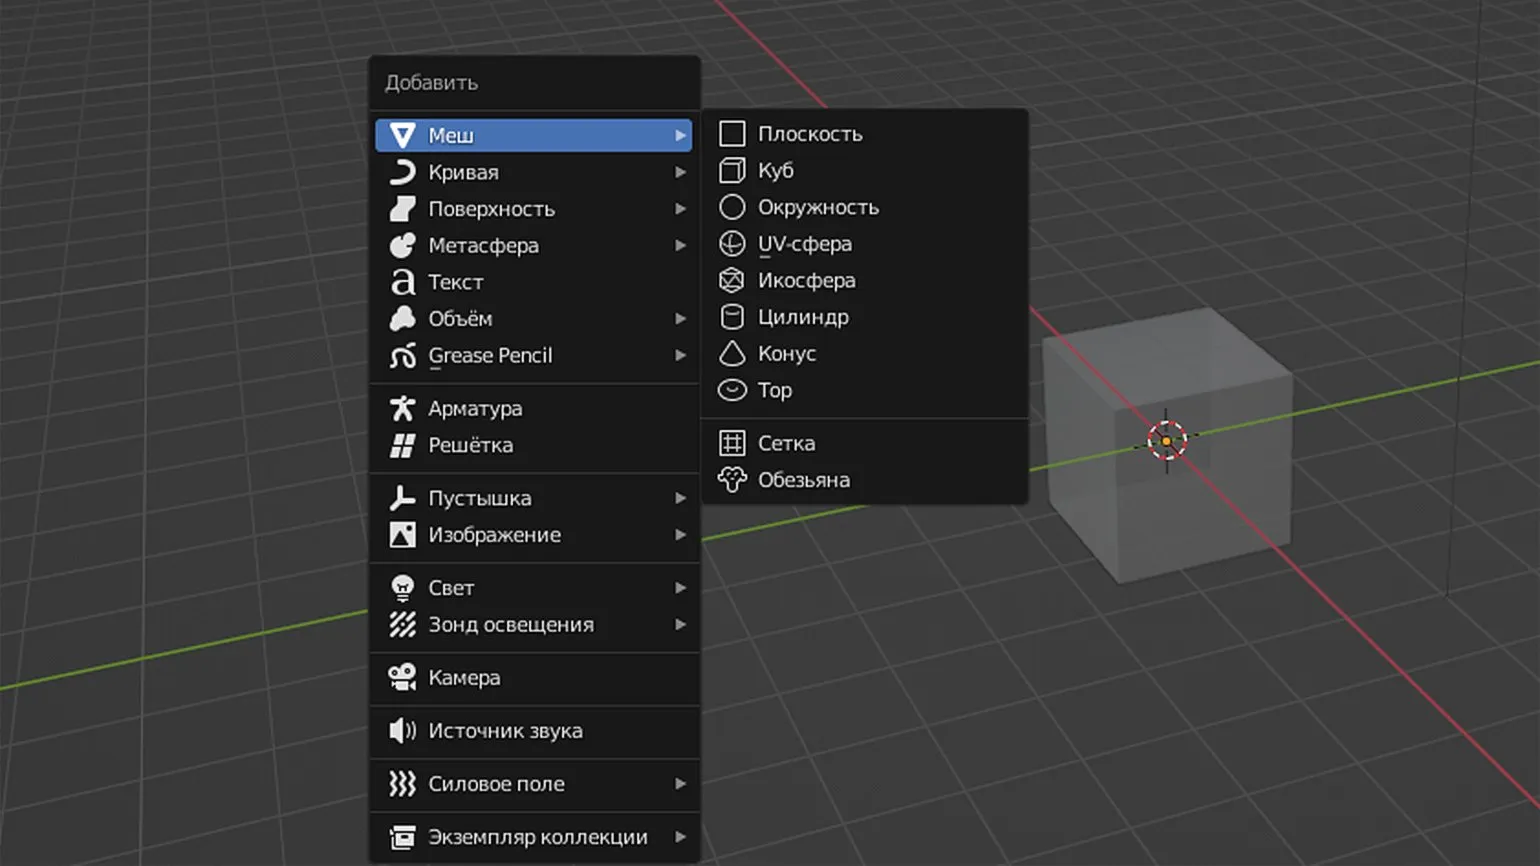
In Blender, when you open a scene, a cube—one of the basic primitives—appears by default. However, the program offers many more options for creating various geometric shapes. To access these objects, use the keyboard shortcut Shift + A, which will open a menu with a variety of objects organized by category. In this tutorial, we will focus on the Mesh tab. (Mesh), which presents geometric primitives that can be used for modeling and creating unique 3D objects.
A plane is a geometric shape consisting of four vertices, four edges, and one polygon. To visualize a plane, you need to switch from Object Mode to Edit Mode. This can be done through the menu in the upper left corner or by pressing the Tab key. To delete an object while in Object Mode, you need to select it, press the X button, and select Delete in the dialog box that appears.
A cube is a key element that we see at the beginning of a project. It serves as a basis for further development and visualization of ideas. A cube symbolizes structure and order, which is important for the successful implementation of any project.
A circle is a geometric shape consisting of all points that are an equal distance from a central point. The circle is an important object in mathematics and geometry, possessing unique properties and characteristics. It is used in a variety of fields, from engineering to art, and plays a key role in the study of shape and spatial structures. Understanding the circle and its properties helps solve problems involving areas, perimeters, and angles, and is the foundation for more complex mathematical concepts.
A UV Sphere is a three-dimensional model composed primarily of square polygons, but also includes some triangles on both bases. This shape resembles a globe and is widely used in 3D modeling and computer graphics. UV Spheres allow for efficient texturing of objects, providing a more realistic display on the surface. Using UV Spheres in projects helps create detailed and high-quality visualizations, making them an essential tool for designers and game developers.
An Ico Sphere is a geometric shape composed of triangular faces. This structure is an important element in computer graphics and 3D modeling, as it allows for the creation of complex shapes with a minimum number of polygons. The icosphere is used in a variety of applications, from visualization to gaming, due to its ability to effectively represent rounded objects. An important feature of the icosphere is its symmetry, making it ideal for use in animation and rendering.
A cylinder is a three-dimensional geometric figure characterized by two parallel bases of the same shape and size and a lateral surface connecting these bases. In mathematics, a cylinder is often used to study volume, surface area, and other parameters. Cylinders can be straight or oblique, depending on the location of the lateral surface relative to the bases. The use of cylinders is widespread in various fields, such as engineering, architecture, and physics, where they are often found in the design of pipes, tanks, and various mechanical devices.
A cone is a three-dimensional geometric figure with a circular base and tapering toward the apex. Cones are common in nature and in various fields of science and engineering. For example, they can be used in architecture, design, and manufacturing. Possessing unique properties, the cone is an important element in geometry. In mathematics, a cone can be described by its height, base radius, and volume. Understanding cones is significant in the study of three-dimensional forms and their application in real life.
A torus is a geometric figure in the form of a donut. A torus is a surface formed by rotating a circle around an axis that does not intersect the circle. In mathematics and physics, the torus is used to study various phenomena and models. This figure finds application in fields such as topology, manifold theory, and even in some aspects of theoretical physics. Due to its unique properties, the torus is also used in computer graphics and design. Understanding the structure of the torus and its characteristics is important for many scientific research and practical applications.
A grid is an object that resembles a plane, but in edit mode it becomes apparent that it is divided into cells. This structure allows for easy control of the arrangement of elements and simplifies the design process. The grid ensures precise alignment of objects and helps create harmonious compositions. Using a grid in design significantly improves the quality of visual representation and facilitates working with various graphic elements.
Monkey is a model of the head of Suzanne the monkey, which is one of the most recognizable objects in Blender after the standard cube. This model is widely used as a test object for various visualizations and experiments in 3D graphics. Suzanne the monkey serves as an excellent basis for exploring texturing, animation, and lighting in Blender, as well as for testing new software features.
When you add an object, a small menu with basic parameters appears in the lower left corner. Each shape has its own unique settings. As an example, consider the configuration of a cylinder.
Vertices are the number of points where lines intersect or connect in a graph. Each vertex represents a unique entity that can have its own characteristics and properties. In the context of graphs and networks, vertices play a key role, as they serve as nodal points for connecting with other elements. Optimizing vertex management is an important aspect of graph processing algorithms, which is especially relevant in areas such as computer networks, social media, and data analysis. A proper understanding of vertices and their interactions allows for improved computational efficiency and analyzed models.
The radius of a cylinder is the distance from the center of the cylinder's base to its edge. The radius is a key parameter determining the shape and size of a cylinder and influencing its volume and surface area. Correctly calculating the radius is important for various applications in engineering and architecture. To obtain accurate results in calculations, it is necessary to consider the units of measurement for the radius to ensure compatibility with other cylinder parameters, such as height and diameter.
Depth is a measurement that denotes the distance from a surface to the lowest point of an object or space. In the context of height, depth plays an important role in various fields, including architecture, surveying, and water exploration. Understanding depth allows for a more accurate assessment of the volume of objects and their location in space. Correct use of the term "depth" in various contexts helps improve the understanding and analysis of data, which, in turn, facilitates more effective decision making.
Cap Fill Type is a method for filling the bottom of graphical elements. It can be represented as a single polygon, an array of triangles, or may contain no fill at all. Correctly choosing a cap fill type is important for data visualization and enriching the graphical presentation. Optimal use of Cap Fill Type improves information comprehension and enhances the aesthetic appeal of graphs and charts.
Location is a set of coordinates that defines an object's location in space. Understanding position is key in various fields, such as geography, navigation, and cartography. Accurate coordinates allow for efficient location identification, which is especially important for logistics, transportation, and GPS technologies.
Rotation is a value that determines the angle by which an object rotates around its axis. In the context of geometry and physics, rotation plays a key role, as it affects the position and orientation of objects in space. A proper understanding of the rotation angle is necessary for solving various problems related to the movement and transformation of objects. It is important to note that the rotation angle can be measured in degrees or radians, depending on the context.
The parameters tab is available only once. After performing any actions on an object in the scene, the menu disappears and cannot be accessed again. However, you can always modify a shape in edit mode or delete it and re-add it, specifying the necessary settings.
In the second part of our guide, we'll continue our exploration of Blender and dive into the fundamentals of modeling. You'll learn key concepts and techniques that will enable you to create 3D models. We'll discuss the tools and techniques necessary for successful modeling, and provide practical tips for optimizing your workflow in Blender. This will help you develop the skills and confidence to create high-quality 3D content.
Explore other materials in this series.
- Blender Tutorials: Modeling Basics
- Blender Tutorials: Object Structure, Optimization, Python Scripts
- Blender Tutorials: Animation Basics
3D Generalist Profession
You will become a versatile specialist who can do everything in 3D: create objects and environments, adjust textures and color, animate models and integrate them into a 3D scene. You will master Houdini, Autodesk Maya, Blender, Photoshop, ZBrush, Marmoset 3D, Substance Painter, Marvelous Designer, Arnold, and Rizom UV. You can apply for a job in advertising, games, or film. Pictured: work by course participant Evgeny Kuznetsov.
Find out more