Course with employment: "3D Generalist Profession"
Learn more
A computer graphics specialist with experience in project optimization and automation. The author of a Blender training series focused on developing skills in 3D modeling and animation. I offer professional services in creating visual content and improving the efficiency of workflows.
A year ago, Andrey released an extensive course on Blender on his YouTube channel, with which he has been working for over seven years. The tutorial starts with the basics, aimed at beginners, but subsequent lessons will be of interest to experienced users as well, as Andrey explores the program's hidden features. This material was recorded using Blender 2.90.1, but the knowledge gained remains relevant for both earlier versions (starting with 2.80) and the latest updates (including 3.0.0).
In this text, we present the key points of the fifth video lesson, dedicated to the basics of animation using keyframes, drivers, and modifiers in Blender. The lessons in the previous stages cover important topics such as object structure, optimization, and randomization, which are also implemented using Blender tools and Python scripts. You can find detailed information at the link.
A computer graphics specialist with experience in project optimization and automation. Author of an educational program and a series of lessons on working in Blender, aimed at developing user skills and improving their professional level.
Animation with Keyframes
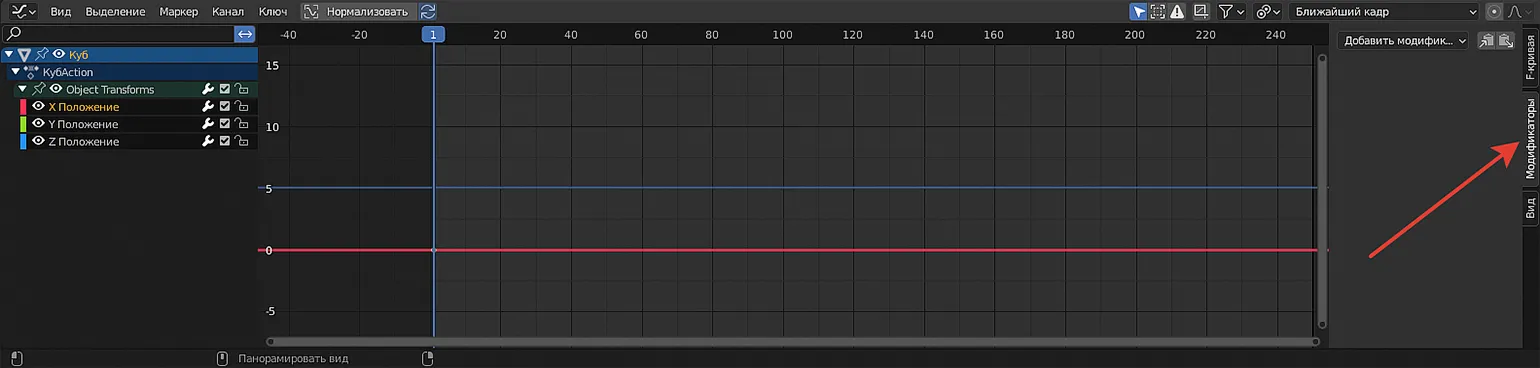
Blender offers several animation methods, among which the most common is the use of keyframes, or keyframes. By default, a timeline is displayed at the bottom of the program interface. This timeline allows you to fix various object parameters using keyframes. This feature allows you to precisely control changes in the animation, making the animation creation process more flexible and efficient. Using keyframes, you can easily set the initial and final states of objects, which is the basis for creating dynamic and expressive animations.
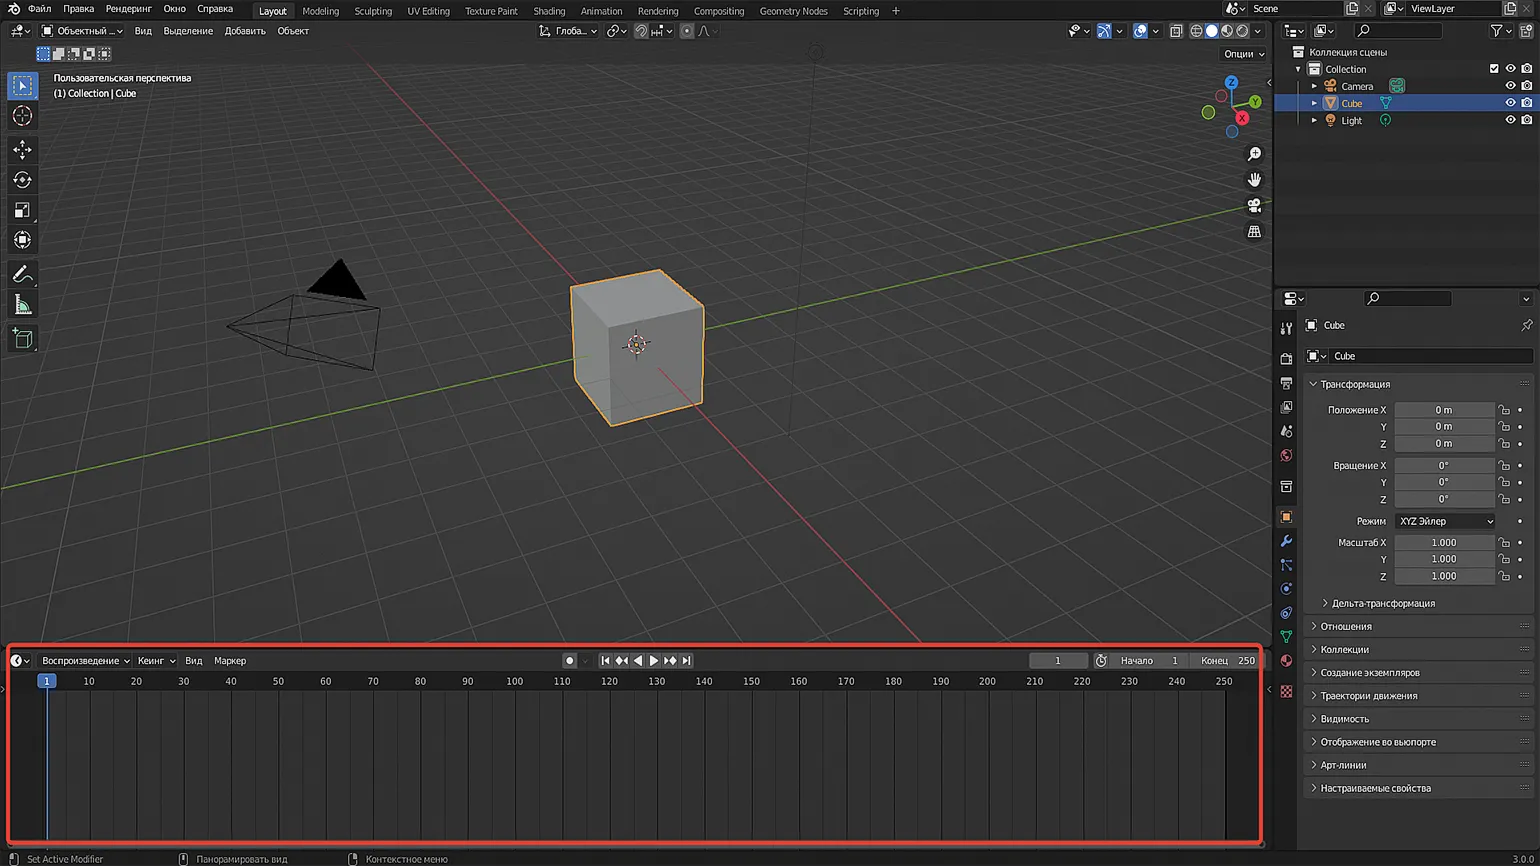
Let's lock the cube's position at frame one. Select the object and press I to open the keyframe menu, then choose Location. A keyframe will appear in the timeline at 0, 0, 0. This will save the initial position of the cube for further animation.
Let's go to frame 50 and move the cube to the side. Then press the I key again and select Location to lock the object's new coordinates. After that, play the animation in the timeline using the Space key and watch the cube move. The program automatically calculates the object's movement between two set keyframes.
The movement is smooth because Bezier curve interpolation is used by default when adding keyframes. This can be visually observed in the Graph Editor, which allows you to customize the animation and control its smoothness.
The Graph Editor is a tool similar to the Timeline, but with more detailed information about keyframes and their interpolation. In this editor, users can see how the curve is displayed on the graph, allowing them to fine-tune animation and control the dynamics of object movement. With a detailed graph view, users can easily make changes and optimize animation processes, making editing more intuitive and efficient.

In this context, it's worth noting that the animation uses a Bezier curve as its default interpolation mode. This means the object starts off moving slowly, then accelerates, and finally slows down again. For a more visual representation, we can set the Pivot Point to Individual Centers and increase the keyframe width using the S key. This change will affect the graph and, consequently, the distribution of the object's speed between keyframes. These settings provide an opportunity for experimentation and further optimization of the animation.
Let's study the various interpolation modes. A full list is available by pressing the T key.
Linear motion is characterized by uniform movement of an object without changes in speed, such as deceleration or acceleration. This mode is optimal for animation-related tasks, such as simulating the Earth's rotation around its axis. Linear motion provides predictability and stability in animation, making it an ideal choice for visualizing processes that require clear and continuous dynamics.
Constant is a mode in which there is no intermediate value between frames. It is ideal for creating stop-motion animation, allowing you to achieve clarity and sharpness in each frame. Using the "Constant" mode Provides stability in animation, making it a preferred choice for projects where detailed elaboration of individual elements is important.
Let's explore the modes presented in the Dynamic Effects category. These modes allow users to create unique visual effects, adding dynamism and interactivity to content. Dynamic effects can significantly improve the user experience, attracting attention and maintaining interest. Each mode offers a variety of customization options, allowing you to tailor visual elements to the specific needs of the project. Considering these modes will help you choose the optimal solutions for creating an attractive and modern design.
Bounce is a physical effect characterized by the damped bounce of an object after it has fallen. This process is caused by the object's interaction with the surface it falls on, resulting in a partial recovery of its energy. In the context of physics and animation, bounces play an important role, as they help create realistic movement and dynamics. The bounce effect can be applied in a variety of fields, including games, animation, and modeling, to add visual appeal and naturalness to the movement of objects.
Elastic is an effect reminiscent of a taut string that returns to its original state when released. This effect is used in various fields, including animation and web design, to create smooth and natural transitions. Elastic animations add dynamism to interfaces, making them more engaging and intuitive for users. The elastic effect helps draw attention to important elements and improve the overall perception of interaction with the content.
Back is a programming technique in which an object moves slightly beyond a given point and then returns back to it. This approach is often used to create visual effects and animations, providing a smooth transition and dynamic user experience. This can improve user experience and add impact to the interface of an application or website.
To animate various parameters, such as rotation, you need to set the initial rotation angle of the object. After that, activate the menu with the hotkey I and select the Rotation option. Repeat this process for another frame to create a smooth animation.
The keyframe menu doesn't need to be open in the viewport. You can simply hover over the desired parameter in the Transform section and change its value if necessary. Then press the I key. The parameter will change to yellow, indicating that the changes have been successfully saved in the keyframe. This allows you to effectively manage animation and control key parameters without unnecessary actions, improving your workflow.
Keyframe animation can be applied not only to standard object parameters such as position, rotation, and scale, but also to material settings, modifiers, and other software tools. This allows for more complex and expressive animations, expanding the creative possibilities of developers and animators. Using keyframes for various parameters provides flexibility in animation creation and helps achieve the desired visual effect.
Learning Blender? We recommend taking the Skillbox "3D Artist" course. In this course, you will gain skills in programs such as Autodesk Maya, Blender, Houdini, Substance Painter, and Photoshop, from beginner to professional level. This course provides a deep dive into 3D modeling, texturing, and rendering, enabling you to create high-quality work and advance your career in the computer graphics industry.
Animation with Drivers
Drivers in Blender allow you to establish dependencies between the parameters of different objects. This functionality helps automate animation and improve your workflow. In the next section, we'll look at the practical application of drivers to optimize animation and control parameters in Blender.
Delete the previous object and create a new cube, along with the Plain Axes object we worked with in the second lesson. Move the Plain Axes object sideways along the X axis using the G + X command. Then, select the cube and, right-clicking on one of the three Rotation parameters in the Transform panel, select Add Driver. This will allow us to control the cube's rotation using a dummy, which simplifies the animation and makes it more flexible.
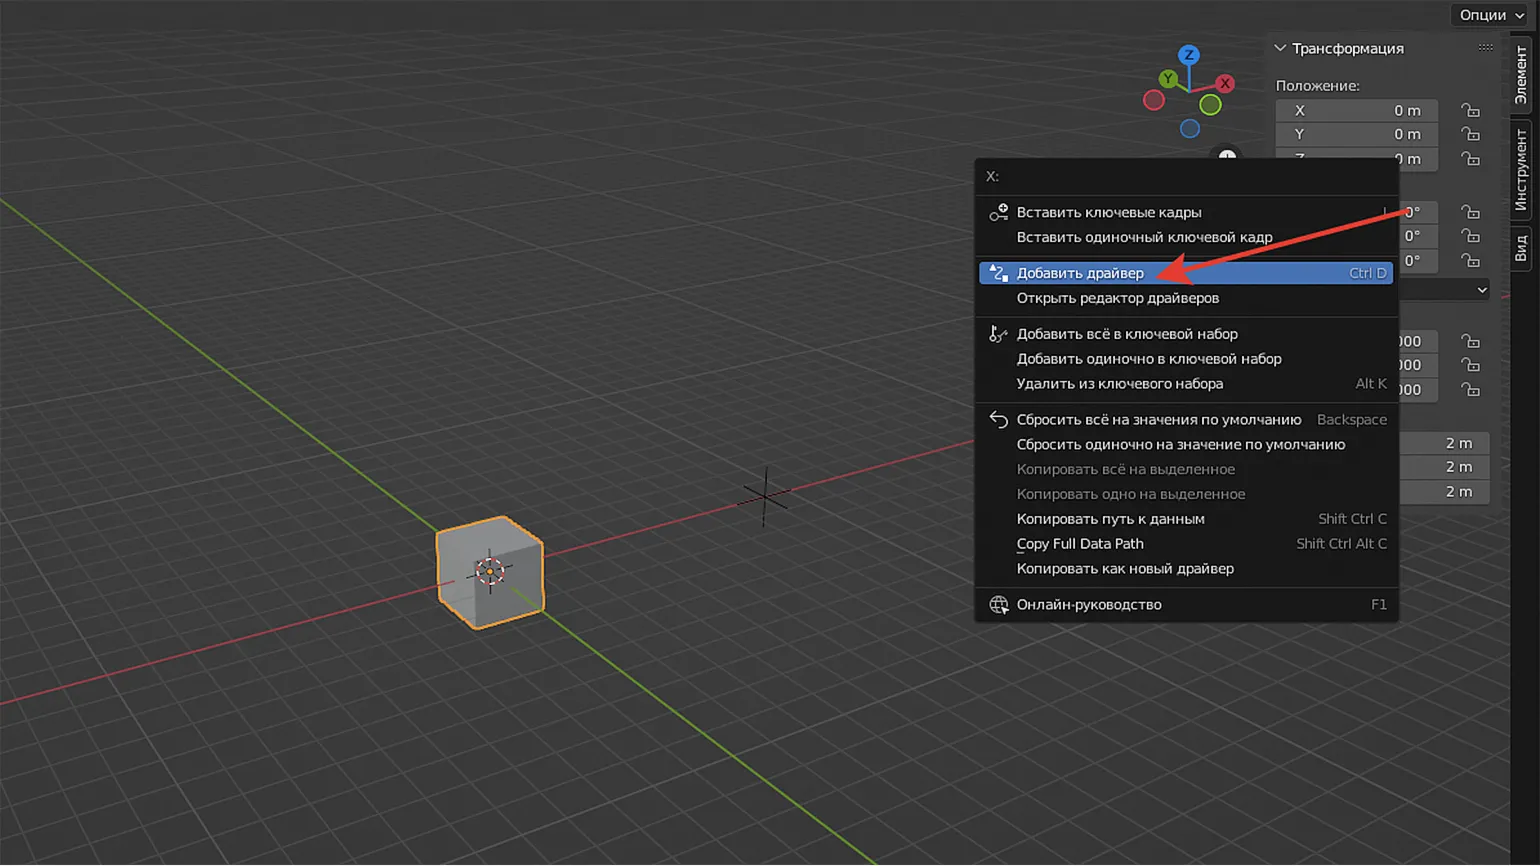
When opening the driver settings window, you should ignore the pop-up warning. Drivers support single-line Python expressions, but their functionality is significantly limited compared to full-fledged scripting. In some cases, using drivers can lead to unstable operation. For example, animated objects controlled by drivers may remain static during rendering or move differently than when the animation plays in the viewport. Despite this, drivers are a convenient tool for performing simple operations and can significantly simplify your workflow.
A note is an important element used to supplement or clarify information in the text. In the context of various documents, articles, and publications, notes help the reader better understand the content by providing additional explanations, references, or clarification of terms. Notes can be placed at the bottom of the page or at the end of the document, depending on the formatting style. Proper use of annotations improves the readability of text and increases its informativeness, which is especially important for SEO optimization. They can include keywords that can improve the visibility of material in search engines. Thus, annotations not only enrich the content but also contribute to its online promotion.
Python functionality in drivers is limited to the built-in methods of the language itself and a few imported modules, such as math, mathutils, and bpy. For users familiar with Python, the expressions we create are lambda functions with the appropriate features. For a full list of available classes and methods, you can access the Python Console using autocomplete in the bpy.app.driver_namespace dictionary, as shown in the third lesson. Furthermore, additional functions can be added to this dictionary using Python scripts, expanding the capabilities of working with drivers.
Drivers have a parameter called Type, which determines the method for calculating the final value. In this lesson, we will take a closer look at the Scripted Expression type. This type allows you to use scripts to define values, which gives users greater flexibility and customization. Script expressions can include various mathematical operations, logical conditions, and even calls to other functions, which makes them a powerful tool for working with drivers.

Let's create a variable for the cube, selecting Empty as the object. In the (x) field, change the name from "variable" (var in English) to empty. In the expression (Expression), also replace var with empty. This will allow you to set the parameters more precisely and simplify working with the object in the future.
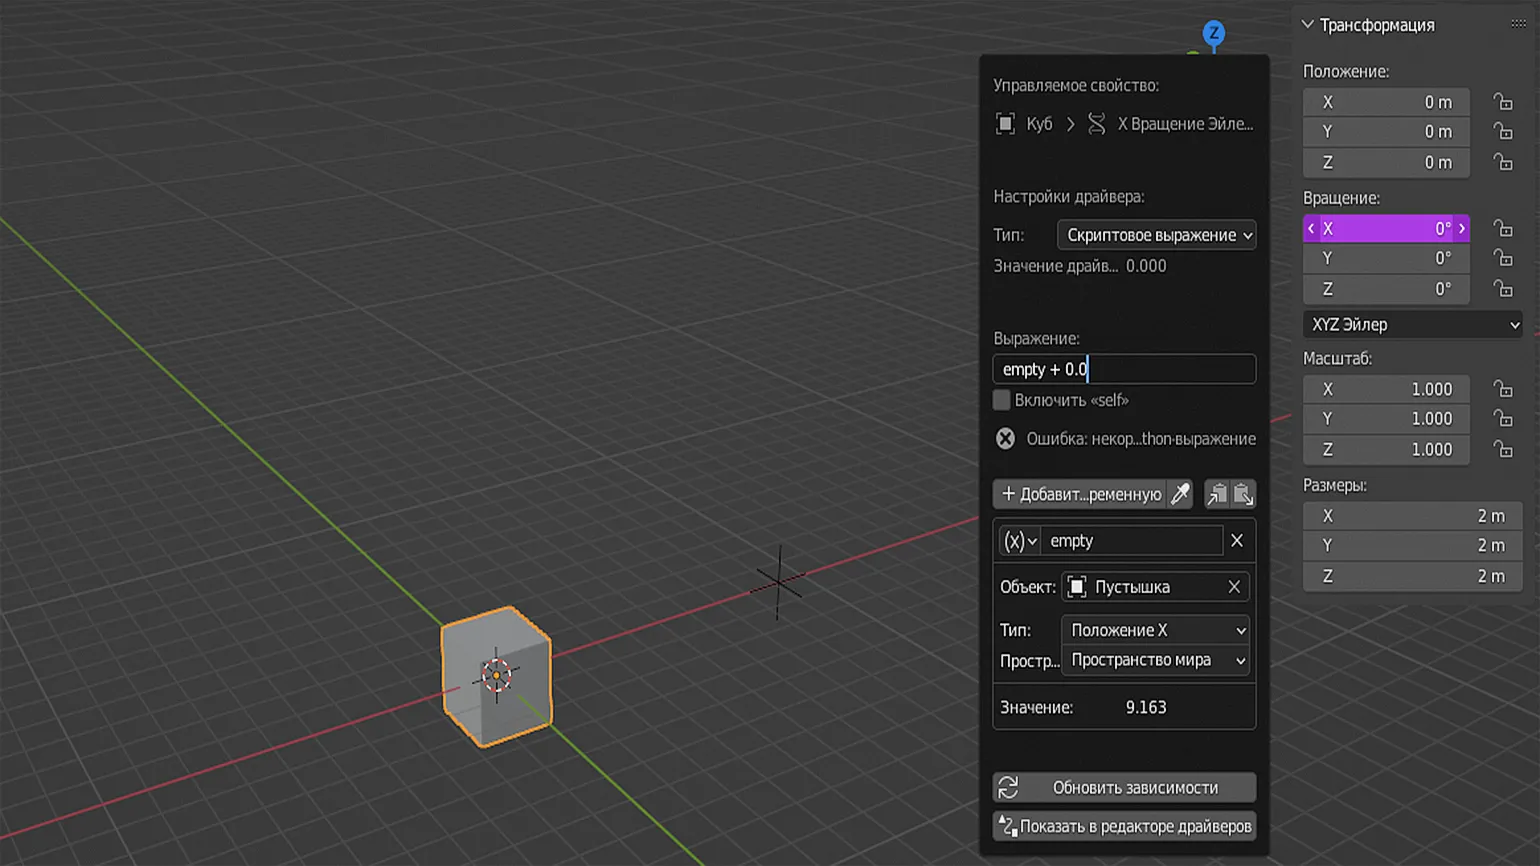
In the Type section, we specify which dummy parameter will be used as a driver for rotating the cube. Select X Location, which means the cube's rotation will depend on the empty's position along the X axis. Now, if you move the empty along this axis, the cube will begin to rotate. This allows you to create a dynamic animation, where the movement of the dummy directly affects the behavior of the cube, which opens up possibilities for more complex animation scenarios.
You can use small formulas, known in drivers as expressions, to create animations. To make changes, return to the menu by right-clicking the modified parameter and selecting Edit Driver. In the Expression field, multiply the empty variable by 2 and press Enter. This approach allows for efficient animation management and improves control over parameters as you work.
The asterisk (*) is used to denote a multiplication operation. After pressing Enter, moving the empty along the X axis doubles the cube's rotation speed. This allows for more dynamic interaction with the object, which can be useful in various graphics and animation applications.
We continue our experiment with duplicating the cube. Use Shift + D to copy the object, then select the new cube and move it slightly to the side. Switch to Edit Driver mode and enter the following in the Expression field:
The second cube will rotate four times faster, which is noticeable compared to the first cube. This significantly increases the dynamics of its movement, which can draw more attention to the visual effects. The rapid rotation of the second cube creates a sense of dynamism and energy, which makes it more expressive in the context of the performance.
This method is ideal for animating mechanisms, gears, and interdependent structures. During the process, it is important to regularly check how the final result is displayed in the renderer and during export. It is recommended to avoid complex animation systems, as the use of drivers does not provide a full guarantee of correct animation playback, even for simple operations. Animation optimization and thorough testing will help achieve a stable result.
Note: This text is intended to improve the SEO optimization of the content.
A note plays an important role in presenting information, allowing the reader to better understand the context and meaning of the presented material. It can contain clarifications, additional information, or links to sources, which makes the text more informative and useful. Using notes helps structure the content and improves its comprehension, which is especially important for sites aimed at attracting an audience through search engines. Proper formatting and placement of notes contributes to the quality of your content, which in turn can positively impact its ranking in search engines.
It's important to understand that you can't import Python modules in an Expression. For example, theoretically, you could set a random number to rotate multiple cubes, as in lesson three, using the expression empty * 2 * random.randint(0, 100) for the first cube. However, in practice, the driver doesn't recognize either the random module or the randint method. Therefore, using random numbers is only possible within the Python context, not in expressions. This limitation should be kept in mind when developing scripts to avoid errors and misunderstandings.
Blender has expressions that allow you to animate objects without the need for other objects. First, let's delete the first cube's variable and the expression itself. Animation is a change in parameters over time, where the parameter value can change on each frame. If you include the word frame in the Expression, the driver will set the parameter value to the current frame. This happens because frame in Blender is a keyword that denotes the current frame number. Using such expressions allows you to create dynamic animations and increases the efficiency of working with animation in Blender.
Rewriting your text with an SEO focus can improve its visibility in search engines. It's important to consider keywords that are relevant to the topic and make the text more informative.
Your goal is to create high-quality content that will be useful to readers and meet their needs. This includes a clear structure, the use of headings and subheadings, and the presence of internal and external links.
In addition, it's important to optimize meta tags, such as the page title and description, as they play a key role in attracting traffic. Make sure your text is easy to read, logically structured, and not overloaded with complex terms.
Optimizing images and using alt attributes will also help improve SEO. Regularly updating your content and adding new materials will increase its relevance.
Focus on creating valuable content that answers your target audience's questions. This will increase the time users spend on the page and reduce the bounce rate.
It's important to keep the mobile version of your site in mind, as many users prefer to use smartphones to search for information. Responsive design will help improve the user experience and, accordingly, improve your search engine rankings.
So, create high-quality and useful content optimized for SEO to attract more visitors to your site and increase its visibility online.
When the driver is activated, there is no need to go to the Edit driver menu to change the expression. Simply left-click on the parameter you want to change in the Transform tab and enter the new expression directly there. This simplifies the editing process and increases the efficiency of working with drivers.
The cube rotates at high speed - on frame 9, it rotates 516°. This happens because the rotation parameter is measured in radians, not degrees. To convert radians to degrees, you need to use the appropriate mathematical expression.
In this context, pi is an important keyword, denoting the mathematical constant π (approximately 3.14159). When you press Enter, we see the cube rotate 9° on the screen. If you want to speed up the animation, you can multiply the formula by the desired factor; for example, take the first part of the expression in parentheses and multiply it by 20. This way, we can control the speed of the animation and achieve the desired visual effect.
The cube will begin rotating at a rate of 20° per frame, and on the ninth frame, it will complete a 180° rotation. To slow down the rotation, you need to decrease the speed value.
You can also use mathematical expressions with sine (sin), cosine (cos), tangent (tan), arctangent (atan), and other trigonometric functions. As an example, consider the following expression:
The sine function on the graph represents a wave. As it does, the cube begins to rotate from side to side, creating a dynamic effect. This movement visually demonstrates how sine functions can affect objects in space. The importance of understanding these mathematical concepts lies in their wide application in various fields such as physics, engineering, and computer graphics.
To reduce the amplitude, you can divide the value by, for example, 20. This will help achieve more stable results and improve performance. Dividing by 20 reduces oscillations and makes the data more manageable.
In this case, the cube will wiggle slightly.
Basic operations are ideal for implementing background events, such as clouds moving across the sky or grass swaying. Simply attach a driver to an object, and it will begin to move on its own. This approach eliminates the need for keyframes, significantly simplifying the animation process and increasing the efficiency of working with graphics.
To remove a driver from an object, right-click on the modified parameter and select Delete Drivers. This process will effectively remove unnecessary drivers, ensuring optimized system performance.
The Skillbox "3D Artist" course provides a unique opportunity to master 3D modeling in one year. During the course, you will create more than 20 practical projects that will significantly enrich your portfolio. After mastering this course, you will gain a sought-after profession that opens doors in the film and gaming industries. Join us and begin your path to a successful career in the world of 3D graphics.
Animation with Modifiers
Modifiers in the Graph Editor are a powerful tool for creating animation. They allow you to control various animation parameters, adding flexibility and precision to your work. In this context, it is important to understand how to correctly use modifiers to achieve the desired effect. Let's look at the main aspects of working with them and their impact on the final animation.
Go to the beginning of the timeline. In the Transform panel, right-click on the Location parameter along the X axis and select Insert Keyframes. This process will allow you to lock the current position of the object on the timeline, which is an essential step for animation.
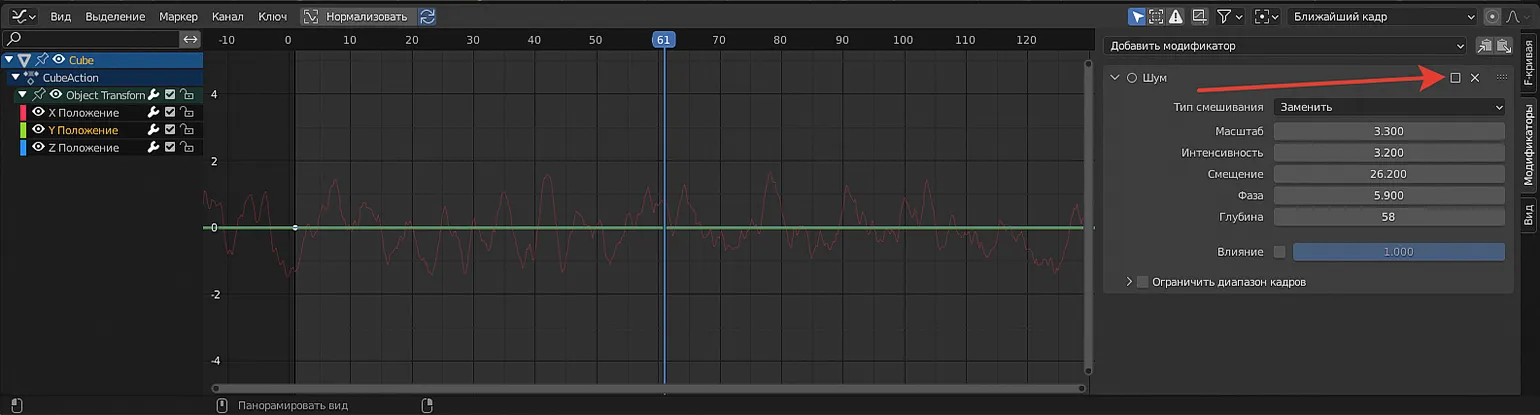
Now go to the Object Transforms tab, which is located on the left side of the Graph Editor. Select the X Location option and press the N key. A panel with the Modifiers tab will open on the right, where you can adjust the necessary object transformation parameters.
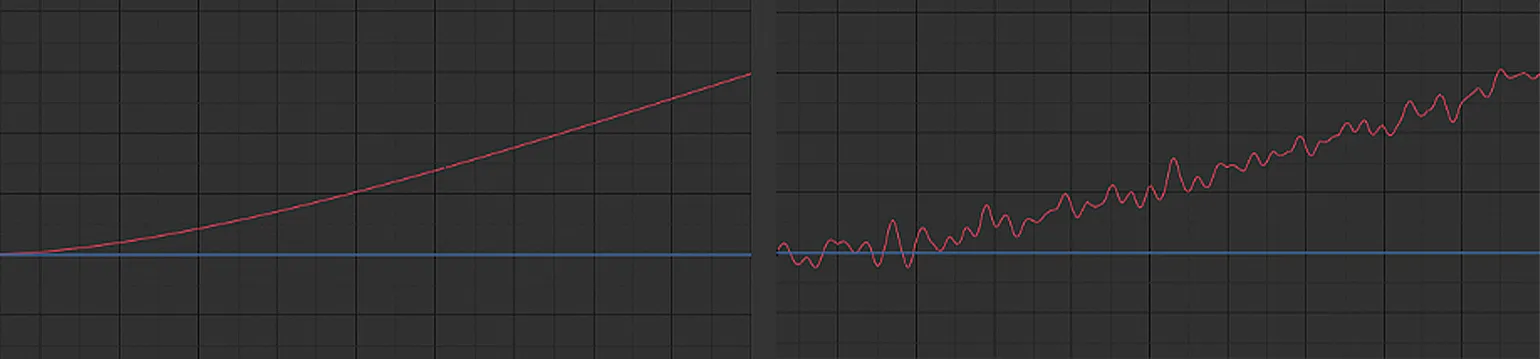
In the «Add modifier» list, select «Noise». This modifier changes the object's position along the X axis independently of keyframes, while still allowing you to edit this position using the keyframe graph. After adding the modifier, the overall trajectory of the graph remains unchanged, but it is the modifier that sets the precise position of the object based on the set keyframes. Thus, using the Noise modifier Allows you to achieve more dynamic and interesting movement of objects in animation, while maintaining control over their movement.
After applying the Noise effect, a set of modifier parameters will appear on the toolbar. Let's take a closer look.
Scale determines the speed of an object's movement along a selected axis. In this context, we are talking about movement along the X-axis. Setting the scale correctly allows you to control the dynamics of movement, which is important for creating smooth animations and realistic effects in 3D modeling and animation. Understanding how scale works helps optimize visual elements and improve user experience.
Strength represents the amplitude with which an object moves along a given axis. This concept is important for understanding the dynamics of movement and the physical processes involving objects. The higher the intensity, the greater the amplitude of oscillations or displacements, which can affect various aspects, such as the force of impact on the environment and the stability of the system. For a more in-depth analysis of intensity, it is necessary to also consider other parameters, such as the speed and direction of movement.
Offset represents a shift of the noise envelope to the left or right. This is an important parameter that allows you to adjust the temporal characteristics of the audio signal. Proper use of bias helps achieve the desired sound in audio production and improves the quality of the recording. Understanding the principle of bias can significantly impact the creation of musical compositions and sound effects.
Phase is a process that generates a random initial element, including both phase and antiphase. This mechanism is used to create a variety of states in various applications and systems. Phase can be a key element in a number of scientific and technical studies, providing unique and unpredictable results. The use of such random elements is an important aspect in the field of modeling and simulation, allowing for the exploration of various scenarios and their consequences.
Depth - creates a subtle dynamic effect, similar to a gentle shaking. This element adds visual appeal and helps improve user interaction with the content, creating a sense of volume and space. Using depth in design helps emphasize key elements and improves the overall aesthetic.
Apply the settings to the other axes. Copy the modifier with the specified parameters by clicking on the corresponding icon, which you can see in the attached screenshot.

Select another tab, such as Y Location, and paste the settings by clicking the icon next to the copy icon. The cube will now move along two axes. For demonstration, you can slightly change the Offset parameter and watch how the object moves randomly along the X and Y axes.
Similar actions can be performed with the Z axis. If you copy the settings and change the Offset parameter, the cube will begin to move randomly along all three axes. This modifier is a useful tool for creating chaotic object movement, which can be especially useful in animation and game development. Using offset parameters allows you to achieve variety in movement, adding dynamism and realism to visual scenes.
Property modifiers can be limited. To do this, disable the modifiers for the Z and Y axes by clicking the corresponding checkbox on the right. This will allow you to more precisely control the settings and avoid unwanted changes in these areas.
The X Location modifier must be left enabled. In its settings, select the "Restrict Frame Range" option and set the keyframe range within which the modifier will operate. For example, set a range from 50 to 150. To create a smooth fade at the beginning and end of the animation, use the "Offset Start" (In) and "Offset Out" (Out) parameters, which are similar to the fade-in and fade-out effects in audio tracks. Adjust them as desired and preview the result. This will allow you to achieve a more professional effect in the animation and improve the perception of your content.
If one modifier isn't enough, you can add another Noise effect and activate it in another section of the timeline or overlay it on the first one. This will create additional volume and texture, for example, to form a background. Using multiple modifiers helps to diversify the sound palette and improve audio quality.
Besides the Noise modifier, there are a number of other modifiers, one of which is the Generator. To use it, you need to activate the Additive setting in the X Location. This allows the Generator values to be added to the results of the previous modifier, instead of overlapping them. As an example, in the x^1 section, we reduce the value to 0.1, which leads to a slow movement of the cube along the X axis during the animation. At the same time, from the 50th to the 150th frame, thanks to the active Noise modifier, the object will "shake" slightly. This combination of modifiers creates a more natural and dynamic animation, improving the perception of movement.
Keyframes and modifiers don't need to be set manually—all animation is performed automatically. In practice, such oscillations, shakes, and simple movements give objects a more natural appearance and are ideal for animating armature bones, similar to the human skeleton. This aspect will be discussed in the next lesson.
Although the animation is performed automatically, to use modifiers, you must set at least one keyframe for the desired parameter. This will allow you to more precisely control the animation effects and achieve the desired result. Setting keyframes is an important step in the animation creation process, as they determine the initial and final states of the animated object.
We've covered three key animation playback methods that are suitable for solving a variety of tasks, regardless of the project's complexity. By continuing to experiment with the settings, you will be able to implement all your ideas and achieve the desired result in animation.
Study other materials in this series.
- Blender Tutorials: Interface, Navigation, Simple Operations
- Blender Tutorials: Modeling Basics
- Blender Tutorials: Object Structure, Optimization, Python Scripts
3D Generalist Profession
You will become a versatile specialist who can do everything in 3D: create objects and environments, adjust textures and color, animate models and integrate them into a 3D scene. You will master Houdini, Autodesk Maya, Blender, Photoshop, ZBrush, Marmoset 3D, Substance Painter, Marvelous Designer, Arnold, and Rizom UV. You can apply for a job in advertising, games, or film. Pictured: work by course participant Evgeny Kuznetsov.
Find out more