Contents:

Photographer and hand-printing specialist. Chemist working at a research institute. Author of the creative blog "BEZNOGNM", where he shares his developments and ideas in the fields of photography and science.
What is Cyanotype?
Cyanotype is one of the most accessible alternative printing methods. This process produces unique monochrome prints, colored in various shades of blue, which is considered one of the most attractive. Cyanotype is not only easy to learn, but also produces stunning visual results, making it a popular choice among photographers and artists looking to experiment with printing.
Cyanotype is a contact printing method in which a full-size negative is placed directly onto a layer of chemical emulsion. This emulsion can be applied to a variety of surfaces, including paper, fabric, wood, and plastic. Its versatility has attracted artists from a variety of fields, including photographers and fashion designers. This method allows for the creation of unique and expressive images, making it a popular choice for creative projects.
The printing process involves two main substances: ink and solvent. Ink provides the brightness and saturation of the color image, while solvent plays a key role in its application, ensuring the necessary fluidity and even distribution of the ink across the surface. These components interact with each other, directly affecting the quality and durability of prints. The correct selection and combination of these substances are crucial for achieving high definition and brightness of prints, which is especially important in various fields, from fine art to commercial printing.
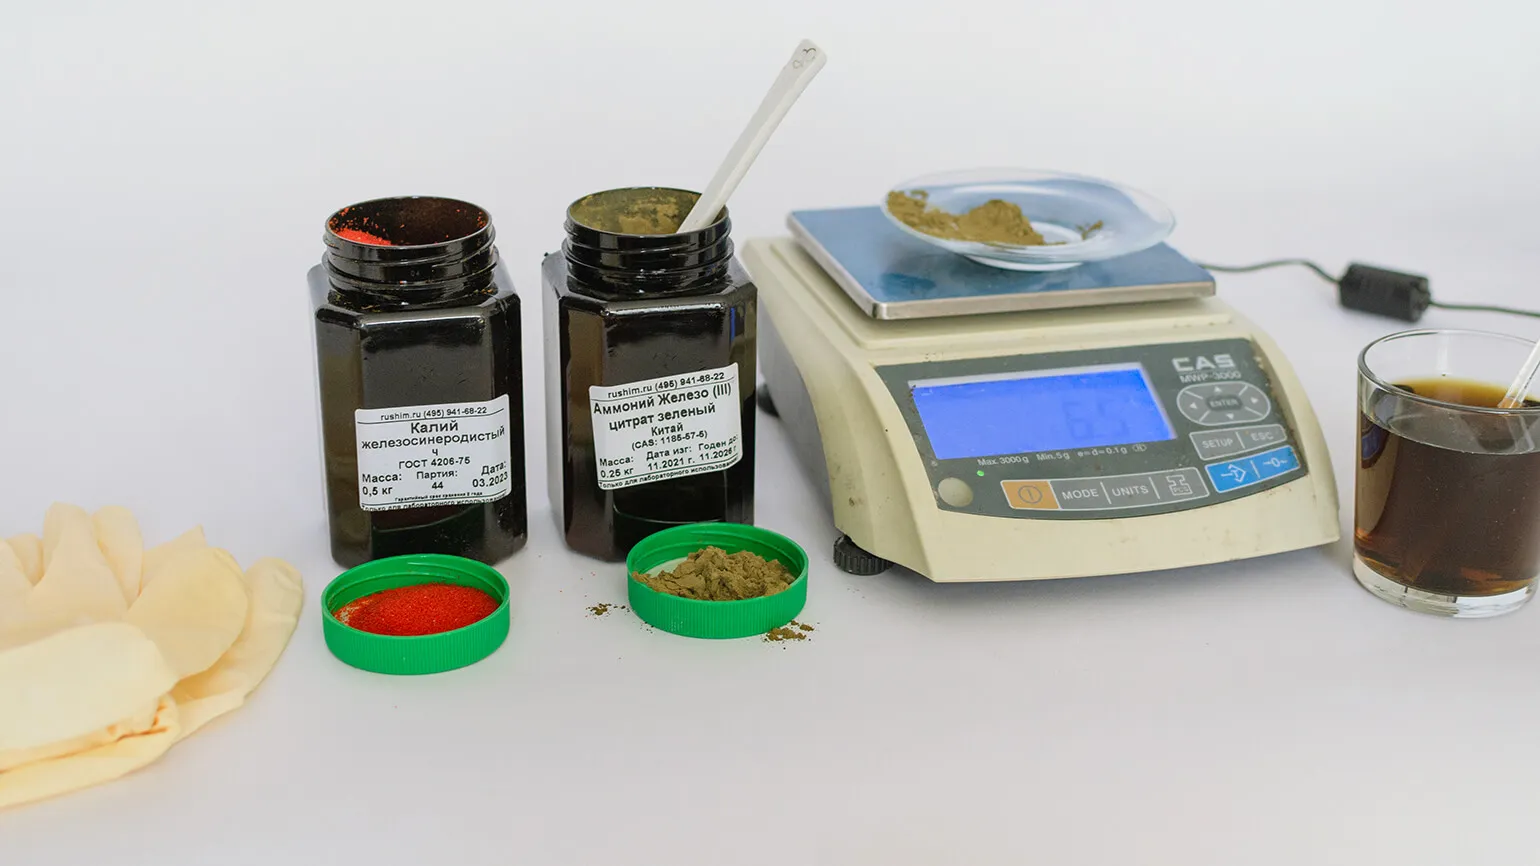
- potassium hexacyanoferrate(III) K3[Fe (CN)6], or potassium ferricyanide;
- iron(III) ammonium citrate FeC6H5O7·(NH4)2C6H6O7. It is also called iron(III) ammonium citrate.
These two chemical compounds interact as follows: iron ammonium citrate reacts to light, and potassium ferricyanide develops the image, making it visible. When the solutions are mixed under ultraviolet light, a reaction occurs resulting in the formation of a blue insoluble pigment - Prussian blue. This process is used in a variety of fields, including photography and art, due to its ability to create crisp, rich images.
Looking at the chemical formulas may seem intimidating, but don't be too quick to dismiss this article. They're really just two chemicals in bottles. The printing process using these chemicals is highly variable, allowing creative people to express their improvisation and individuality. This approach to chemical printing opens new horizons for experimentation and self-expression.
What you'll need for printing
- Red blood salt. Note: Don't confuse it with yellow blood salt - it won't work.
- Iron ammonium citrate. I strongly recommend looking for ferric citrate in green (not reddish-brown): this modification provides a more predictable result, and the print color is purer and more saturated.
- Citric acid - sold at any grocery store.
- Hydrogen peroxide 3% - sold at the pharmacy.
- Baking soda (optional).
- Acetone (optional).
- Distilled water (and only distilled).
Red blood salt and ferric citrate can be easily found in specialty chemical stores. Acetone is available at hardware stores, where it is sold along with other solvents. These substances are widely used for various industrial and household purposes, so their procurement is not difficult.
Each reagent and solution requires the use of separate containers, syringes and spoons to avoid mixing and preserve the original properties of the substances. Avoid metal utensils, as metal may react with solutions, negatively affecting their properties. Proper storage and use of laboratory materials will ensure the accuracy of experiments and the reliability of the results.
- A set of plastic spoons - for measuring reagents for weighing and mixing solutions. Glass rods can be used for stirring, if you are lucky enough to have such luxury.
- Three glass containers - for mixing solutions. Ideally, three beakers.
- Two dark containers made of plastic or glass - for storing solutions.
- A set of syringes, from small to large. The size depends on how much emulsion you will be applying and on what surface.
- Scales - kitchen or analytical, electronic.
- Gloves to protect your hands: red potassium ferrocyanide is a toxic substance. Regular latex gloves from the drugstore will do.
- Watercolor paper with a density of at least 200 g/m². I use "Rybachka" paper from LHPBP LLC.
- Paintbrush. It is best to buy a brush with stiff bristles. You can use artist's sponges instead.
- Negative printing film. There are many transparent printing films on the market; the choice depends on the type of printer you have. I use Lomond for black-and-white copiers. If you have an inkjet printer, look for film for inkjet printers.
- Any ultraviolet light source. Sunlight will also work. I use three Camelion E27 26W UV lamps.
- Two transparent glasses no smaller than 35 x 30 cm in size. We will place an A4 sheet between the glasses, leaving extra space on each side.
- A set of paper clips - large and medium ones will come in handy, at least four of each size. We will use them to clamp the sheet with the negative between the glasses.
- Aluminum foil, without patterns or engravings.
- Cuvettes or any rectangular containers that can easily fit an A4 sheet. You will need at least three cuvettes - if you plan to print a lot, it is better to have even more. I bought my containers at a hardware store.
After preparing all the necessary materials, you can begin working. It is recommended to perform the cyanotype process in the evening, under artificial light or in a darkened room. Although cyanotype printing is not a particularly light-sensitive technique and the reagents retain their effectiveness for a long time, it is best to avoid frequent exposure of the finished materials to light. This will help ensure a higher quality of the final result and prolong the life of your reagents.
Preparing Solutions
Attention! Pay attention to important aspects that can impact your life. We offer up-to-date information and helpful tips to help you make the right choice. Don't miss the opportunity to learn more about key topics and stay up-to-date. Pay attention to detail and don't let important information slip through your fingers.
When working with reagents, be sure to use protective gloves. This is important to ensure safety and prevent skin contact with chemicals. Reliable hand protection helps avoid possible allergic reactions and irritations, and minimizes the risk of injury. Compliance with this rule is a prerequisite for the safe conduct of experiments and work in the laboratory.
If you purchased ready-made cyanotype kits with solutions of the required concentration, you can skip this step.
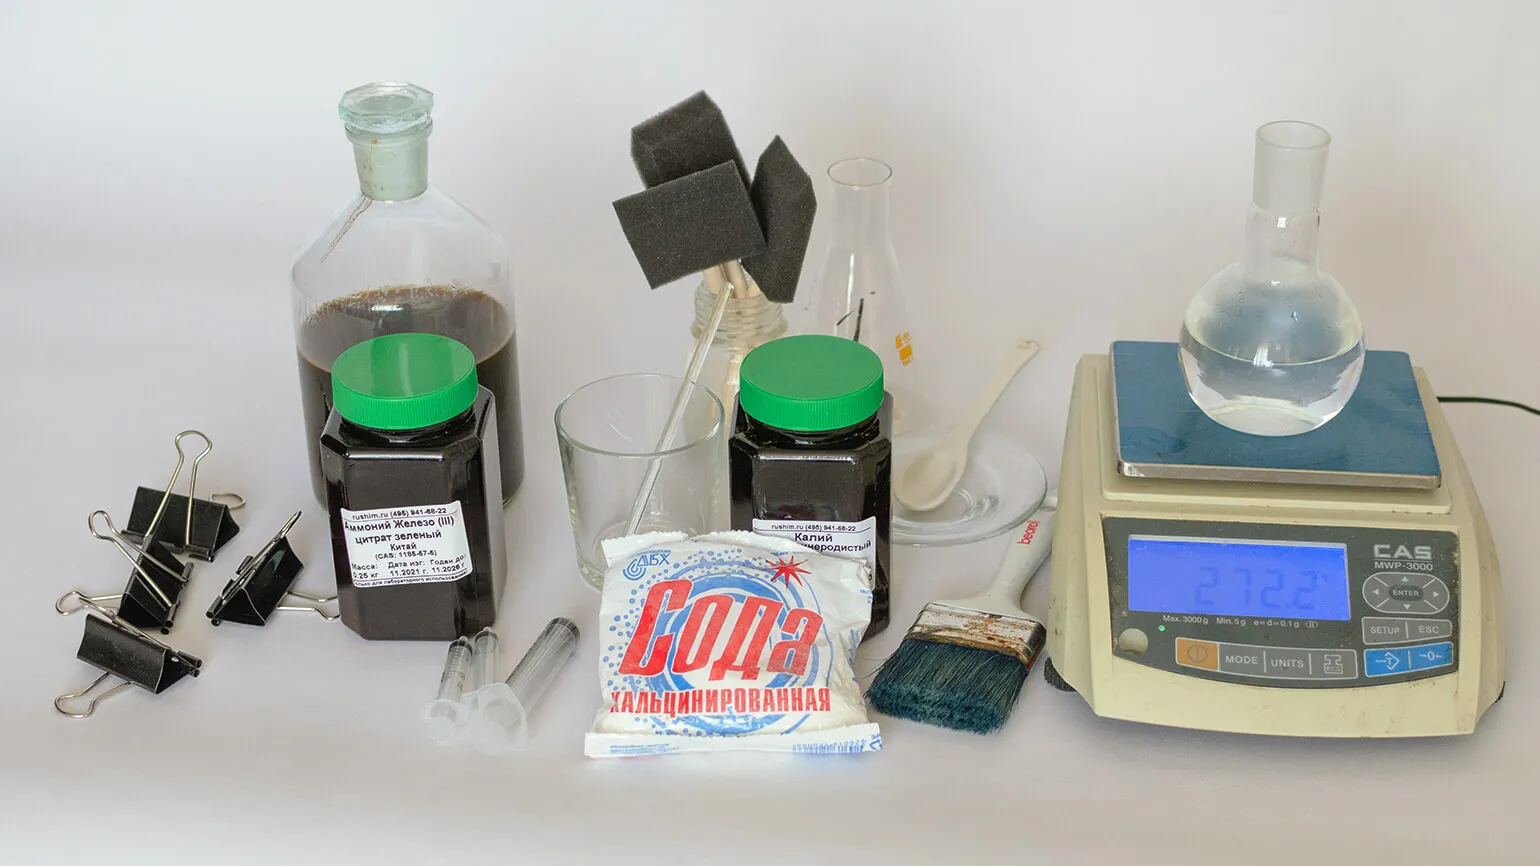
Those who decided to master the process on their own from scratch will need the following equipment: scales, two plastic spoons, two containers for weighing reagents, two containers for mixing solutions, and two dark bottles for storing prepared solutions. The correct equipment will ensure accuracy and safety during the work.
To prepare a solution of citric ammonium iron, hereinafter referred to as solution A, you need to weigh 20 g of the solid substance and dissolve it in 100 ml of distilled water. It is necessary to thoroughly mix the solution until it is completely transparent, which will ensure the homogeneity and stability of the final product.
To prepare a solution of red blood salt, hereinafter referred to as solution B, you need to weigh 8 g of the solid substance. Then dissolve it in 100 ml of distilled water. Stir the solution thoroughly until it becomes clear.
Pour each solution into separate dark containers. Store the resulting solutions in the dark and avoid heating them to preserve their properties and effectiveness.
These 200 ml solutions, consisting of 100 ml of each component, are enough to print one hundred photographs measuring 15 × 20 cm. If you plan to undertake larger projects, it is recommended to mix a larger amount of solids with an increased volume of water for optimal results.
Mixing solutions, preparing an emulsion
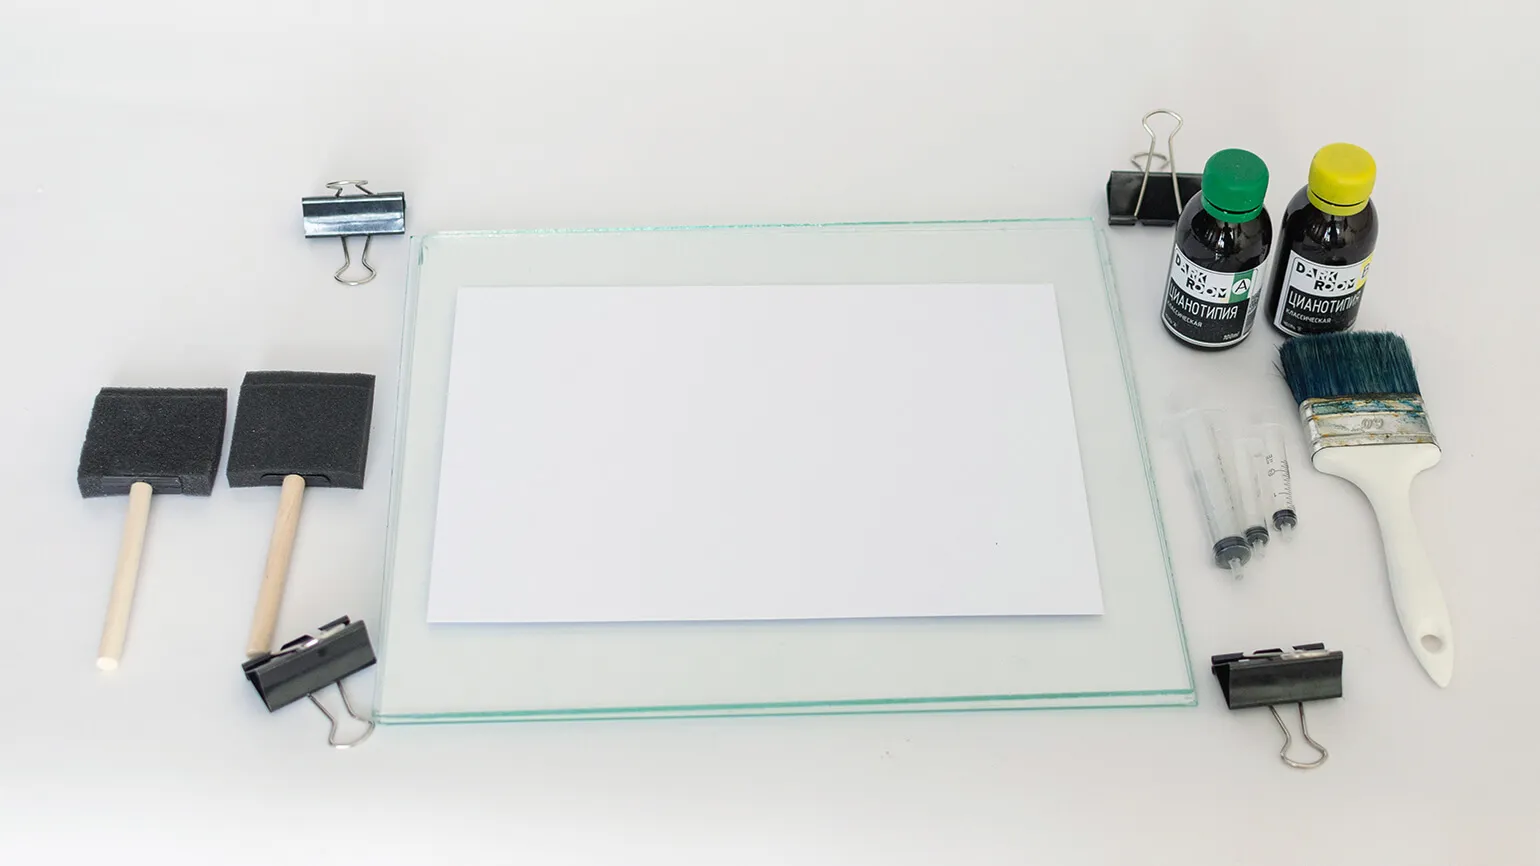
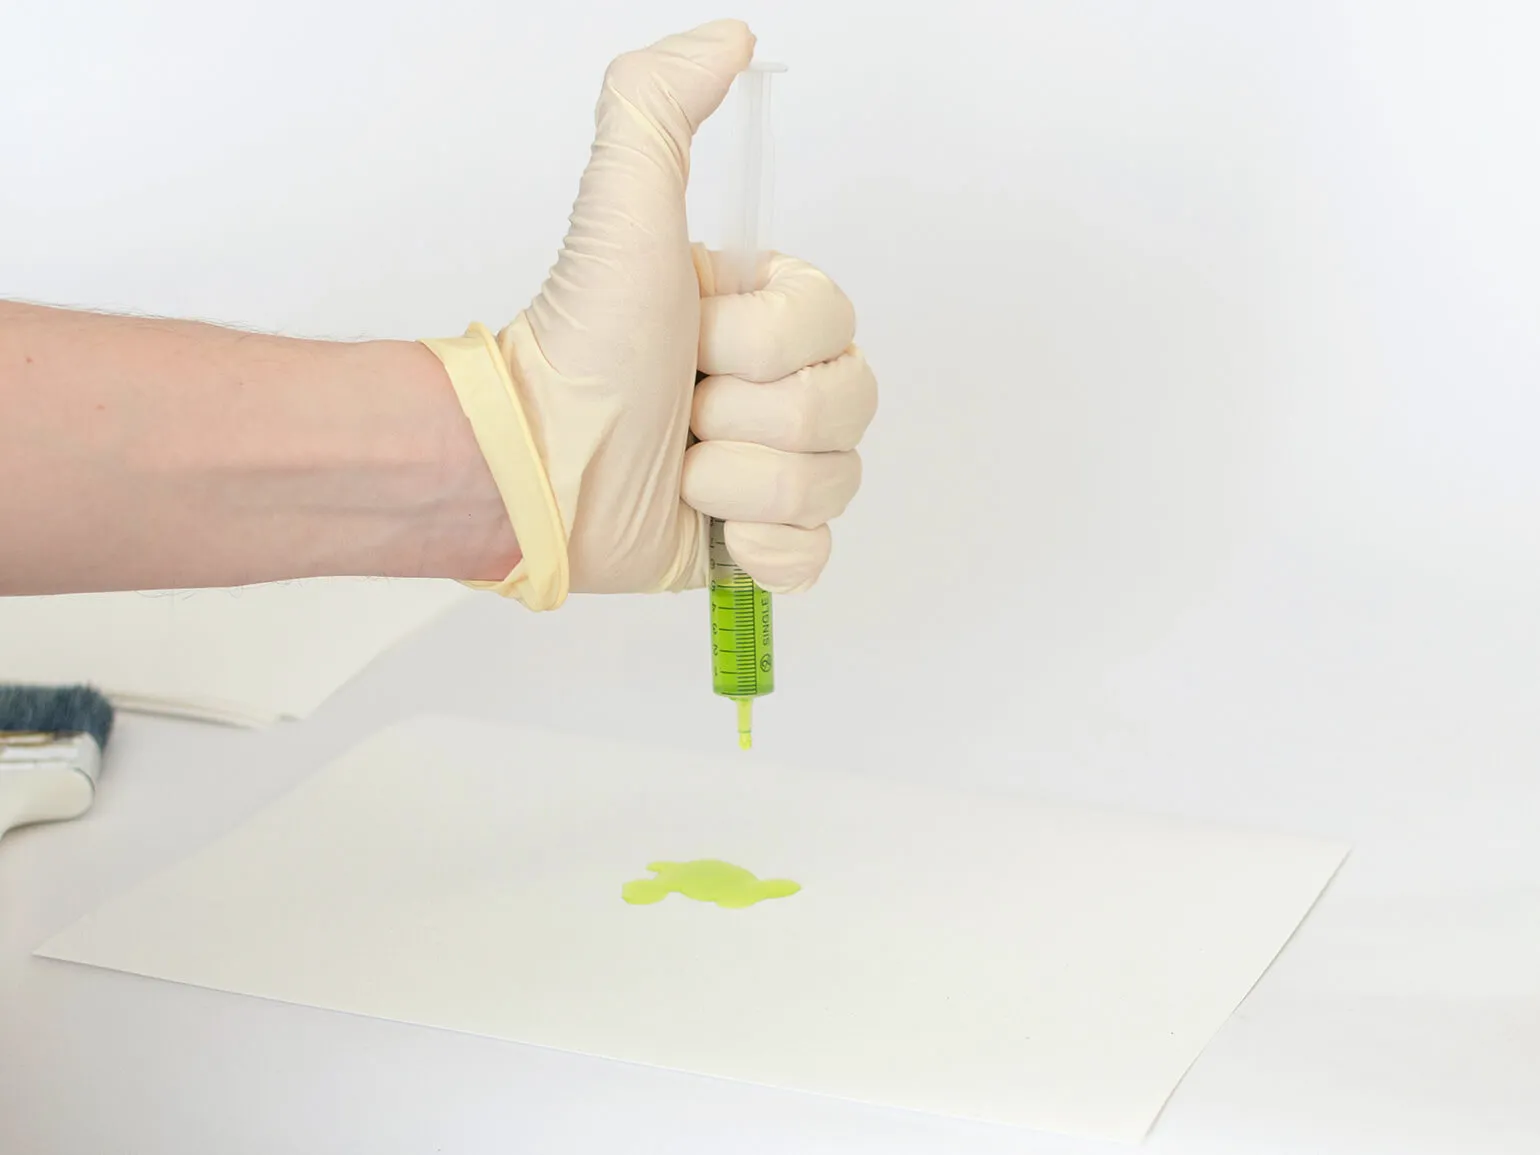
At this stage, you will need three syringes and a clean glass container. These tools are essential for the subsequent steps. Make sure the syringes are sterile and the container is thoroughly cleaned to avoid contamination and ensure the safety of the process.
The metal needles of the syringes must be removed.
Measure out equal volumes of solution A and solution B using clean syringes. Pour both solutions into the container and mix thoroughly. Your emulsion is ready. Now take a third, larger syringe and fill it with the resulting mixture.
Avoid preparing a large volume of emulsion, as it quickly loses its effectiveness, even when stored in a dark place. It is recommended to prepare a new portion of the emulsion immediately before printing and use it immediately. This will ensure the best results and consistent print quality.
Applying the emulsion to the surface
For the next step, you will need a large syringe filled with the emulsion you prepared earlier. You will also need a paintbrush or an artist's sponge for application.
For best results when printing images using emulsion, start by dropping it in the center of the paper. Experience shows that distributing the emulsion over the entire surface can lead to the appearance of dark circles on the final print. To print an image measuring 15 × 20 cm, 20 drops of emulsion are usually sufficient, which is approximately 1 ml. However, the amount of emulsion may vary depending on your idea, the desired print size, and the texture of the material used. Don't be afraid to experiment to find the optimal proportions and achieve the desired result.
Take a brush and apply the emulsion evenly to the paper using broad, smooth strokes. Imagine yourself as Tom Sawyer painting a fence. This process requires precision and attention to ensure a uniform coverage. Try to avoid gaps or drips to ensure a pleasing and attractive result.
Advice is a recommendation or instruction aimed at helping you make decisions or solve problems. Advice can cover various aspects of life, including health, career, personal relationships, and financial planning. Receiving advice can significantly increase your chances of success in various situations. It's important to choose reliable sources of information and consider expert opinions to ensure that advice is truly useful and effective. By considering different perspectives, you can make more informed decisions and avoid common mistakes.
All syringes and brushes must be thoroughly cleaned immediately after preparing sheets for printing. This ensures their longevity and prevents contamination. Cleaning your tools promptly ensures high-quality results and prevents paint from mixing.
Drying
Some artists use a hair dryer to dry watercolor paper, but I prefer another method. I leave the product in a dark and well-ventilated room for one hour. This time is enough for the paper to dry. Dried sheets do not have to be used immediately; they can be stored in a dark place. I once printed on sheets that had been stored for almost a month, and the result was quite satisfactory, although I had to reduce the exposure time slightly. This approach allows you to achieve high-quality results without the risk of damaging the paper.
Preparing the Negative
To complete this task, you will need a computer with Photoshop installed, a printer, and transparency film for printing. If you have acetone, be sure to take it with you, as well as several printing trays. In this text, I will explain exactly how I use these materials.
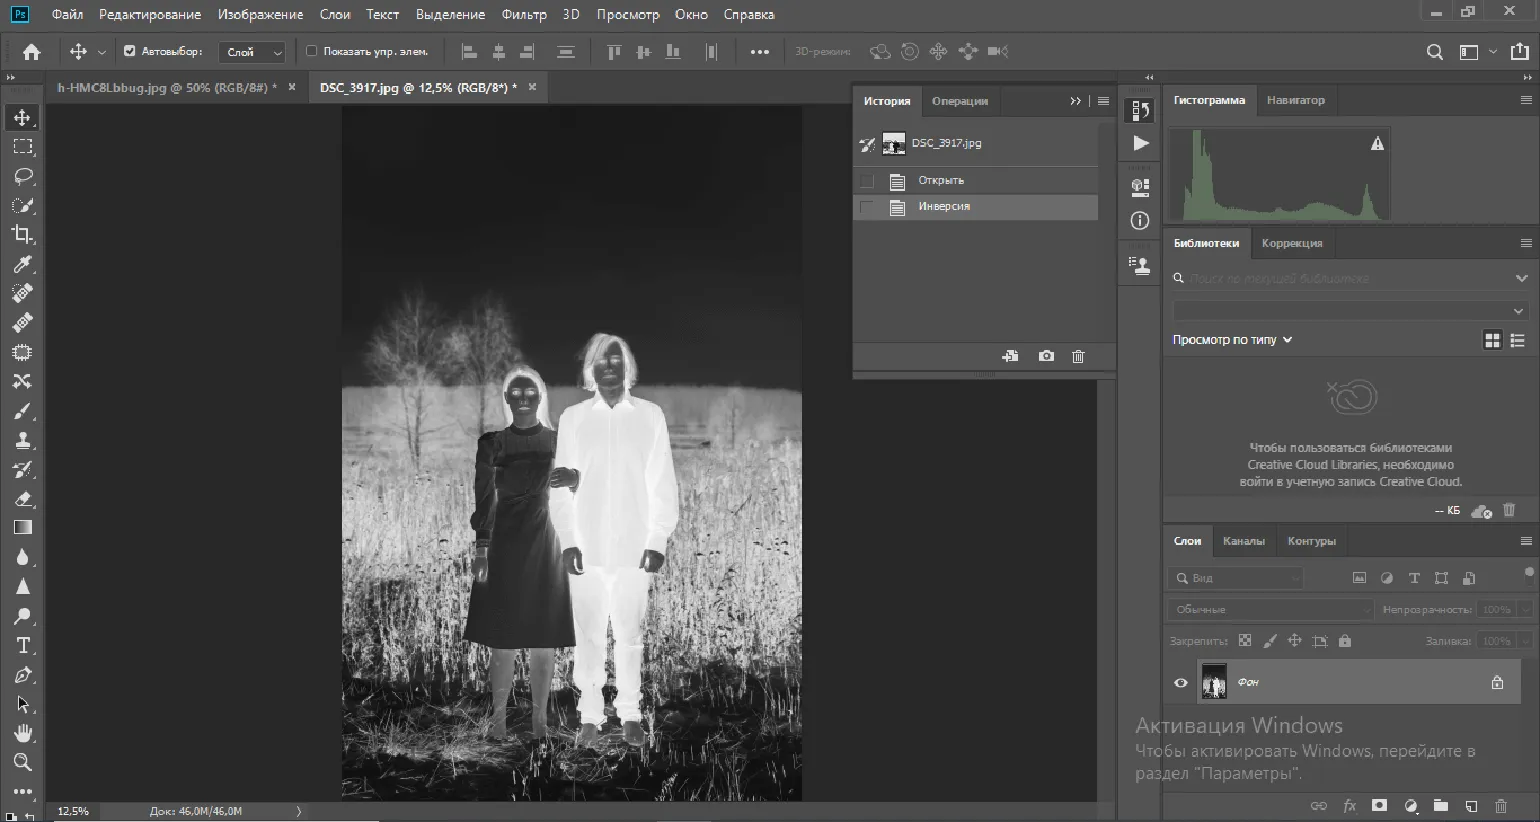
To prepare the negative image, open it in Photoshop and convert it to black and white. You can conduct various experiments with a monochrome image, for example, increasing the brightness and contrast. Please note that the final cyanotype will have lower sharpness and contrast than the digital original. Dark areas of the image on paper will be even darker, since, unlike a monitor, paper does not have a backlight.

After processing the black-and-white positive, you need to invert the image using the keyboard shortcut Ctrl/Cmd + I. This process converts the positive image into a negative, which can be useful for various artistic and technical purposes. Inversion allows you to obtain reverse colors, which opens up new possibilities for creativity and image analysis.
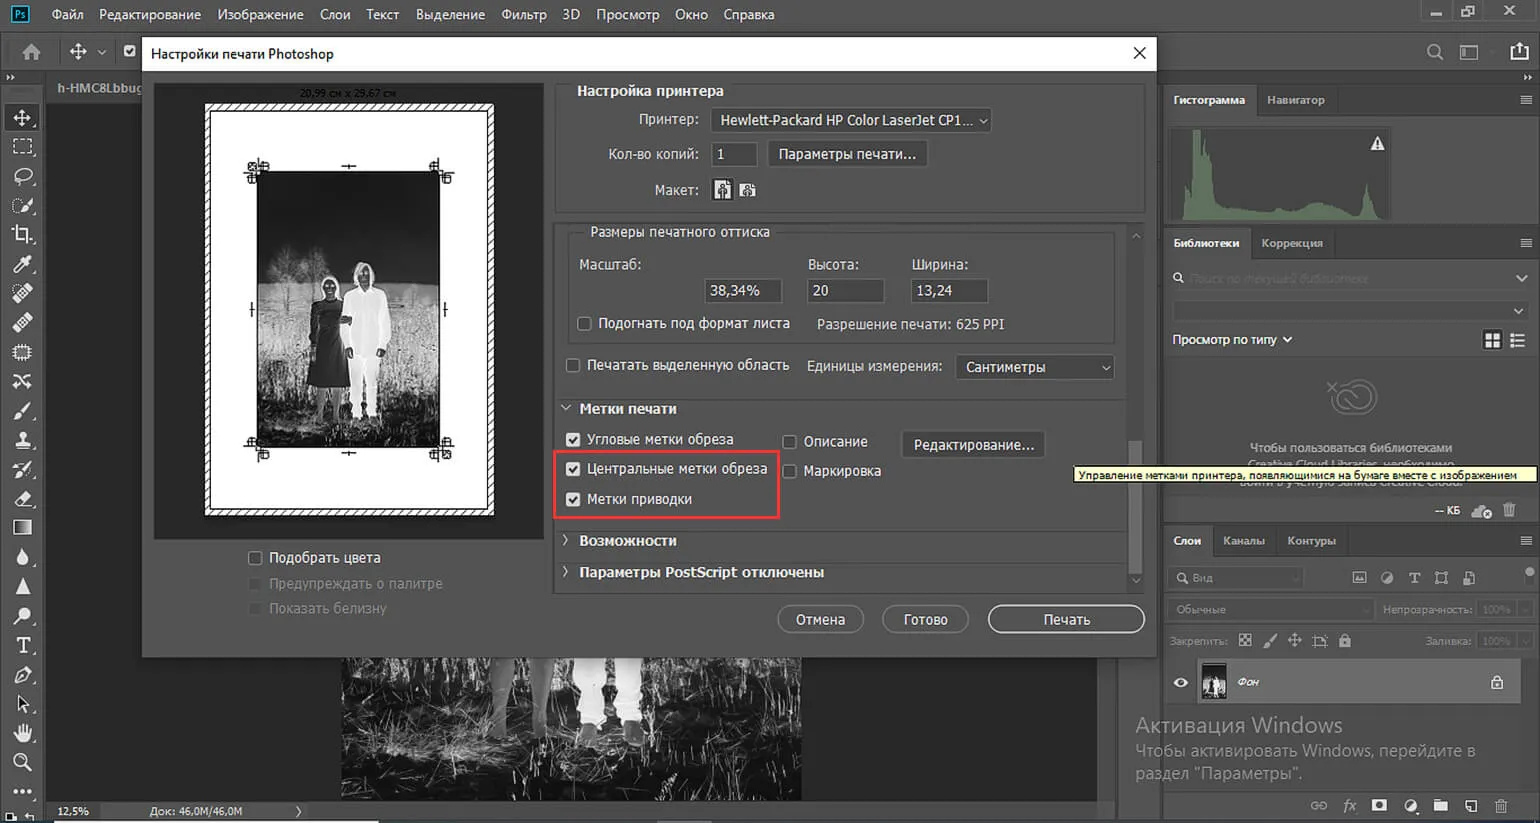
Open the print settings and select the desired scale. To accurately cut the printed frame with a colored border, check the "Center crop marks" option. This will ensure precision when cropping and maintain the integrity of the image.
Go to the "Color Management" section and select the "Color Handling" option. Set it to let Photoshop manage the colors. To print, select black and white mode and specify the paper type as "film" or similar.
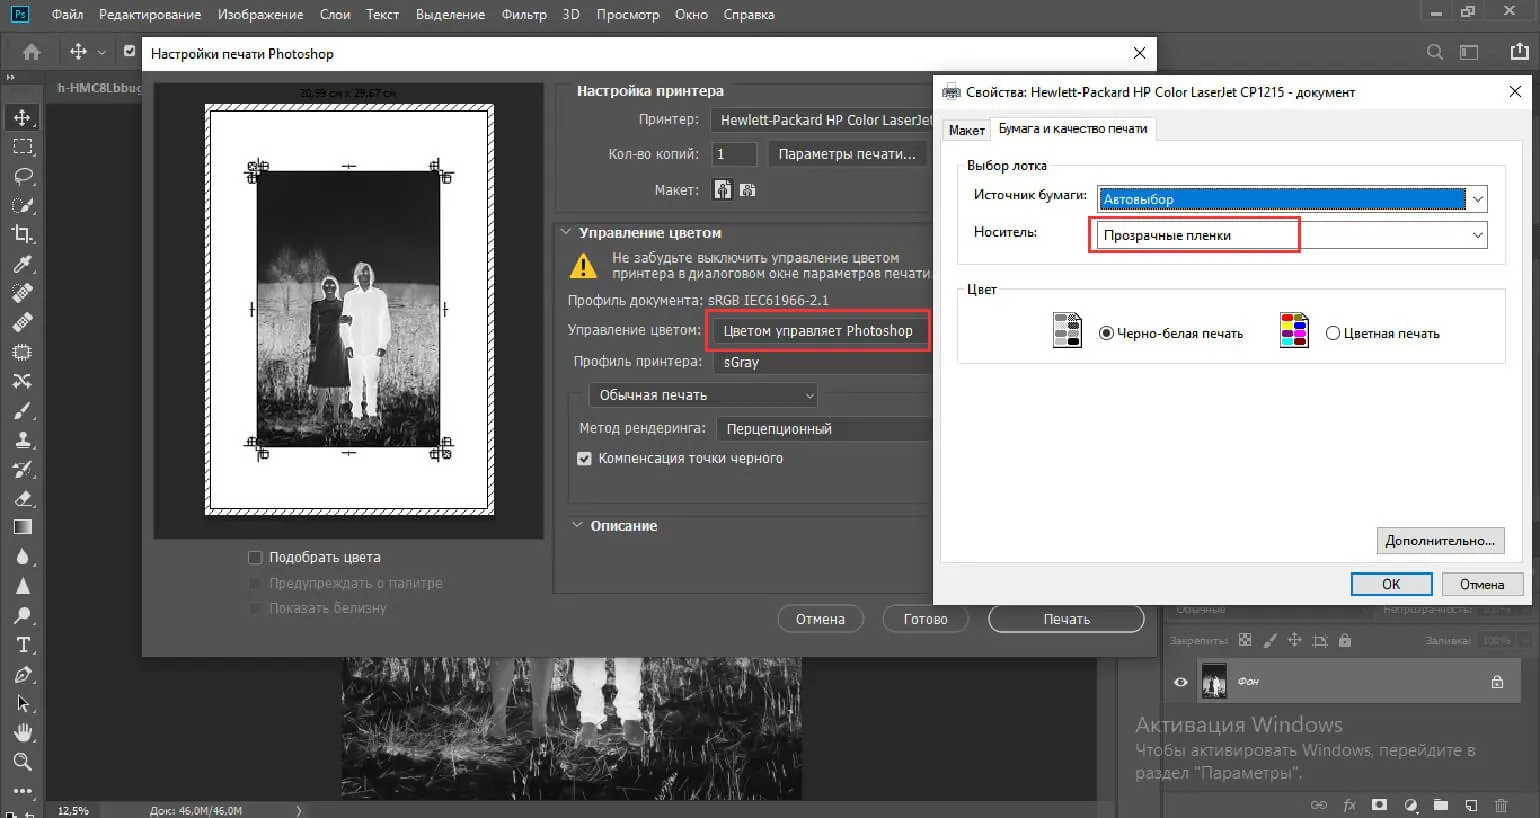
Send the document to print.
Laser printers, unlike inkjet printers, have some limitations when applying toner to film. However, there is a way to improve the quality of film printing using a laser printer. In this article, I will share effective methods that will help achieve higher print quality.
Before making any changes, we recommend testing the print from a negative image first. Print quality directly depends on the characteristics of the printer and the cartridge used. This will allow you to evaluate the current capabilities of the device and identify potential problems before making any improvements.
Pour acetone into a tray and carefully place the printed negative on the surface. It is important not to submerge the negative in acetone, as this will remove the toner. To do this, use another tray to cover the negative from above and leave it for twenty minutes. The acetone vapors affect the toner, causing it to partially soften. As a result, the toner becomes denser and less light-transmitting.

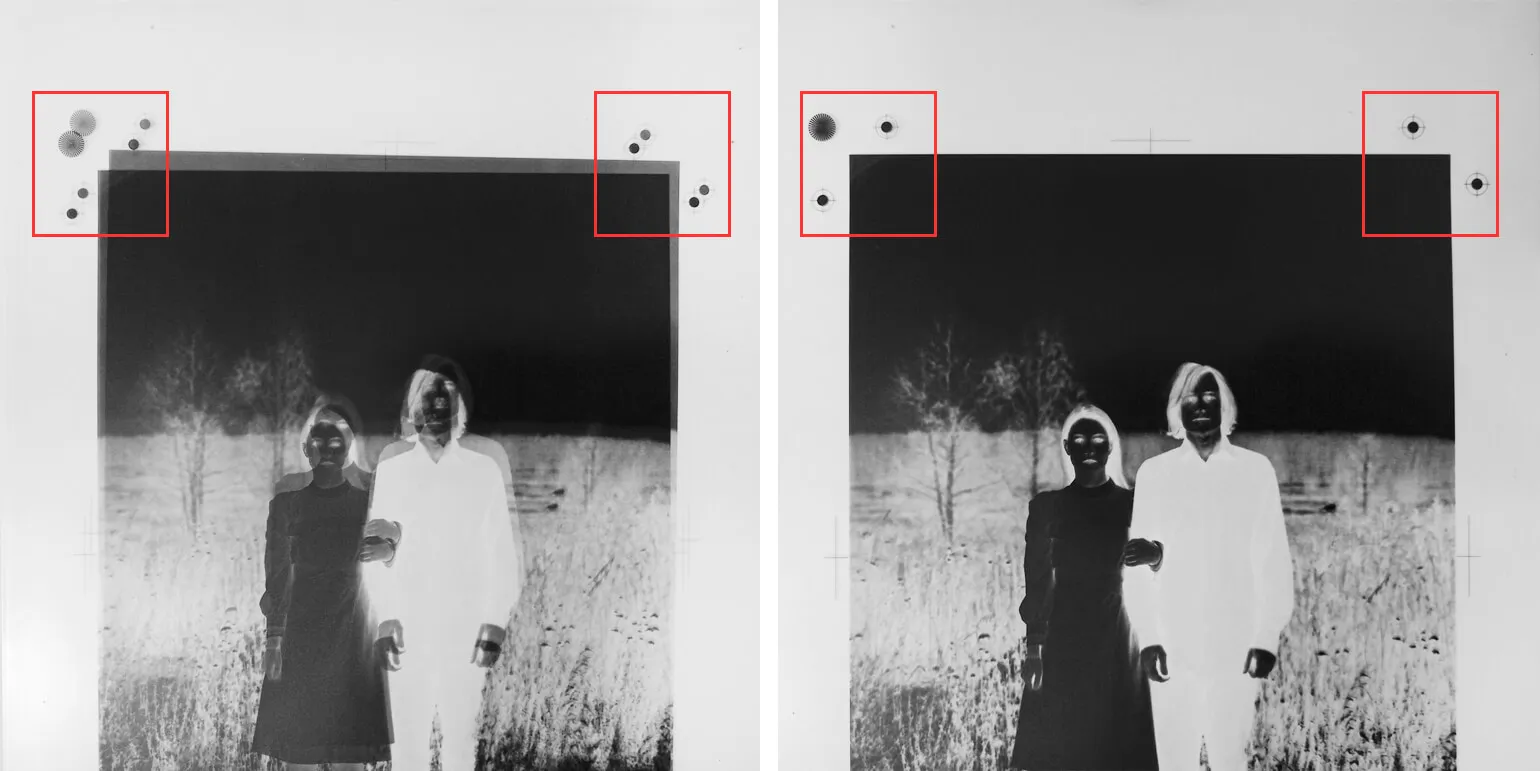
In Photoshop, to print documents, press the key combination Ctrl/Cmd + P. In the print settings window that opens, check the box next to "Registration marks". This will allow you to add the necessary marks for precise cropping and alignment during printing.
For maximum effect, use two copies of the negative image instead of one. Align them using the alignment marks. Double negative printing will provide higher contrast and increase toner density, preventing UV light from penetrating the material and unwanted bleeds. This approach will improve print quality and increase the clarity of the finished image.
The negative is ready for use.
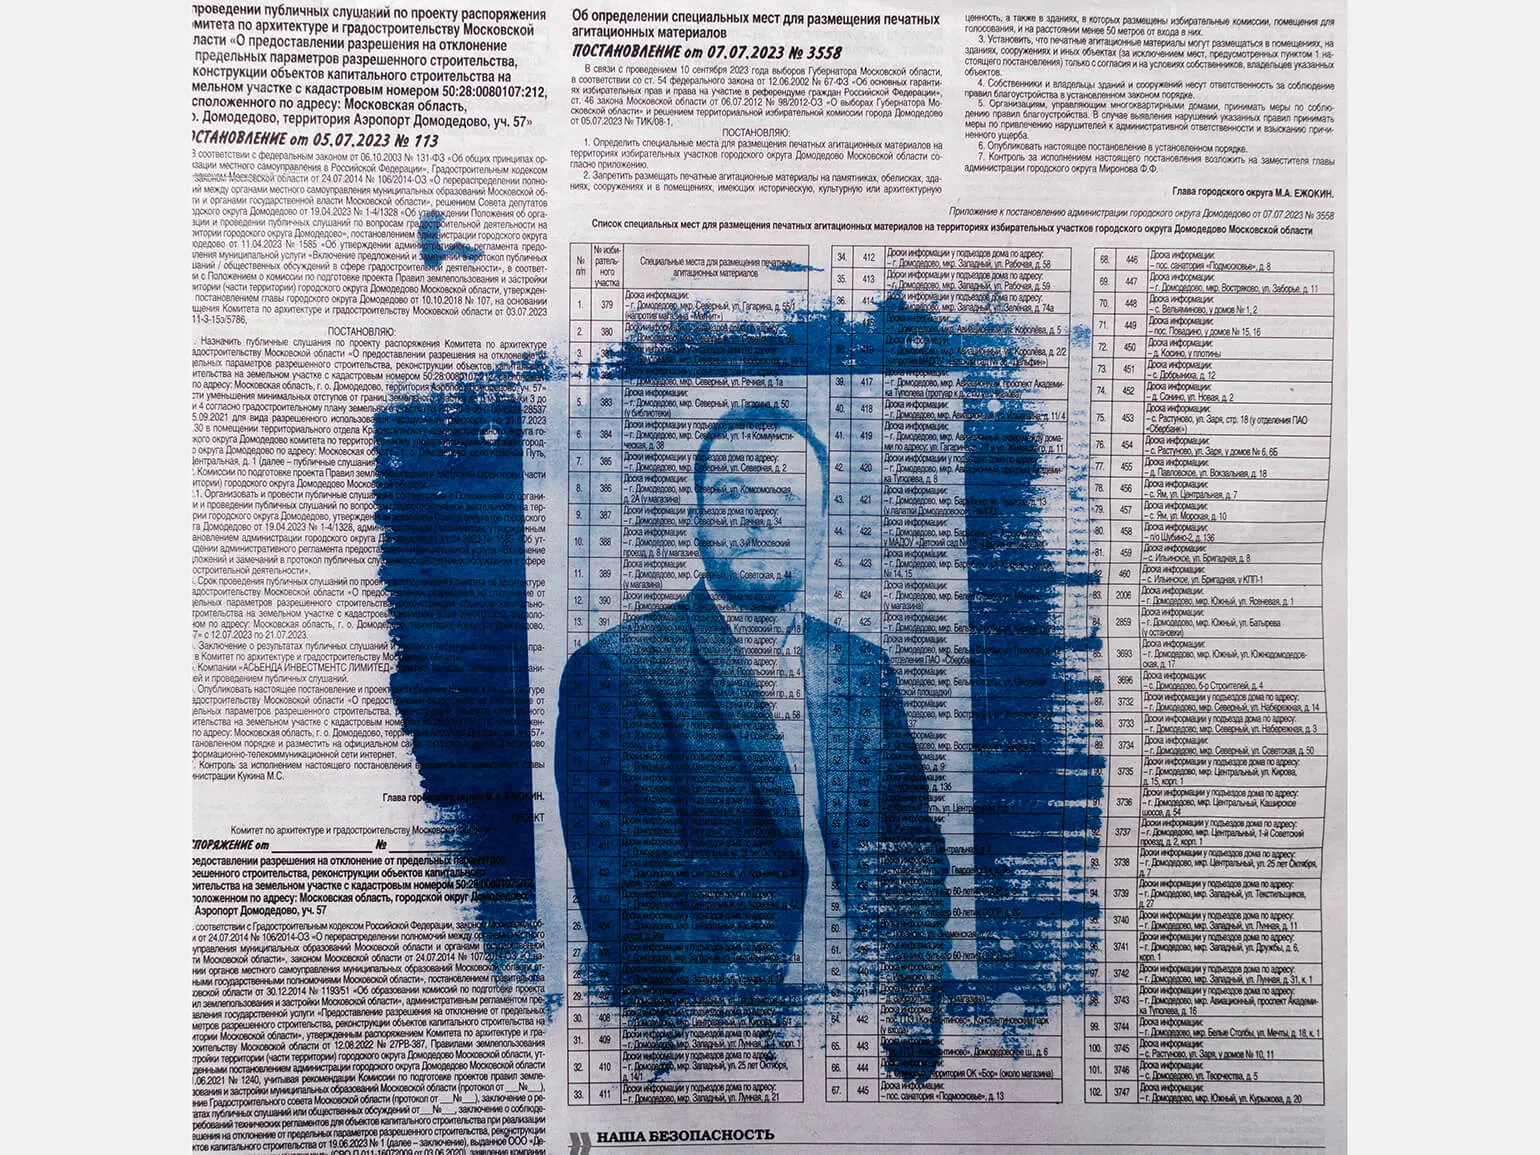
The cyanotype process uses a negative to control the areas of the image that should not be colored blue. Toner covers these areas, preventing them from interacting with ultraviolet light. As a result, they do not react and remain uncolored. After the washing process is complete, the unreacted emulsion is easily removed, leaving only those areas that have not been exposed to ultraviolet light. Transparent areas of the film allow light to reach the emulsion, resulting in a characteristic blue color known as Prussian blue. This approach allows artists and photographers to achieve the desired effects and precision in their work, creating unique images.
Exposure
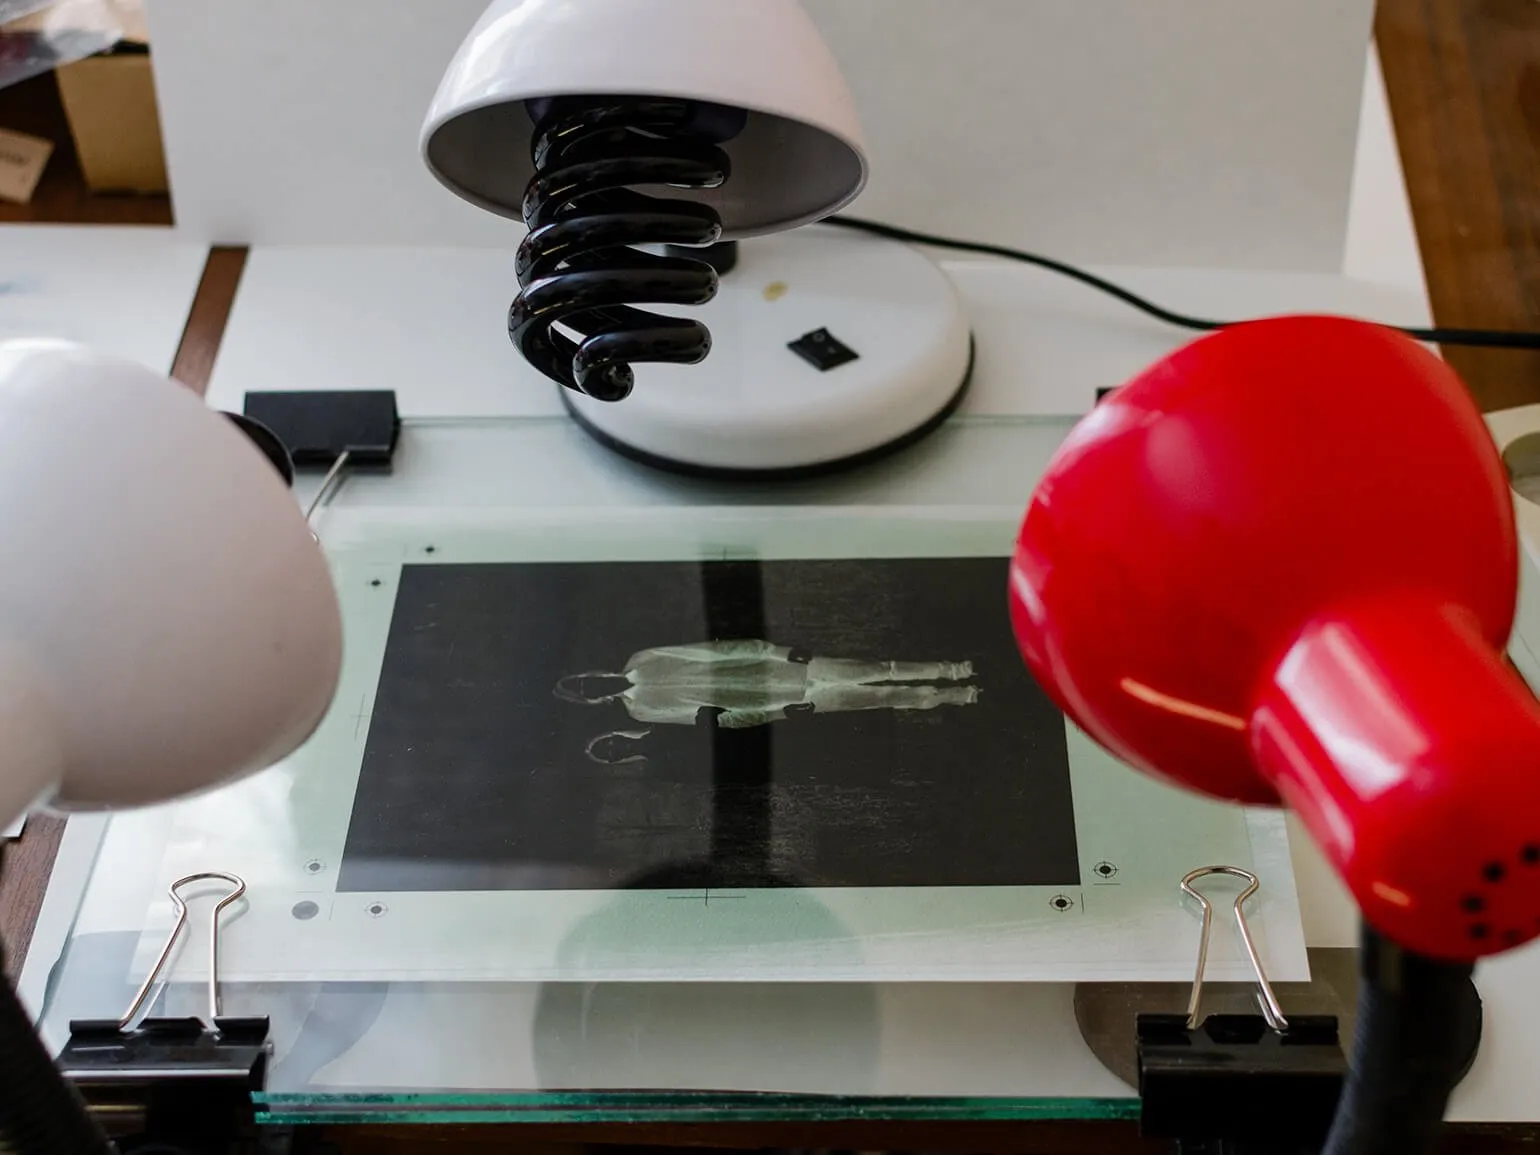
We have come to the key stage of the process—this is where the magic of printing begins to unfold. For this, you will need UV lamps, glass surfaces, paper clips, and foil. This set of tools will allow you to create high-quality and unique printed items. Pay attention to the correct use of each element to achieve the best results in your work.
For the photographic printing process, begin by preparing the glass. Place a sheet of dried emulsion on the bottom glass. Then carefully place the negative, and cover it with a second glass. Secure the structure on all four sides with paper clips. As a result, you will have something similar to a sandwich, ready for further processing.
Now place this structure under the UV source for exposure. Make sure the lamps are positioned so that the paper is exposed evenly. This will ensure optimal results and improve the quality of the final product.
Before turning on the lamps, it is recommended to create a reflective cap from sheets of foil, with the reflective side facing inside. Cover the lamps with this cap: the foil will effectively reflect the UV radiation and store it for maximum exposure. If you are using a home tanning bed, place it horizontally on the sheet with the lamps facing down. A tanning bed is an excellent source of UV radiation and provides uniform exposure, making it ideal for achieving the desired effect.
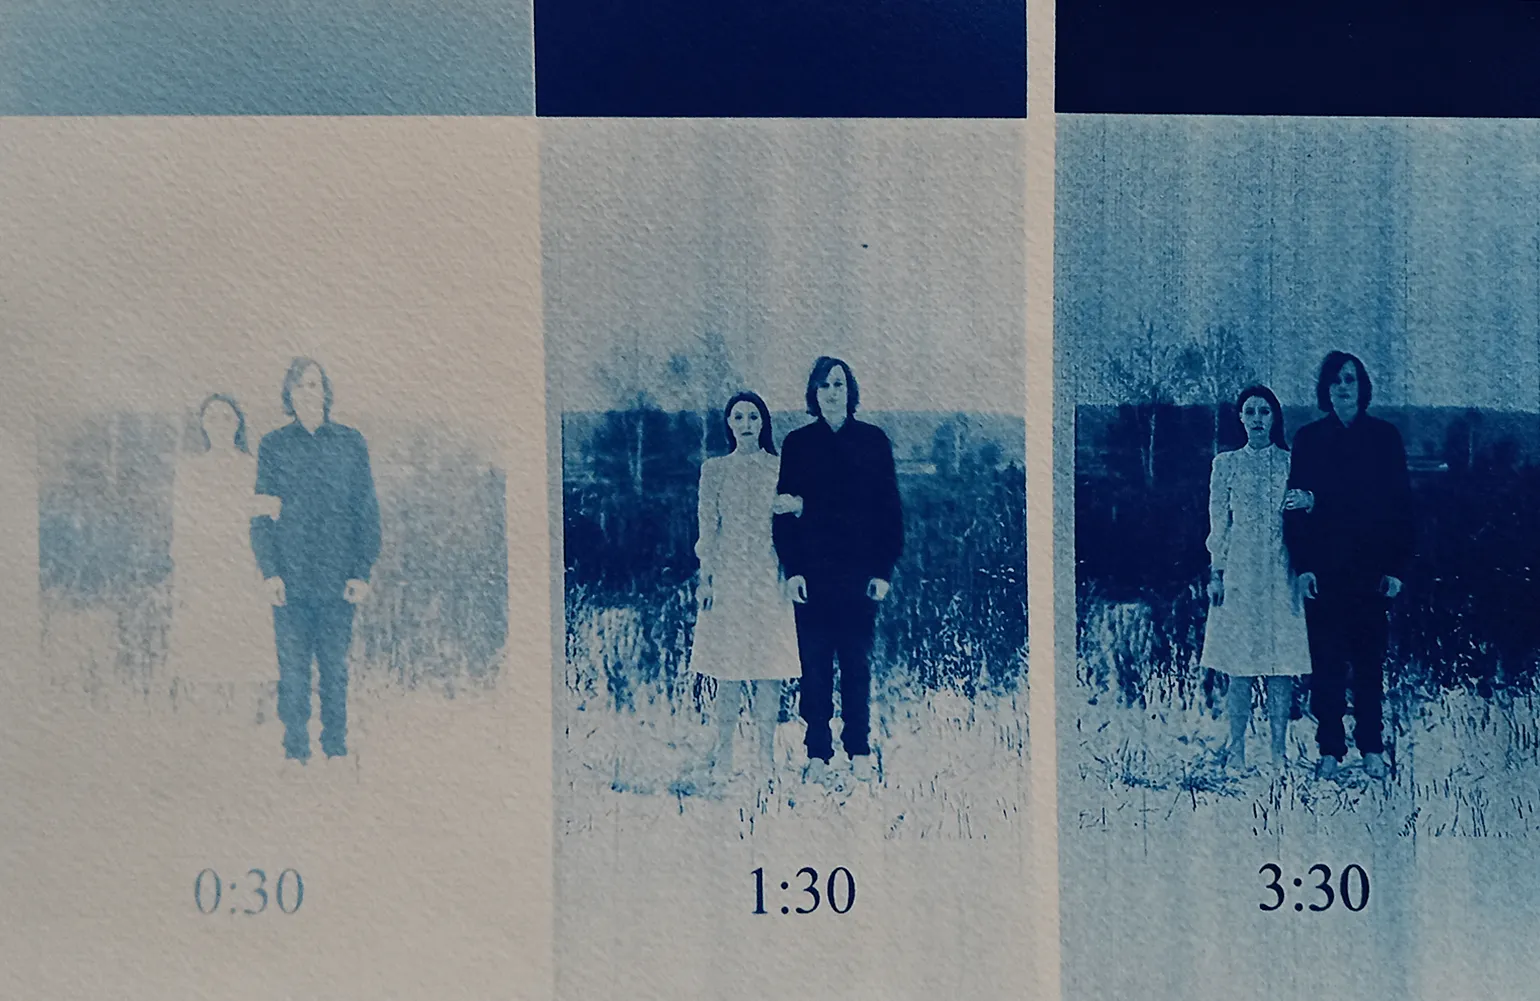
Turn on the lamps. I leave them on for one minute and thirty seconds.
The exposure time is determined experimentally. For an accurate determination, it is recommended to conduct a test print. Take a pen or pencil and divide the emulsion sheet into several sections by drawing lines. Label each section with the exposure time. Exposure each section sequentially, gradually increasing the exposure time, while covering the remaining sections with black paper. This method will allow you to accurately determine the optimal exposure time for the best results.
If you've mastered the basics and are looking to plan results with high accuracy, consider creating a calibration curve. This method will allow you to analyze your data in detail and improve the predictability of your results. A calibration curve helps visualize the relationship between variables and provides more accurate predictions, which is especially useful in scientific research and analytics.
Advice is a recommendation or guidance that helps people make decisions or cope with various situations. It's important to remember that advice can be based on personal experience, knowledge, or professional expertise. It can cover various aspects of life, including health, finances, relationships, and career. When seeking advice, it's helpful to consider multiple sources to gain a more complete understanding of the situation. Effective advice is often accompanied by practical examples and strategies, allowing you to better understand how to apply it. When choosing advice, it's also important to consider whether it's tailored to your individual circumstances and goals.
When working with lamps, it's important to promptly remove solutions from the table, as UV radiation can negatively impact their quality. Proper storage and protection of solutions will help maintain their properties and extend their lifespan.
A well-exposed image looks like a digital original, with details clearly visible in both light and dark areas. Great job! Now release the sheet for printing and proceed to the next step of the process.
Pay attention to important aspects that may influence your decision. We recommend that you carefully study the information and take into account all the details to make an informed choice. Careful attention to the nuances will help you avoid undesirable consequences and achieve the desired results. Don't miss out on helpful tips and tricks that will make your experience more successful and productive.
Exposure is a key step in the cyanotopic process. It's important to consider various parameters, such as the choice of printing materials, the use of reagents from different manufacturers, the type of paper, and the negative processing settings in Photoshop. It's also worth paying attention to the printer's toner characteristics. All these factors directly affect the exposure time and, consequently, the quality of the final result. Properly adjusting each of these elements will help achieve the optimal balance and improve the final images.
Washing and Developing
To develop the image, you will need three cuvettes (you can use more), citric acid, hydrogen peroxide, and tap water. It is important to follow certain steps in this process to achieve the best result. First, prepare all the necessary materials. Then, place the citric acid in one of the cuvettes, the hydrogen peroxide in the second, and the tap water in the third. After that, carefully mix the solutions, making sure they do not react before developing. Carefully place the image in the prepared solution, observing the process. Development time varies depending on conditions, so monitor for changes and prepare the image for final processing.
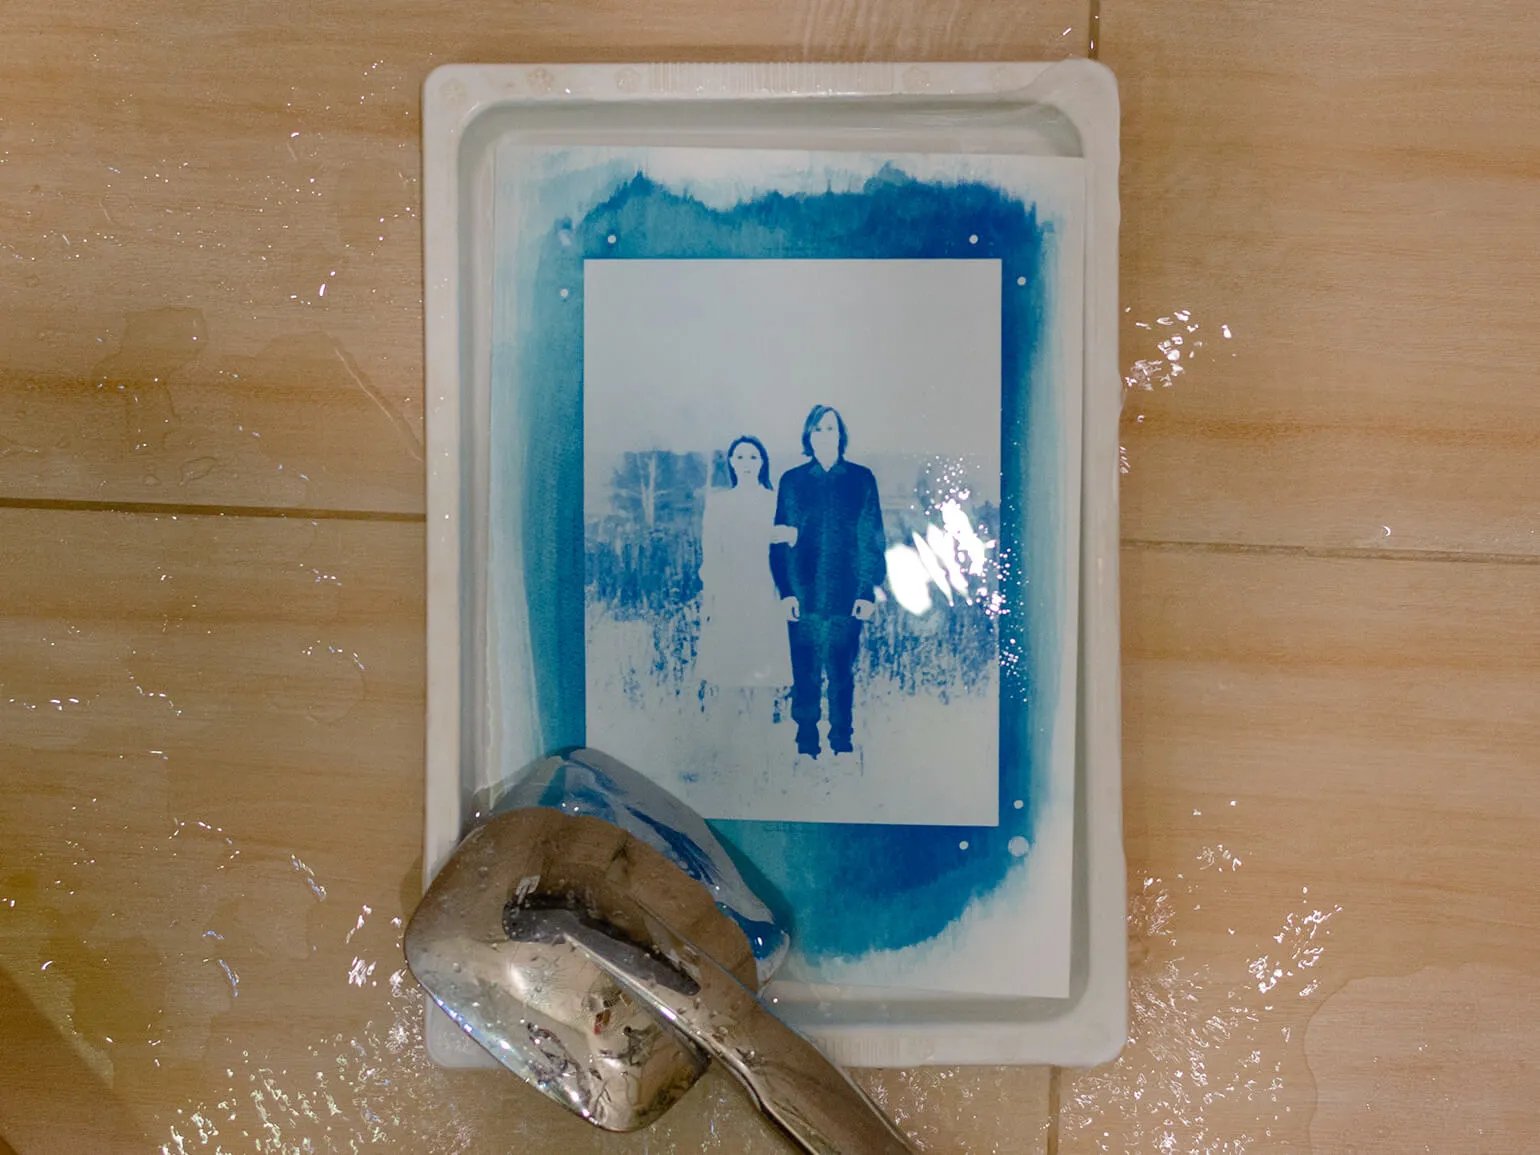
Place the image in the cuvette and place it under cold running water. Alternatively, leave the image in standing, cold water. Some people use hot water, but I believe the best method is to constantly rinse with cold water using a shower head. Set the water pressure to low and direct the shower into the tray, rinsing the film for 10 minutes. This process ensures gentle cleaning without the risk of damage.
While the rinsing and development of the print is taking place, you can observe this process. During this time, prepare two solutions. In one cuvette, dissolve half a teaspoon of citric acid in one liter of water. In another tray, mix 25 ml of hydrogen peroxide with one liter of water. For accuracy, you can use a measuring syringe.
After 10 minutes of rinsing, place the print in a tray with a citric acid solution for 3-5 minutes. It is recommended to gently shake the tray with citric acid, as this promotes more effective removal of yellow film and salt residue. This approach ensures more thorough cleaning and improves the appearance of the print.
After treating the tray with citric acid, it is recommended to rinse the print again for six minutes. This will ensure effective removal of acid residue and help maintain the quality of the print.
After the second rinse, place the print in a tray with hydrogen peroxide. This step will allow the image to immediately regain sharpness and contrast. Some artists prefer not to use peroxide, as the image can improve contrast on its own during drying. However, I recommend using peroxide: it ensures your image will have the desired appearance, even if you're printing on non-standard material. Furthermore, peroxide allows you to immediately identify defects, greatly simplifying the editing process.
After treating the peroxide tray, rinse the sample again for six minutes. This will remove any residual peroxide and ensure the accuracy of subsequent analyses. Proper washing is important for achieving reliable results in laboratory research.
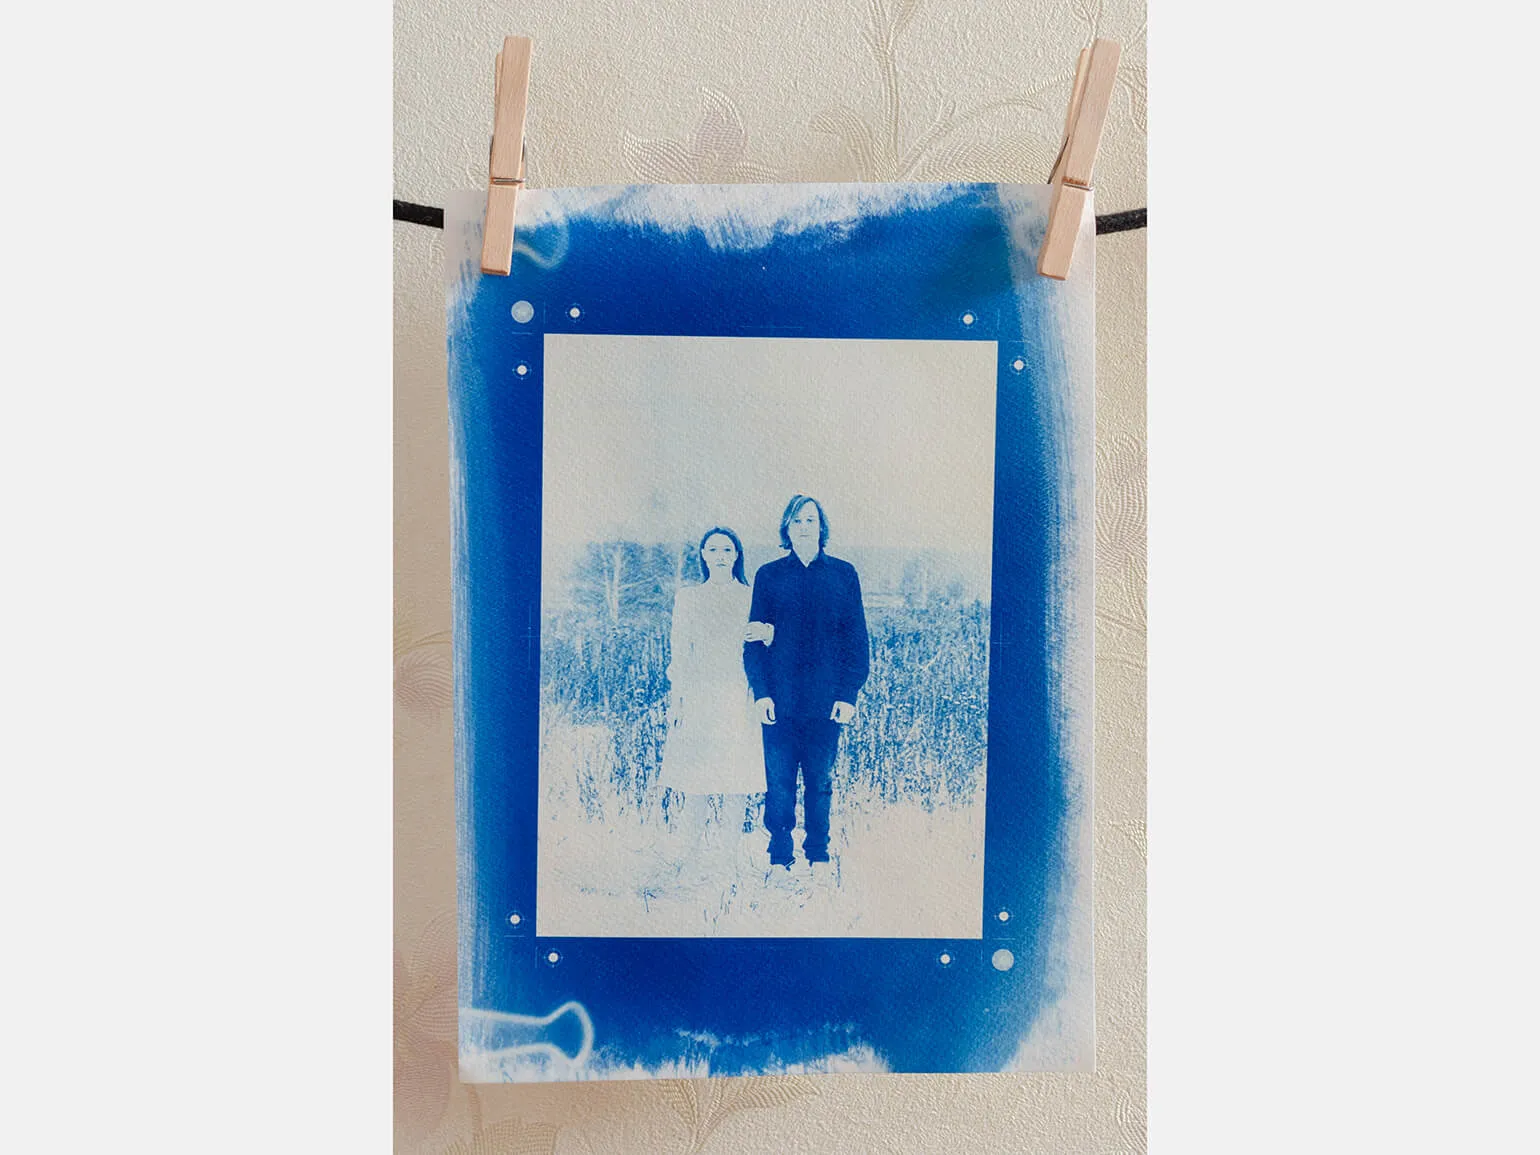
Remove the image and hang it to dry. I use wooden clothespins to attach the stamp to the string. If you plan to tone your photograph, begin the process immediately while the image is still wet.
Before trimming the image, allow it to dry for 24 hours. This ensures that the sheet is completely dry and will prevent any possible distortion during trimming.
If the printed sheet has curled or become deformed, it is recommended to place it under a press. This will help return the document to its original state and prevent further distortion. Using a press is an effective way to correct paper defects, which is especially important for maintaining the quality of printed materials.
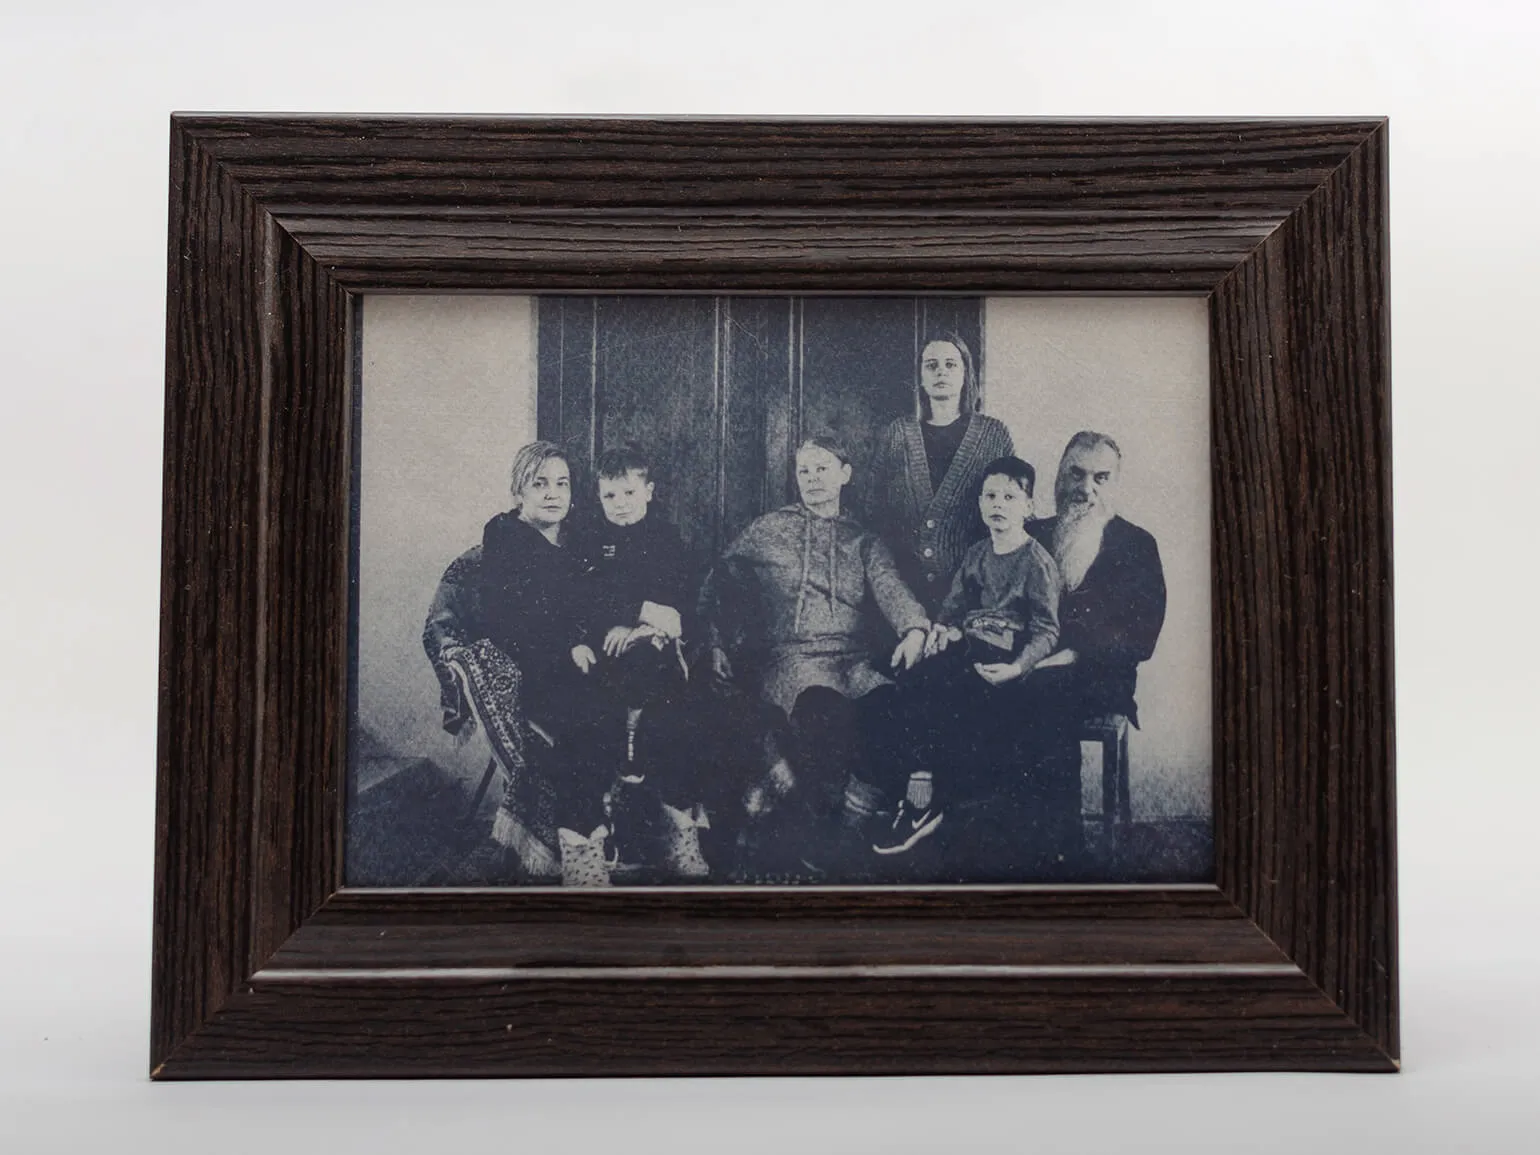
Congratulations on successfully printing your first cyanotype! This process is an important step in mastering the cyanotype technique, which allows you to create unique images with a distinctive blue tint. Now you have the opportunity to experiment with different objects and textures to create your own works of art. Continue to develop your skills in this exciting field and enjoy the creative process.
How else can you develop an image?
I named the last stage "Washing and Developing" for a reason — this process combines two actions into one. This makes cyanotype one of the simplest printing methods. The washing and developing process allows you to quickly obtain high-quality results, which attracts both beginners and experienced printers. Cyanotype, thanks to its accessibility and simplicity, is an excellent choice for creating unique images.
The process of applying solution A to the sheet can be divided into two key stages. First, we evenly apply solution A to the sheet surface and then dry it. It is important to consider the photosensitivity of ferric citrate, so drying the sheet should be done in a dark room to avoid unwanted reactions.
After exposing the image, we move on to the development process, which is carried out in a tray with solution B. This method allows you to adjust the color intensity and tone depending on the development time. For example, if the image was overexposed, but you want details in the shadow areas to remain visible, you can control the development process. By observing how the image develops tone, you can stop the development when you are satisfied with the result. Afterwards, it is important to thoroughly wash the image to seal the achieved effect.
This sequential printing process allows you to apply images not only to paper, but also to a variety of materials, such as glass and glossy tiles. In the next article, we will discuss this topic in detail, revealing the features of printing on various surfaces and the advantages of each method.
Toning
Toning cyanotypes is an optional step, and the blue looks great even without it. However, tinting is a simple and fun process. There is no universal technique for toning cyanotypes, which allows you to be creative and implement any ideas. Explore different methods and shades to create unique works of art. Toning can significantly enrich your work and add depth to an image, opening up new horizons for self-expression.
Most toner recipes use tannin sources, such as tea, coffee, and wine. These tannins transform bright blue photographs into black and white, as well as shades of gray, brown, or purple. Using pure tannins is also possible and effective for achieving a variety of color effects in photographs. Toning with tannins not only changes the color scheme but also gives images unique character and depth.
Changing the color to green requires significant effort, as it involves the use of additional reagents. To find out which reagents are needed, it is recommended to consult specialized groups on social media or search for information online. This will help you get up-to-date recommendations and advice from experienced professionals in this field.
In this section, I will explain how to perform simple toning. Toning is an effective way to change the color and visual characteristics of a material. Proper tinting can significantly improve the appearance and protect the surface from external influences. It is important to follow certain steps to achieve the best result. During the tinting process, it is necessary to consider the type of material you are going to treat, as well as select the appropriate tinting agents. This will help achieve the desired effect and extend the life of the product.
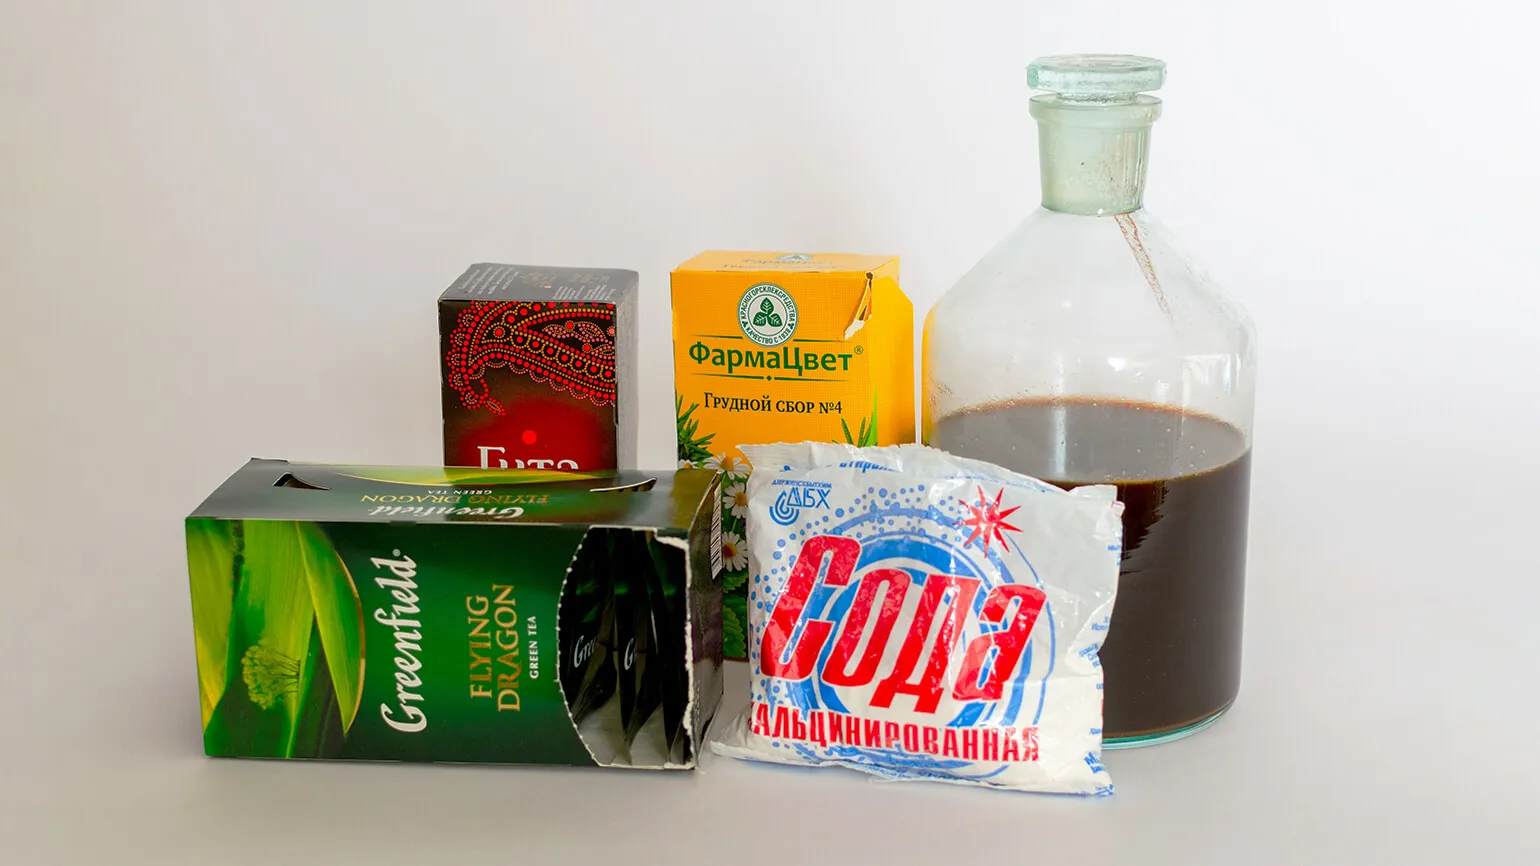
- Thermos - at least one piece.
- Cuvettes - at least three pieces.
- Washing soda (not baking soda).
- Black or green tea, or coffee (ground or instant), or breast collection No. 4.
The choice of tannin source significantly affects the color of wine. Tannin is a polyphenolic compound that contributes not only to the structure but also to the visual characteristics of the drink. Different sources of tannins, such as grape skins, seeds, and oak barrels, can impart different shades to wine. For example, oak tannins can impart warm golden and honeyed tones to a wine, while grape skin tannins can enhance red and purple hues.
Furthermore, the level of tannin extraction during the winemaking process also influences color. Higher extraction results in a richer and deeper color, which is especially important for red wines. Importantly, the interaction of tannins with other wine components, such as acids and sugars, also plays a key role in determining the final color. Proper selection of tannin sources and control over their extraction allow winemakers to create wines with the desired color characteristics, which is an important aspect in the production of high-quality beverages.
- Black tea produces a natural sepia and a slight purple hue.
- Green tea produces a deeper black color, but the hue becomes slightly red.
- In theory, coffee can achieve a natural black and white color without shades, but the coffee, like the toning mode, must be selected correctly.
- Breast collection produces a very interesting yellowish black and white hue, similar to the result of the collodion process.
The volume of the drink depends on the chosen type of tea or coffee. I use 5-6 bags (10-12 grams) of black or green tea. For coffee, I rely on my eye, since I have not yet found the ideal concentration for toning. If you decide to use a breast collection, it is recommended to take six bags. Pour boiling water over the chosen product in a thermos and let it steep for one hour.
While the tinting solution is steeping, you can prepare a tray with washing soda. To do this, you will need 1/3 teaspoon of soda per 0.5 liters of water. Washing soda does not dissolve well in cold water, so it is best to first dissolve it in a small container of warm water, and then bring the volume to one liter in the tray. This approach will ensure better dissolution of the soda and achieve optimal results.
If you decide to use a breast collection, then washing soda is not required. The breast collection already contains all the necessary ingredients to achieve the desired effect, so adding soda is unnecessary.
It is recommended to place the sheet in a tray of water 10 minutes before tinting the cyanotype to soften it. This will ensure a more even application of the tone and improve the quality of the final result.
The toner solution is carefully poured into the tray. Be careful to avoid burns.
After dipping the cyanotype into the tray with the washing soda solution for a few seconds, immediately place it in the toner.
In terms of duration, I follow the following approach: first, I identify the key points that need to be covered, then allocate time for each section. This allows me to effectively plan and manage time to cover all important aspects. This method helps avoid rushing and ensures that all topics are covered in detail. Optimizing time expenditure also contributes to a better perception of the information by the audience.
When toning for the first time, especially if the solution is very hot, it is important to exercise caution. High temperatures can cause discomfort or even damage your hair. It is recommended to test on a small area before beginning the procedure to ensure the temperature and color composition are suitable for your hair type. It is also worth considering that proper preparation and the use of high-quality products will help achieve the desired result without negative consequences. Careful adherence to the instructions and recommendations of professionals will make the process safer and more effective.
- tea or coffee - 5 minutes;
- breast collection - 10 minutes.
If you continue to use the solution, its temperature will decrease, which will lead to an increase in processing time. The second toning also requires attention to the temperature of the solution, as this directly affects the results. Ensure a stable temperature to achieve a uniform color and improve the quality of coverage. Maintain optimal working conditions with solutions to achieve the desired effect during toning.
- tea or coffee - 10 minutes;
- breast collection - 15 minutes.
The third toning takes me from 15 to 20 minutes or more.
Tonning with a cold solution can be performed for a longer period, which can lead to different results. This method allows you to achieve a deeper and more lasting effect, but the results may vary depending on the individual characteristics of the material and the conditions of use.
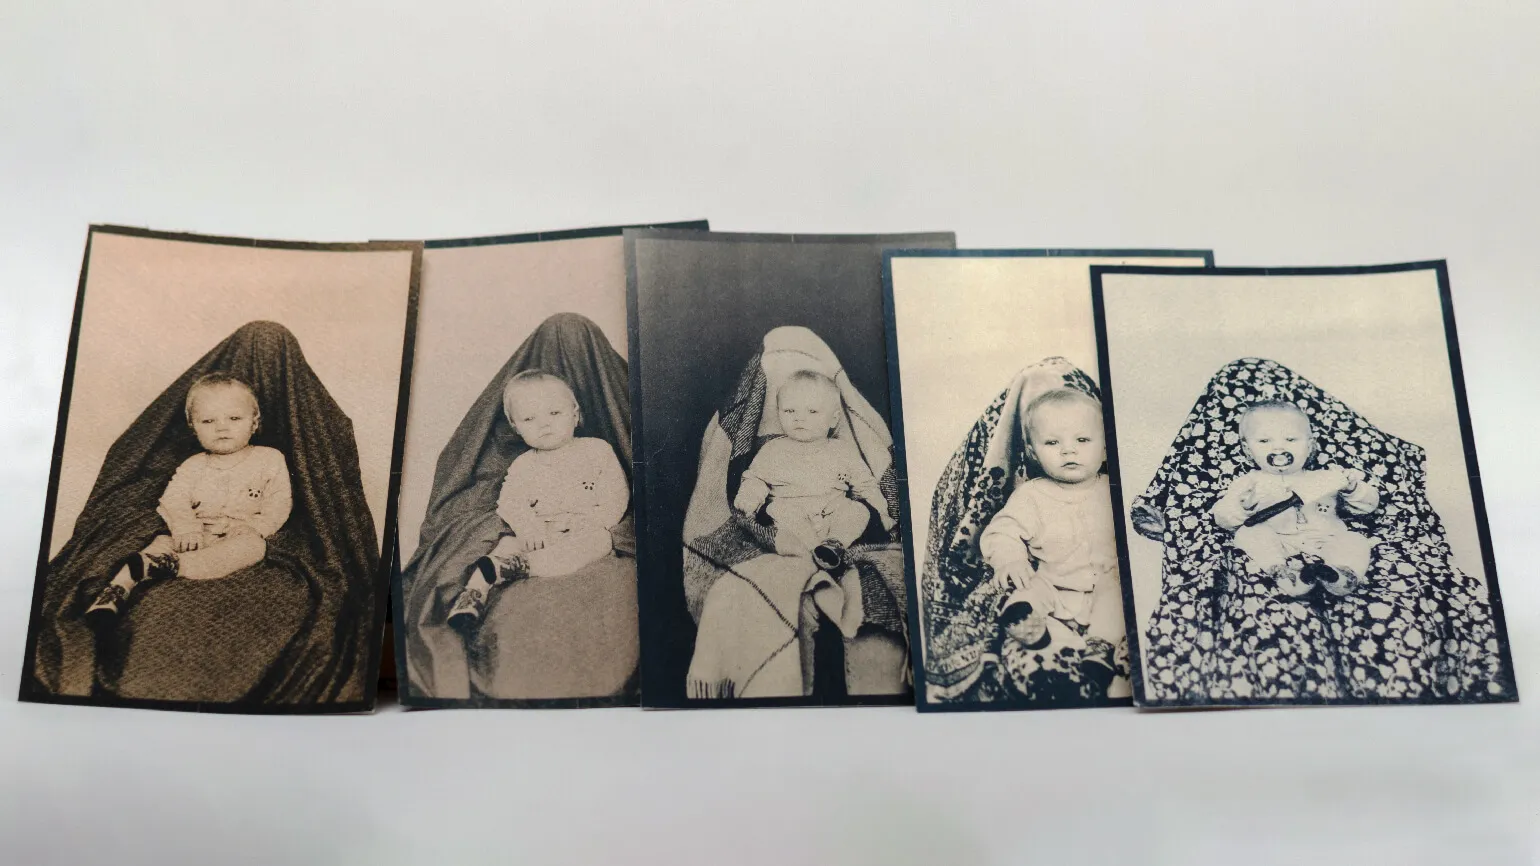
Image tinting can be done without adding washing soda. In this case, the resulting shade will differ from the original, which can also be interesting. For example, prolonged toning with black tea will create a rich and deep color in the image, reminiscent of a "peaty" effect. Alternatively, leaving the print in a baking soda solution for an extended period will create a golden-yellow hue. Don't be afraid to experiment with different methods and ingredients to achieve unique toning results. Drying the leaves should be done similarly to the process we used after washing them. Hang the leaves on clothespins in a well-ventilated area for about 24 hours. Over the next two days after drying, the image will gradually change, becoming more contrasting and saturated. This step is essential for achieving a high-quality result and preserving all color tones. Toning causes a slight coloring of the white areas, resulting in an overall increase in contrast. This factor must be taken into account when creating the negative and the printing process. Understanding these nuances will help you achieve the desired result and improve image quality.
Helpful Tips
In this case, the image appears dull compared to the digital original because a significant portion of the emulsion has been washed away. There's no way to correct this: the only options are to either discard the photo or wash the image. I'll explain how to do this later. To avoid similar problems in the future, you can increase the exposure time. This will help maintain the brightness and contrast of the image.
An image is overexposed if it appears too dark and details in the shadows are indistinguishable. This is caused by excess pigment that forms as a result of the emulsion's reaction when exposed to ultraviolet light. This problem can be corrected in the following ways:
First, use image editing software to increase brightness and contrast. Second, use tools to restore detail in the shadows. You can also use the exposure compensation function to balance the lighting.
Remember that when editing, it is important to maintain the natural appearance of the image to avoid artifacts and preserve textures. Use layers and masks for more precise processing, which will preserve the original details of the image. Proper correction of overexposed images will help improve their quality and make them more appealing to view.
- Try washing the image for a longer period of time. Some types of paper are more difficult to wash. You can also soak it in citric acid for a longer time - it also lightens the image.
- You can also dissolve baking soda in a separate tray (in cold water) and dip the print in it. I use 30 to 100 grams per 1 liter of water. The higher the water temperature and the higher the concentration of soda in it, the faster and more intensely the image lightens. The downside of using soda: you lose control over the process and risk over-lightening the image. If done correctly, the photo will take on a purple tint and lose sharpness, but will be noticeably lighter. The key here is not to overexpose it, otherwise you will wash off the print.
- You can apply the baking soda solution to dark areas with an artist's brush and lighten the desired area with wiping motions.
Sometimes a print may be unsuccessful, but the material itself can still be useful. For example, if you printed on a T-shirt or a shopper, you can use these items to create unique and original items. Don't throw away unsuccessful works – they can be reworked with a new design or embellished with other elements. This way, you'll not only reduce waste but also create something new and interesting.
Dissolve baking soda in a tray. For a more effective result, you can use 200 g of baking soda and add warm or hot water if the material is heat-resistant, such as fabric. Place the stamp in the resulting solution and leave until the emulsion is completely dissolved. This method will effectively clean the stamp and restore its original appearance.
Laundry soap and washing powder can be excellent alternatives to the soda solution. Prussian blue effectively neutralizes any alkaline substances, and the choice of a specific agent depends on the material you are working with. For example, surfactants in the powder can negatively affect the texture of paper, while they are ideal for fabric. Choosing the right detergent will help preserve the quality of the materials and ensure effective stain removal.
Experiment with the proportions of water and substances in the solutions. For example, mixing two parts Solution A and one part Solution B will produce a contrasty, vibrant azure image, but details may become less distinct. Meanwhile, mixing one part Solution A with two parts Solution B will reduce the image contrast, but produce an interesting gray-blue tint, with sharper details. This approach allows us to reveal a variety of visual effects and improve print quality.
When washing images for the first time in tap water, it is recommended to add citric acid. This is especially useful for users who deal with alkaline and hard water, as citric acid effectively neutralizes alkaline components. To prepare the solution, use 1/2 teaspoon of citric acid per 1 liter of water. This approach not only improves the quality of the wash, but also contributes to the durability of the images.
You can use a 5% vinegar solution, which, according to studies, washes out less pigment compared to hard tap water. However, in my opinion, the effectiveness of vinegar depends on the material. If the surface is rough and absorbent, the pigment on such a material will be more stable.
What problems may arise
Cyanotype is an accessible and reliable process that does not cause significant problems. The main attention should be paid to the choice of the surface for applying the emulsion. In this text, we will consider the most common difficulties that cyanotype artists may encounter.
The surface of the printing material may be too smooth or have poor adhesion, which sometimes leads to problems during printing. For example, I encountered similar difficulties using Brauberg paper. In such cases, I quickly washed the image, and the results were quite interesting. I recommend trying a different washing method, using acids, which can improve print quality and achieve more dramatic effects.
Circles in photographs are caused by uneven distribution of emulsion droplets, which often occurs when applying droplets over the entire surface of the sheet. Unfortunately, this problem cannot be corrected. However, on the positive side, the circles may disappear on their own during drying or by contrasting in a bath of hydrogen peroxide. If a dark spot still remains in the photograph after these steps, it cannot be removed. In this case, it is recommended to take another picture - the result may be successful in the next attempt.
There are two main reasons that can lead to failure.
- Most of the UV radiation falls on the darker area. On your next attempt, position the lamps at equal distances from each other and from the image.
- You haven't sufficiently distributed the emulsion across the surface of the material.
If you've been regularly printing with the same paper, solutions, concentrations, and exposure times but are still experiencing problems, the problem likely lies in the condition of your solutions. You may have left the solutions exposed to light, which could have damaged them. You may also have used a dirty syringe or metal equipment, which could have negatively impacted the results. Pay attention to these aspects to avoid mistakes in the future.
A life hack is a useful tip or trick that can simplify everyday tasks and increase efficiency. Life hacks help optimize time and resources, making life more convenient. In today's world, where information and technology are rapidly developing, life hacks are becoming especially relevant. They can relate to various areas: from organizing a workspace to cooking. Using life hacks not only makes routine tasks easier but also opens up new opportunities for creative problem-solving. By incorporating life hacks into your life, you can significantly increase your productivity and improve the quality of your daily tasks.
To check the quality of the solution, use a flashlight and point it at the side of the container. If the solution appears cloudy when held up to the light, it is recommended to replace it. This will help ensure the effectiveness and safety of the solution.
Profession Photographer
You will learn how to take professional photos from scratch. You will learn how to organize shoots, process frames, manage models and a team. Find your style, build an impressive portfolio, and start making money doing what you love.
Find out more